
Treasure chest? Jewelry box? What could it be? There’s something so exciting about starting a new project. Sometimes you start out with one thing in mind, which slowly transforms into a beautiful butterfly. Originally. I intended to paint geometric designs all over this box. A roll of rhinestone ribbon became my inspiration, which revealed my hidden need for a lot of bling. Who knew? Where will your inspiration take you?
How to Decorate a Wooden Box:
Plain Wooden Box with Heart Shaped Window

When selecting a box for your project, look it over carefully for damage. Check for splinters or dents, and test the functionality of the latch and hinges. I often find smudges of glue on the glass/acrylic. If necessary, compare several boxes side by side at the store.
Wooden Box with Open Lid

This box, available through AC Moore, is wood inside and out.
Painted Lid

I liked the look of the natural wood and kept most of it as-is, with the exception of the flat top, which was brushed with white acrylic paint to create a high contrast background.
Project Supplies:

You will need a bag of loose rhinestones and fabric paints in turquoise, black and brown.
Additional Project Supplies:

You will also need a bag of turquoise flat glass marbles, a roll of 1/2” turquoise rhinestone ribbon, Elmer’s glue and a glue gun. The rhinestone ribbon and marbles are available at dollar stores.
Outline the Heart with Rhinestones

Apply a large dot of fabric paint at the edge of the heart. Use tweezers to push a rhinestone down into the wet paint. Alternate the fabric paint colors to create your pattern. Repeat the process until the outline is complete. Just as reminder: the rhinestones are clear. It’s the paint that determines the color.
Apply Rhinestone Ribbon

Rhinestone ribbon is glued in horizontal bands across the top of the box. Use Elmer’s glue because it will allow you to reposition as needed. Use scissors to cut the ribbon to fit. At the end, fill in any blank spaces by cutting rhinestones from the ribbon and hand placing them with tweezers and Elmer’s glue.
Completed Beading on Lid

As you work around the center heart, you may need to pry off individual beads to make the ribbon fit. They say hindsight is 20/20. If I had to do this over, I would probably apply the ribbon first and then outline the heart.
Apply Flat Glass Marbles

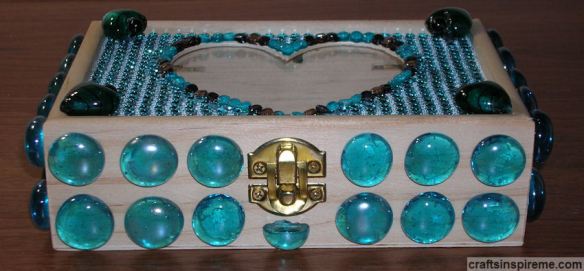
A glue gun will make this step quick and easy. Apply marbles on all sides. Ensure the marble placement will not interfere with the opening and closing of the lid. I found are marble that had broken in half, and placed it under the latch to complete the pattern, which you can see in the next photo.
The Completed Bejeweled Box

Large turquoise hearts are glued in each of the four lid corners. These hearts are actually jewelry pendants. A black onyx bead has been glued to each heart to cover the hole on top.
I’m considering lining the inside of the box with felt or velvet. It all depends upon how it will be used, and frankly I haven’t decided yet. What would you do? Please make suggestions in the comments section. I look forward to hearing your ideas.
Thanks for Reading & Happy Crafting!

Wow! Wow! Wow! I love it! Love boxes and turquoise, looks so beautiful.
Like a treasure and very femenine. Thank you for share, my friend.
Have a lovely day, full of blessings!
LikeLiked by 1 person
Thanks so much! I am glad you like it! Thanks for all your support, my friend! Wishing you all the best!
LikeLiked by 1 person
You are welcome. Always a plesure follow your blog. Love crafts, you are so creative.
Best wishes too! Thank’s.
LikeLiked by 1 person
I love the way you embellished this box! It looks so beautiful!
LikeLiked by 1 person
Thank you so much! I really appreciate the compliments and I am glad you like it. Have a great week!
LikeLiked by 1 person