Dyed eggs are a staple of any Easter celebration. All you need is an egg dyeing kit and some vinegar, which makes it easily accessible for all ages. Decorating doesn’t have to be limited to dye and farm fresh eggs. Options include paints, fabrics, markers, ribbons, and appliques, while the eggs can be wooden, foam, or plastic, just to name a few. Let’s look at a variety of decorated eggs to get your creative juices flowing.
Painted Broken Eggs
Crackle Finish Egg
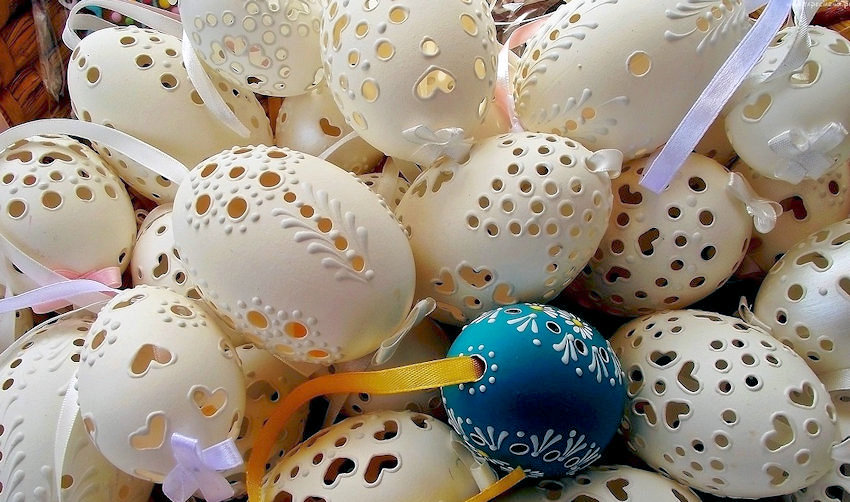
Pierced Eggs with 3D Painted Accents
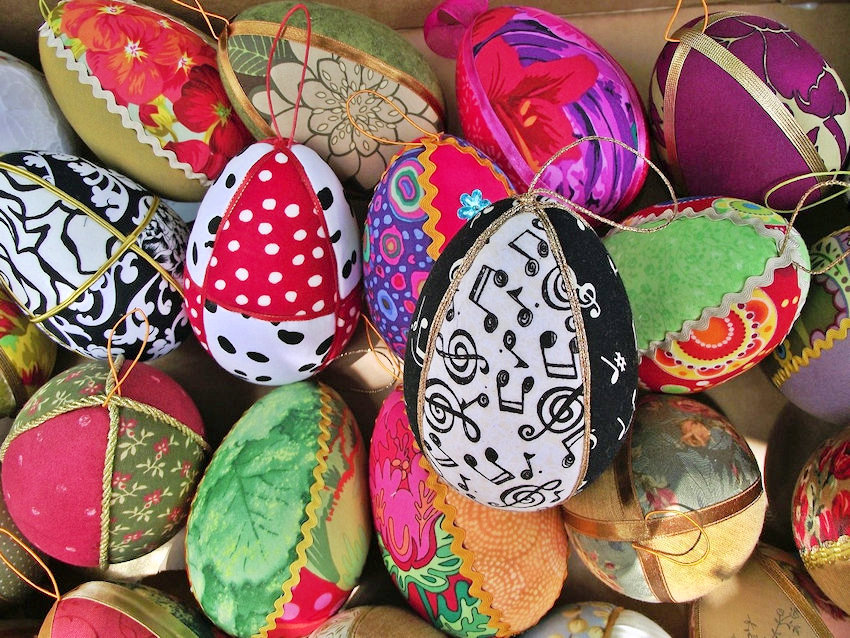
Fabric Wrapped Eggs with Decorative Trims
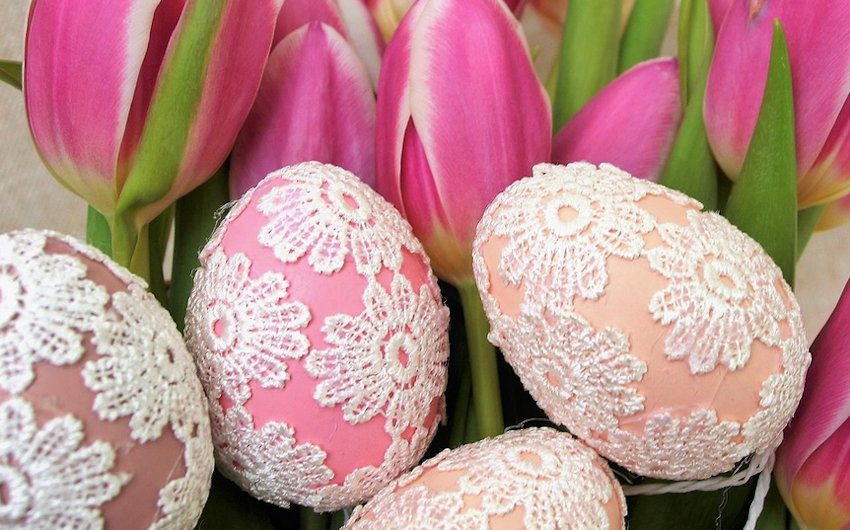
Dyed & Lace Appliqued Eggs
Scrapbooking Eggs
Quilled Egg
Decoupage Egg
Multicolor Marker Egg
Illustrated Egg
Silk Flower Applique Egg
Dyed & Beaded Eggs
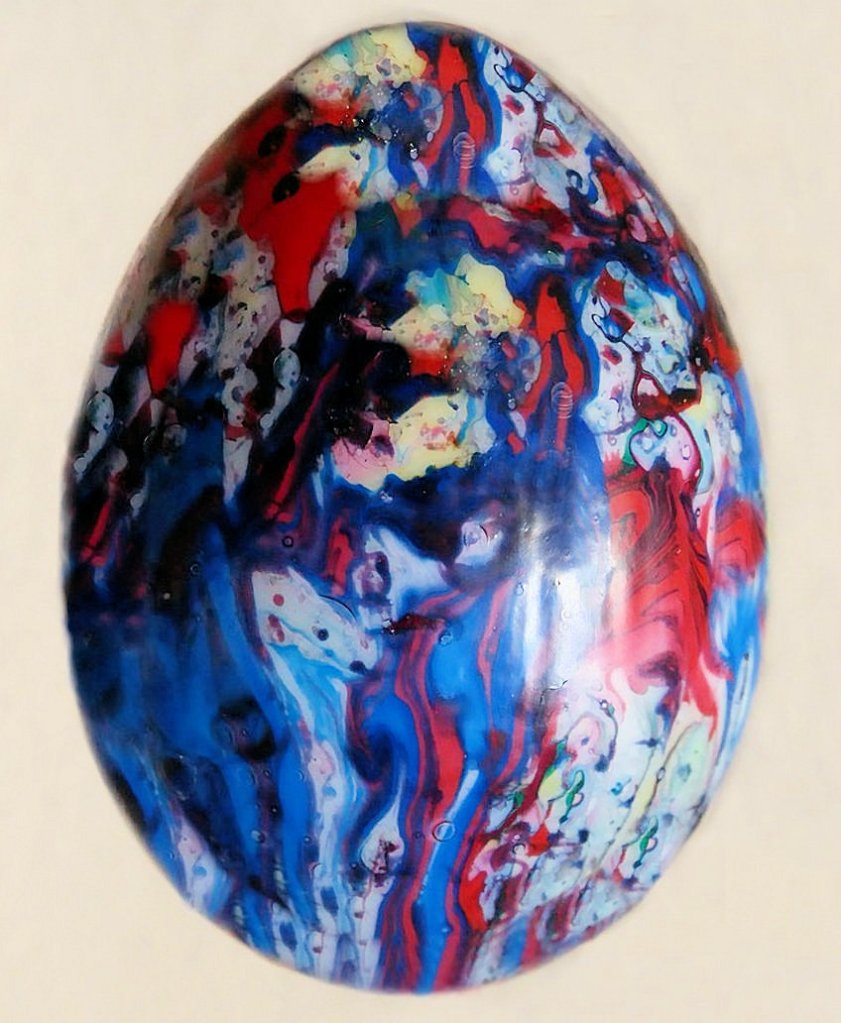
Paint Pour Egg
Sponge Painted Egg
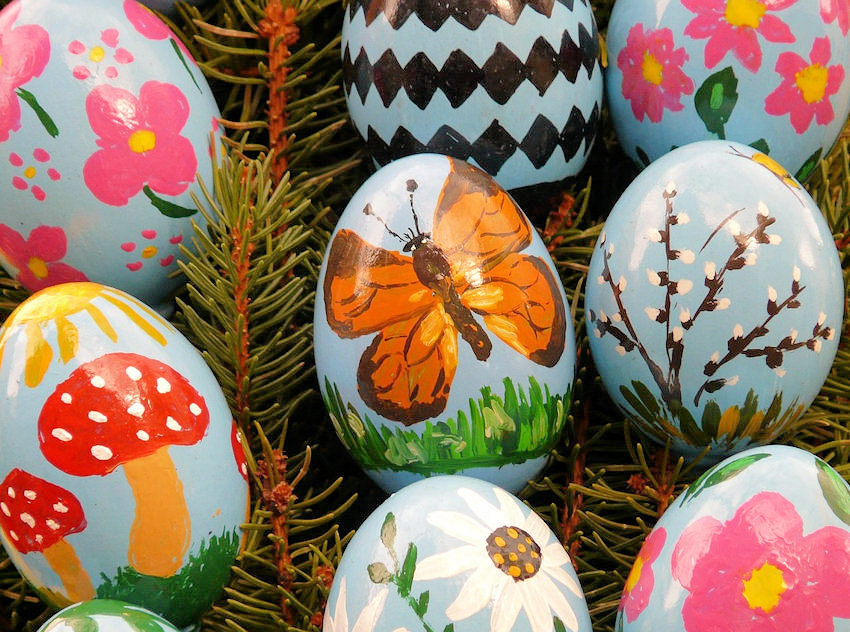
Hand Painting Eggs
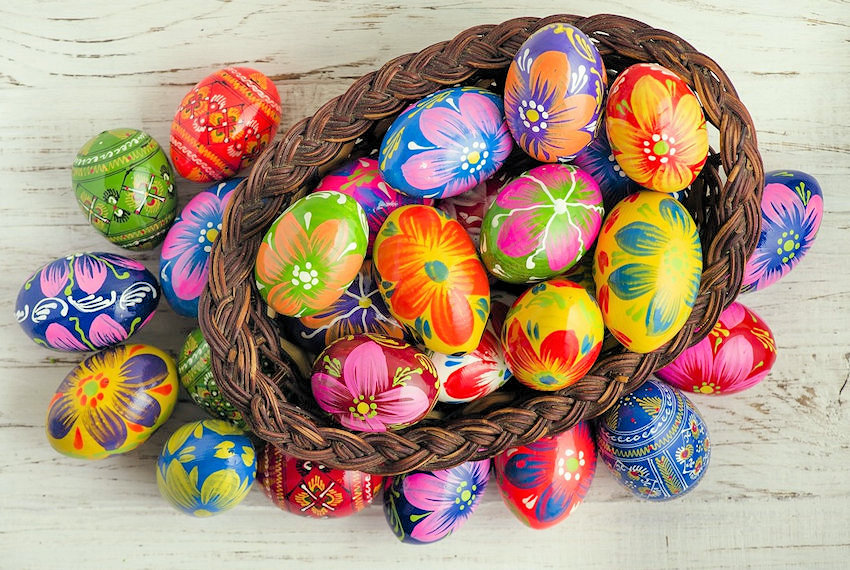
Hand Painted Eggs
Hand Painted Eggs
3D Hand Painting Eggs
Hand Painted 3D Metallic Eggs
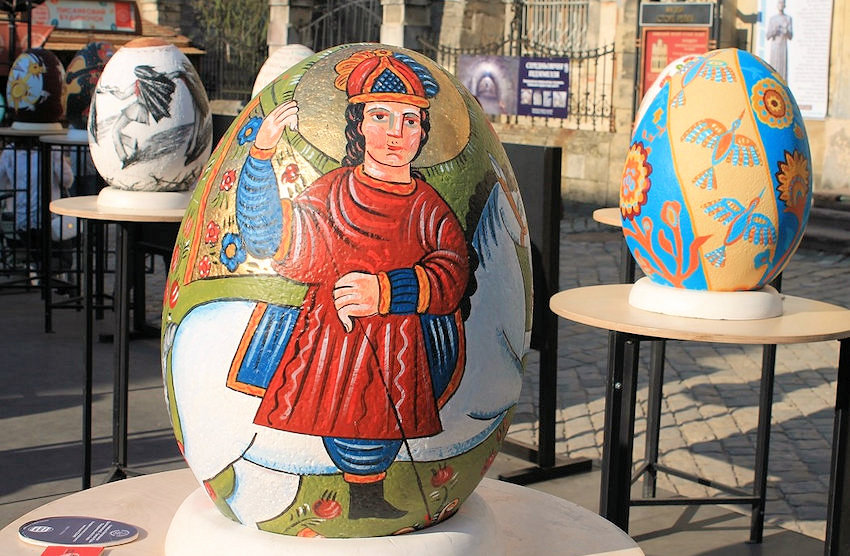
Romanian 3D Metallic Eggs
Ukrainian Egg
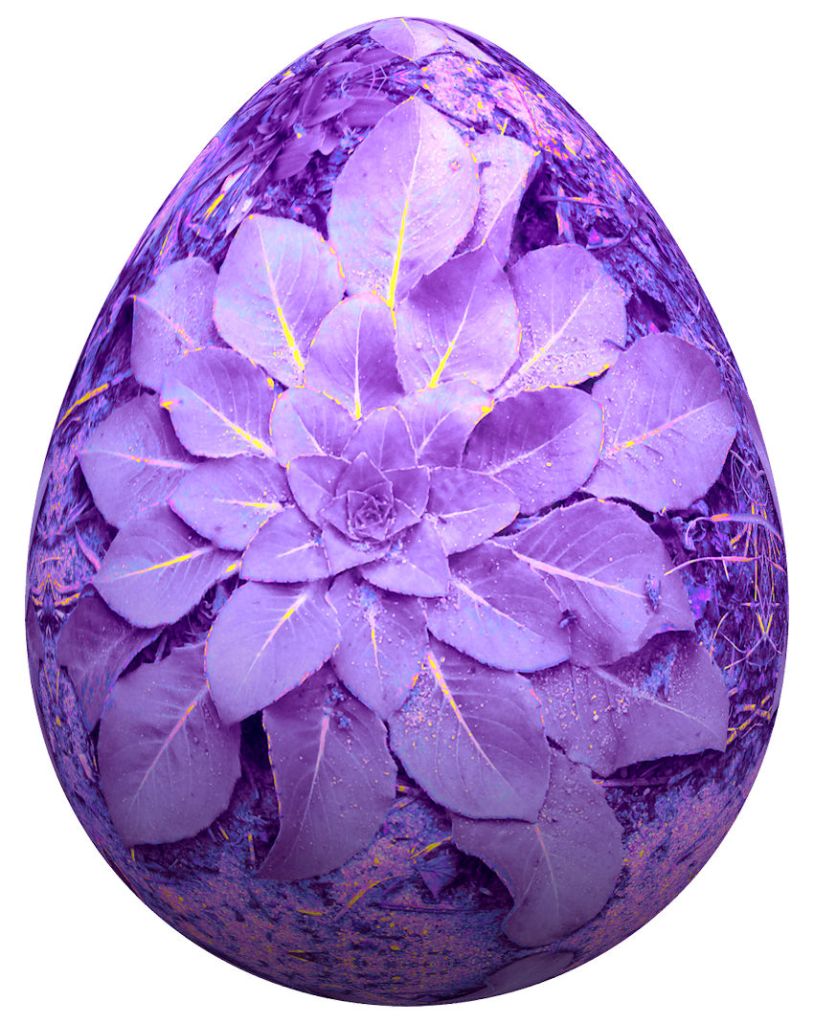
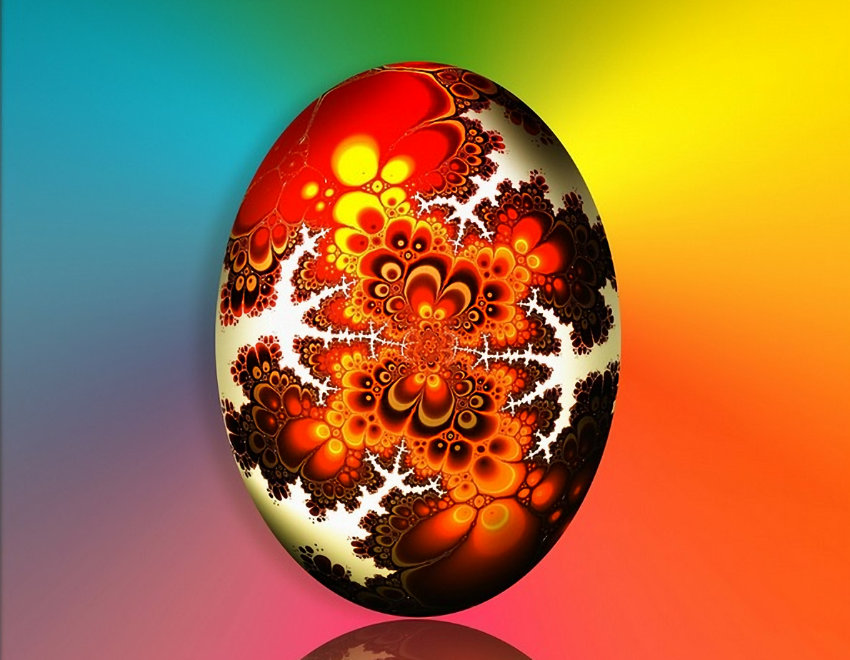
Fine Art Eggs
Fine Art Eggs
Hand Painted Abstract Art Egg
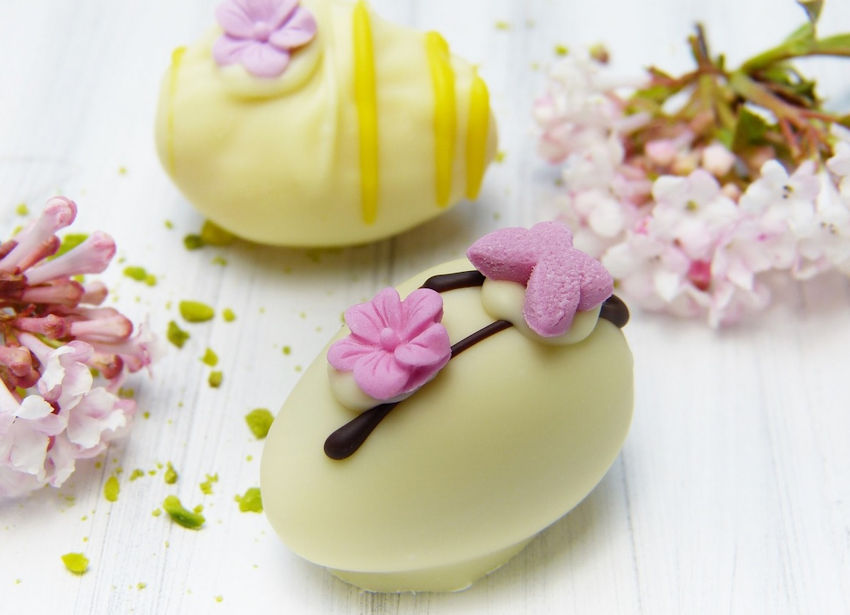
Chocolate Eggs
If you have an egg allergy or if painting is not in your skill set, chocolate eggs can be decorated using the same design principles shown throughout these photos.
I hope you have found some inspiration and will try your hand at decorating eggs. Do you have a favorite? Please let me know in the comments section.
Collages can be created by two different methods: 1) “Old School” Traditional -Assemble and glue groups of photos onto a backer board, or 2) High Tech – Use photo editing software. Both methods are fun and produce impressive results. Let’s look at several possibilities…
“Old School” Collages:
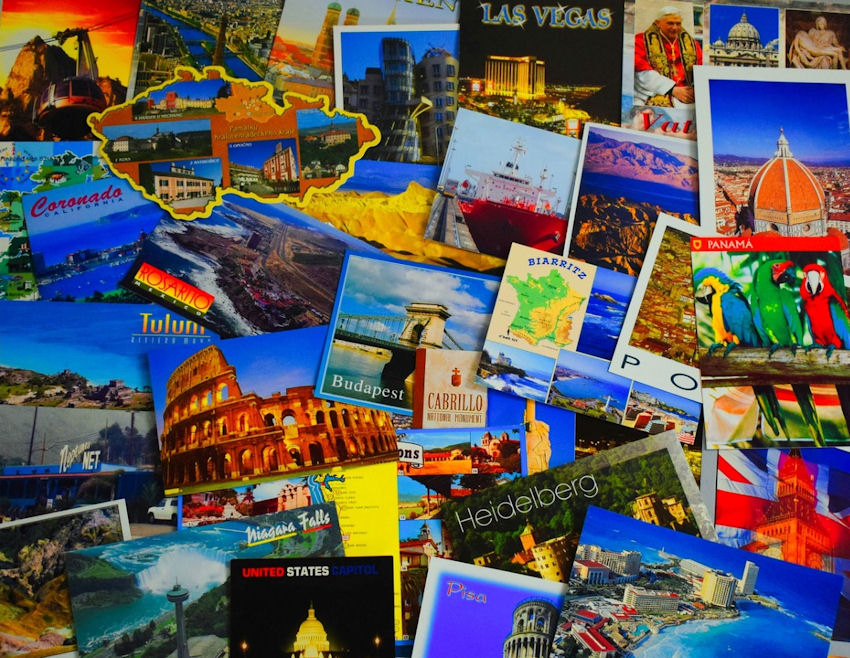
Postcard Collage
Many people collect postcards during their travels. Instead of stuffing them in a drawer, create a collage, frame it, and hand it up so you can reminisce about past vacations and dream of future destinations.
Vision Board
What are your dreams? A vision board helps focus mental and physical energy toward achieving your goals. Magazines, catalogs, travel guides and brochures provide great source material for collages.
For more information about traditional collage making, please click here.
Digital Collages:
Horizontal Grid (a.k.a. Photo Montage)
A horizontal collage is a great way of displaying your favorite photos, such as family members, fur babies, or anything else that warms your heart.
Horizontal Grid
Whatever you love – fireworks, lighthouses, beaches – can be assembled into a frameable work of art.
Layered Images
Compose a one-of-a-kind masterpiece by overlaying multiple images.
Symmetrical Grid
Displaying your collectibles, such as antique door hardware, requires a lot of space, but a photo montage makes it easy to enjoy your collection on a daily basis.
Asymmetrical Grid
The placement and sizes of photos can be easily modified to create a visually pleasing composition.
Custom Grid
With photo editing software, you can experiment with colors, layers, and special effects. Bring your imagination to life right before your eyes.
Hybrid Collages:
Bold Design
Much like the traditional collage making process, images from different photos can be digitally “cut and pasted” onto new backgrounds.
Action Adventure
Spice up your family vacation photos with a few thrills and chills.
Out of this World
To achieve this otherworldly image, photograph a model leaning upon a beach ball. Cut & paste it onto a star filled background. Replace the ball with a photo of the earth and add a planet or two. Enjoy!
Mandalas
Drawing, painting, or traditional collage making would take forever to create this complex mandala. Thanks to digital technology, you can create one quarter of this design and then mirror it vertically and horizontally to complete the circle. You could add three-dimensional sparkle by gluing beads to the completed composition.
Mixed Media Collages:
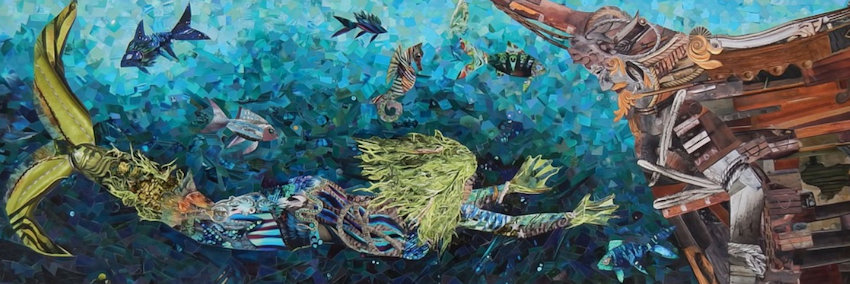
Siren of the Sea
This mermaid and sunken ship can be made using a combination of traditional and digital collage making. The background would be easier to create digitally. After printing out the full-size image, the mermaid and ship could be hand drawn. Based upon desired colors, textures and patterns, pieces cut from the pages of magazines can be glued in place, producing a three-dimensional effect.
Flower Power
Who wouldn’t love eternal spring? Make it a reality by starting with a photo of a beautiful flower garden. Enhance it by cutting and pasting layers of colorful flowers on top of the finished image.
Creature of the Night
A digital sepia tone background can be printed full size on canvas. The owl is drawn and detailed with a combination of markers and paint. Genuine feathers, layered and glued upon the wings, bring this owl off the canvas and into the viewer’s world.
Abstract Words
It is said you should choose your words carefully. Choose a poem or quotes, whatever appeals to you. Layered colors, words, and embossed textures harmonize, creating visual movement and a palpable sense of warmth and peace in this abstract masterpiece.
The Cat’s Meow
What do you think he sees? A bird? A butterfly? Maybe a mouse? Whatever it is, those reflective amber eyes capture our attention. The antiqued background, with embossed floral motifs and pen and ink style writing, ensures this quizzical feline remains center stage. Additional detailing of the cat’s body and punching up the contrast of the purple and green flowers around him will make it appear as if he is sitting in front of a wall.
I hope these collages have inspired you to playfully experiment with the infinite possibilities of photography and collages to create personalized art to be enjoyed for years to come. Please let me know your thoughts in the comments section. Good luck with all your future creative projects.
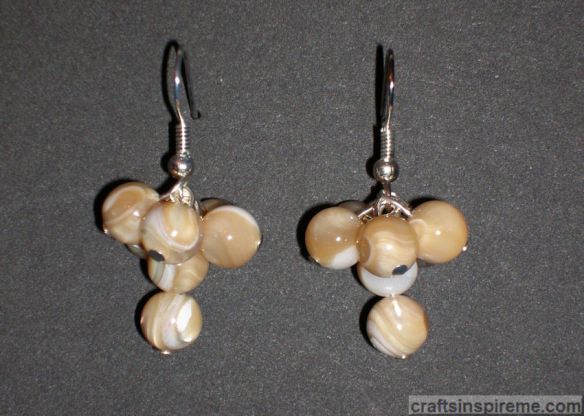
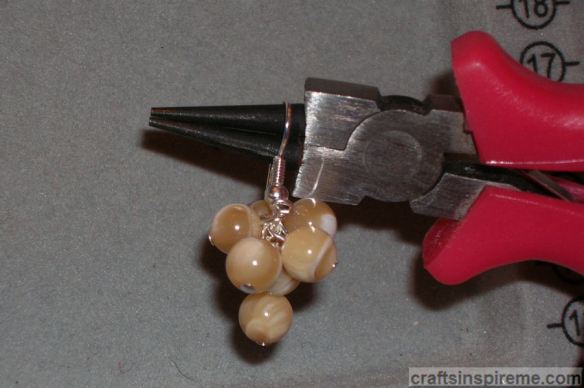
Mother of Pearl comes from mollusks, and is naturally a blend of tan, cream and white, with an iridescent finish. It can be bleached white, or dyed and color of the rainbow. Mother of Pearl beads come in an amazing range of shapes and sizes, while the thicker pieces are carved into cameos and pins, or cut into squares as mosaic tiles. Let’s turn a few round beads into a lovely pair of earrings.
How to Make Natural Mother of Pearl Cluster Earrings
These 1-1/2” long Natural Mother of Pearl earrings swing and shift with your movements, and they’re a neutral color, which coordinates with whatever you’re wearing. In this design, five beads orbit around a dangling two bead central core. These earrings are a little challenging in Step 6. At times you may feel like you have fumble fingers. If you are looking for an easy pair of earrings for beginners, please click here.
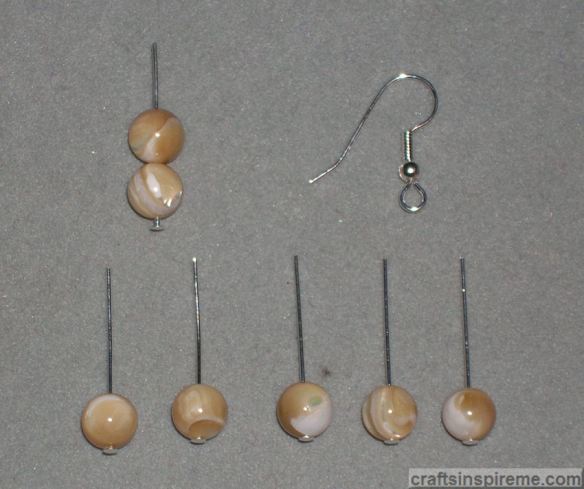
Required Beads & Findings:
Supplies:
To make this pair of earrings you will need:
12) Silver plated Head Pins – 1” length,
14) 7-7.5mm round Natural Mother of Pearl beads,
2) Silver plated Surgical Steel Fishhook Earwires with ball & coil
(Please note: Head pins are the foundation of these earrings. They are inexpensive and come in big packages. Be sure to have several on hand just in case. Craft stores carry jewelry making supplies, including beads, accents, and tools. If you get hooked on jewelry making and yearn for the ultimate selections, look no further than FireMountainGems.com)
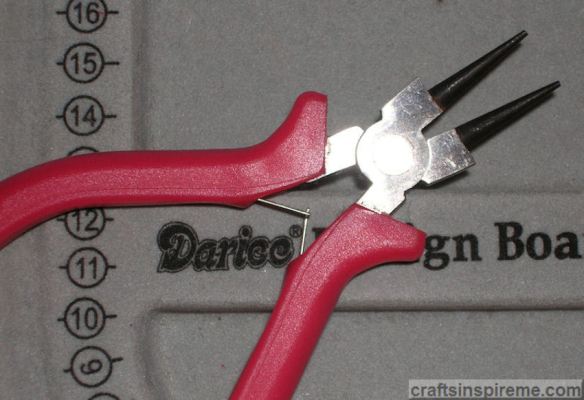
Required Jewelry Making Tools: Round Nose Pliers – the smooth, round tips on these pliers make it easy and safe to manipulate wire, pins, and small jewelry metal pieces known as findings. Please don’t use standard pliers, which have teeth that will damage delicate precious metals.
Jewelry Wire Cutters – a sharp pair of wire cutters makes jewelry making so much easier. Do not use them for other crafts, such as floral arranging, which can damage the blades.
Earring Making Instructions: Step 1: Slide the beads onto head pins as shown.
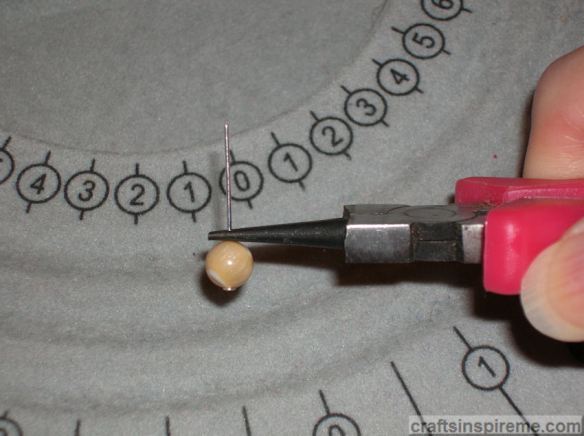
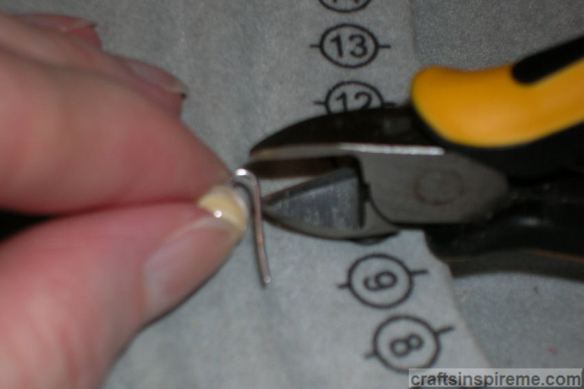
Step 2: With the round nose pliers in your right hand, grip the wire just above the Mother of Pearl bead. Hold the pliers in this position for the next step.
Step 3: Grasp the end of the head pin with your left thumb and index finger, and bend the wire toward you. Continue bending the pin over the tip of the pliers until it touches the Mother of Pearl bead.
The reshaped pins will look like the photo above.
Step 4: Cut off the excess wire. Leave enough wire to form a small loop above the bead. This may take a few tries. Don’t worry if you cut it too short. Simply use a new head pin and repeat the steps.
This photo shows the beads with trimmed pins.
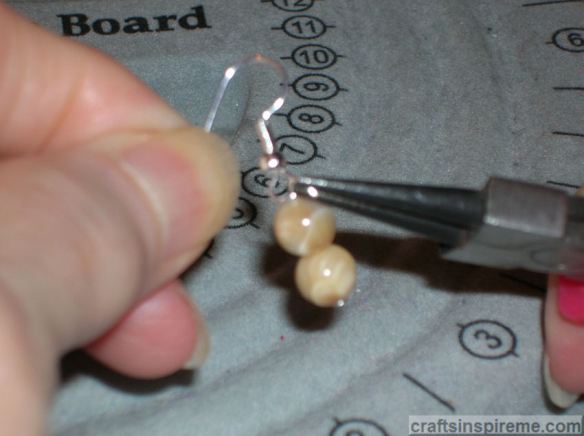
Step 5: Hook the double bead pin onto the loop on the bottom of the fishhook earwire, and close the loop using the round nose pliers.
The earring will look like the above photo.
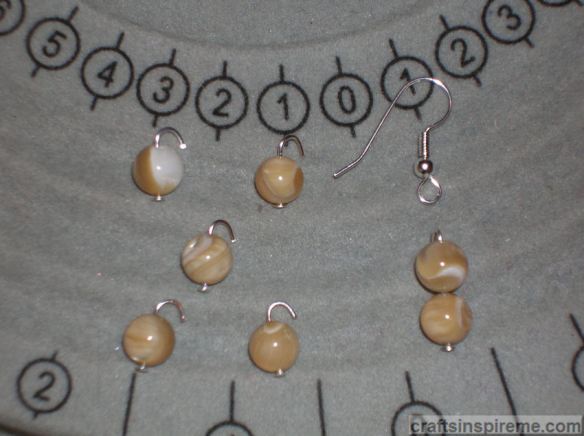
Step 6: Attach the first “satellite” bead to the earwire in the same way.
The earring now has a center core and one satellite bead. Repeat this step for the remaining four beads. If you have trouble getting the beads to lay correctly, remove the dangling two bead central core. Shift the five satellite beads with your fingers until they form a circle around the earwire, and then reattach the two bead central core.
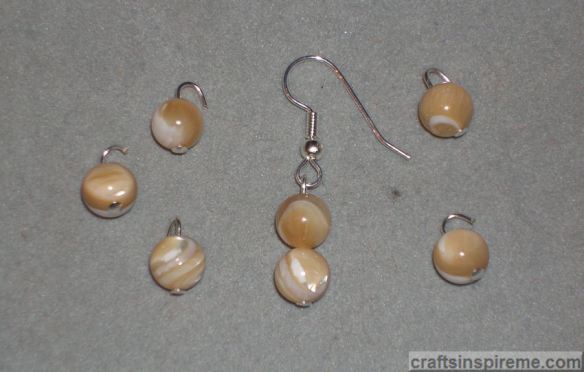
Congratulations! You have successfully made a pair of Mother of Pearl cluster earrings.
Here’s the same pair of earring made with Black Onyx beads. Note how the color dramatically changes the look. You could also experiment with different gemstones, glass or wood beads.
Jewelry making is a great way to explore your creativity. There are so many options available that it’s hard to choose. After making several items for yourself, keep in mind that people love receiving jewelry as gifts.
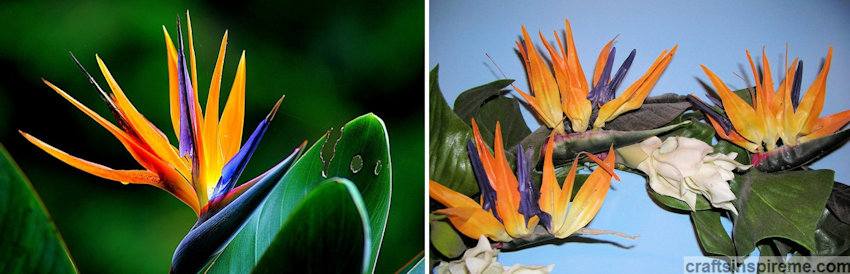
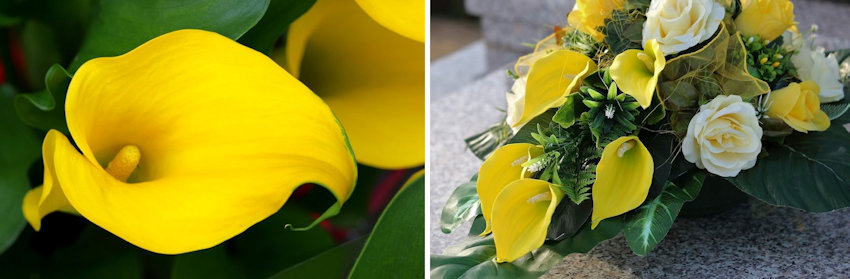
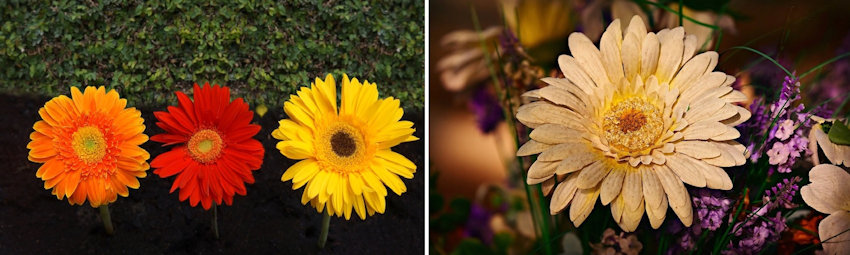
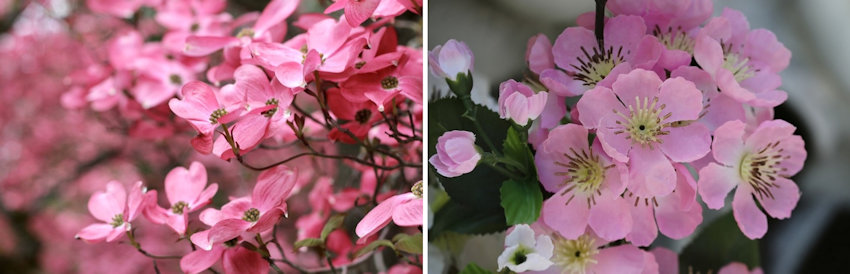
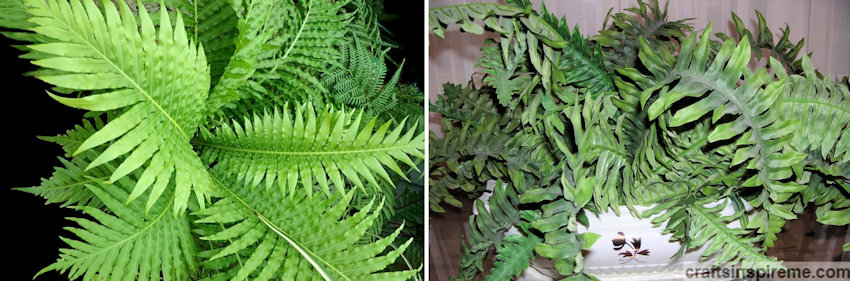
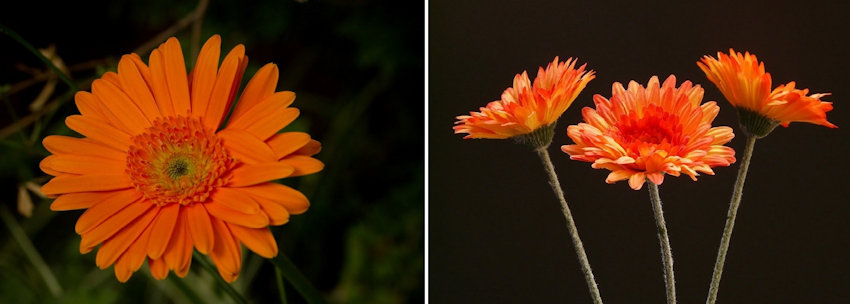
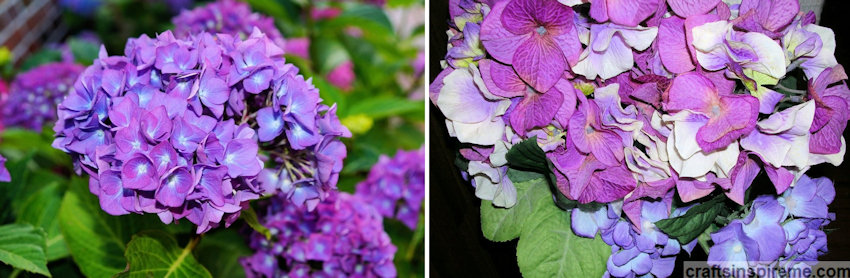
Today’s silk flowers easily fool the eye and are available in an infinite assortment. Prepare to be amazed with the side-by-side photos of silk and live flowers. Which are real and which are an illusion? Can you tell the difference? Let’s find out…
Birds of Paradise
Calla Lilies
Chrysanthemums
Daffodils
Dogwood Blooms
Ferns
Gerber Daisies
Hydrangeas
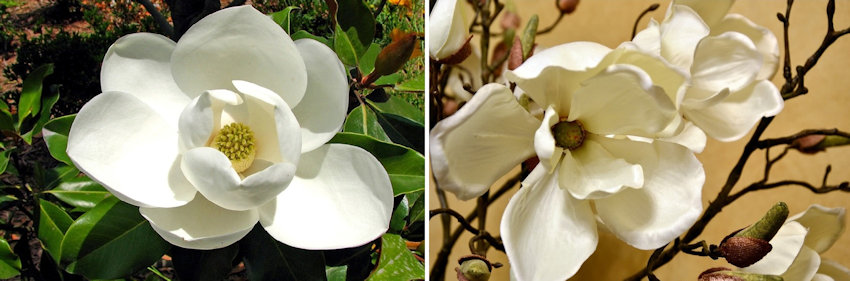
Magnolias
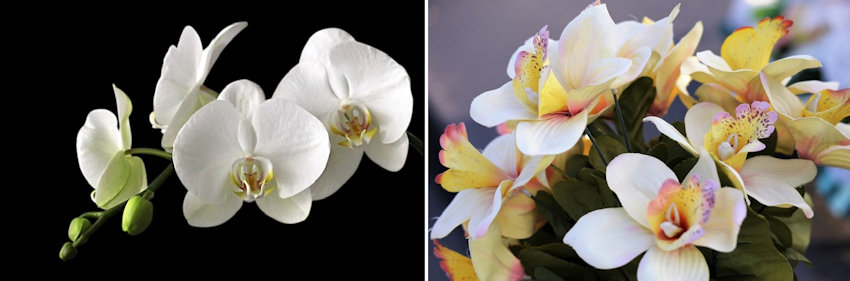
Orchids
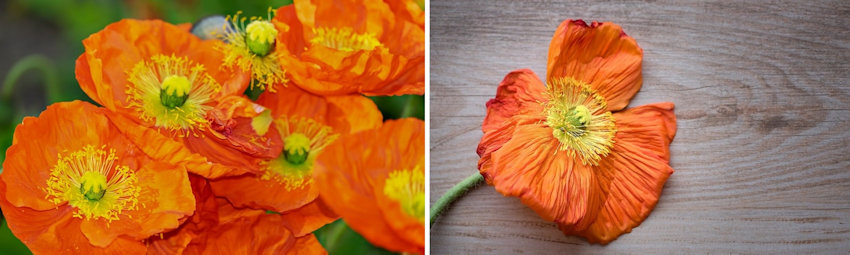
Poppies
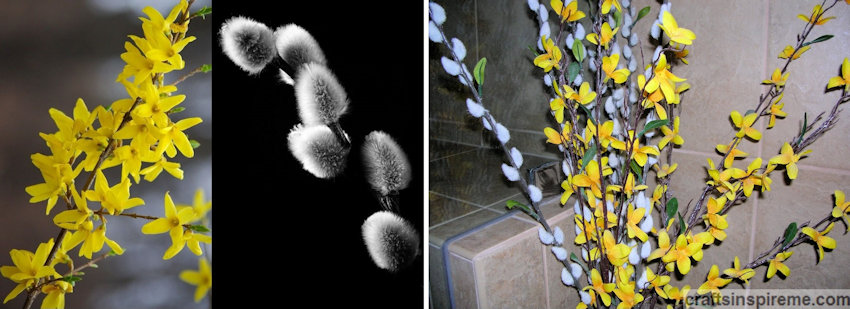
Pussy Willows & Forsythia
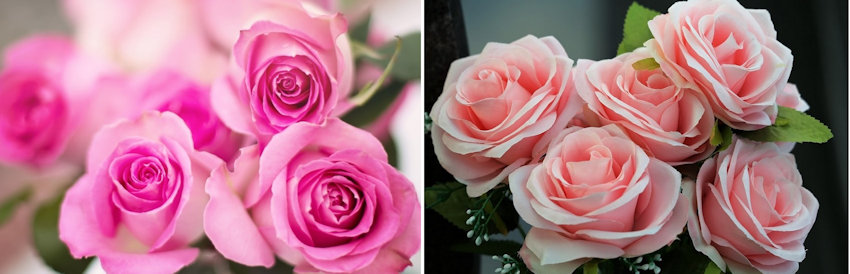
Roses
Roses – Two Tone
Stargazer Lilies
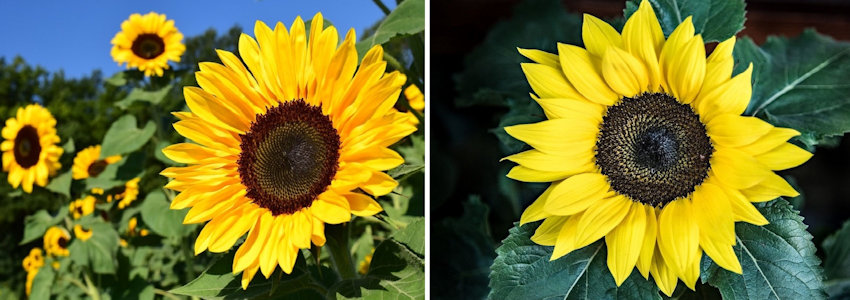
Sunflowers
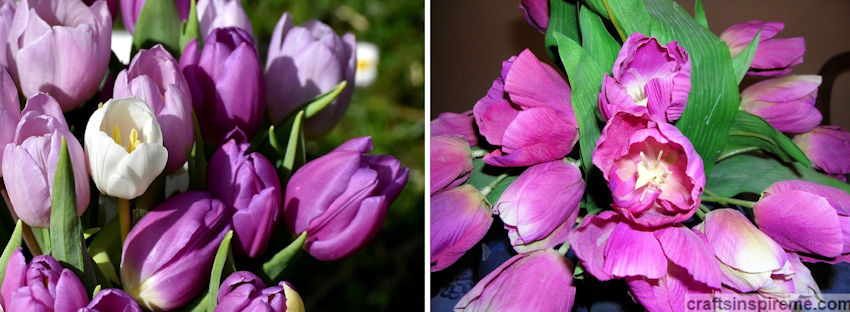
Tulips
With silk flowers, there’s no need for water, fertilizer, sunshine, or a green thumb. In the challenge of recognizing live flowers versus silk, how did you do? Please let me know your thoughts and favorites in the comments section.
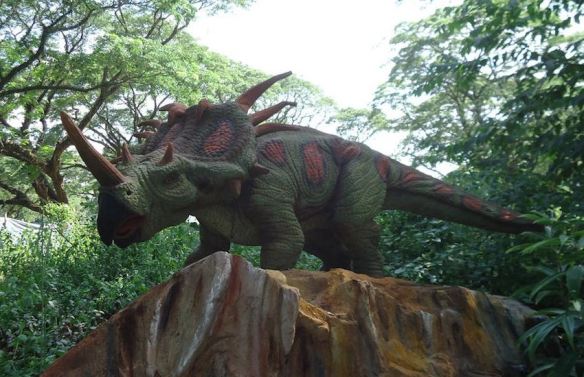
Whose turn is it to walk the dog – I mean dinosaur? Something tells me that 25-foot leash will not be long enough! Dinosaurs are real fan favorites. You can’t get much wilder than that. And what’s not to love?
A Dinosaur Nursery – They’re kind of cute at this stage.
Somewhere between adolescence and adulthood they seem to lose their charm! (lol)
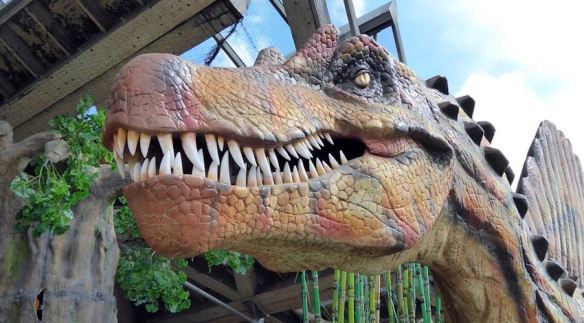
Even when they’re dead, they instill an odd mixture of fear and fascination. Movie Director Steven Spielberg brought dinosaurs back to life on the big screen in the epic movie, Jurassic Park – an emotional roller coaster, that started with awe and wonder, but quickly escalated to bone chilling terror.
We love dinosaurs anyway. Want proof? Look at all the books, movies, television shows, and merchandise. At some point, every kid draws and colors his or her favorite dinosaur. Here’s your chance to feel like a kid again. Grab some paints and brushes and let’s go!
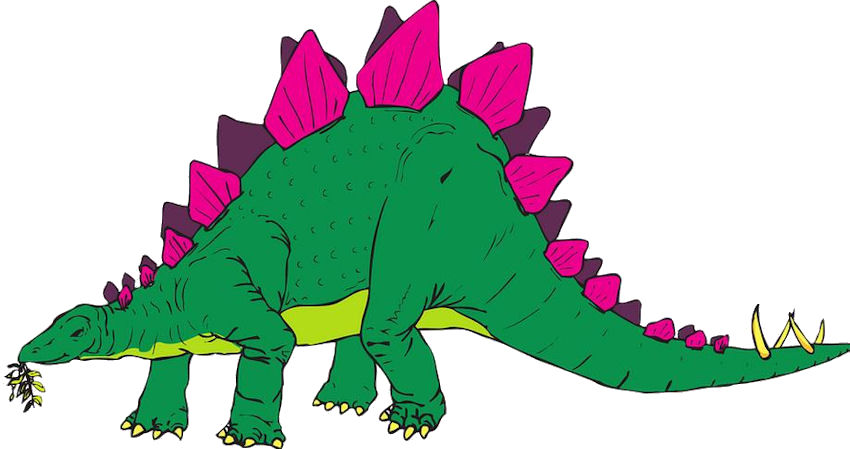
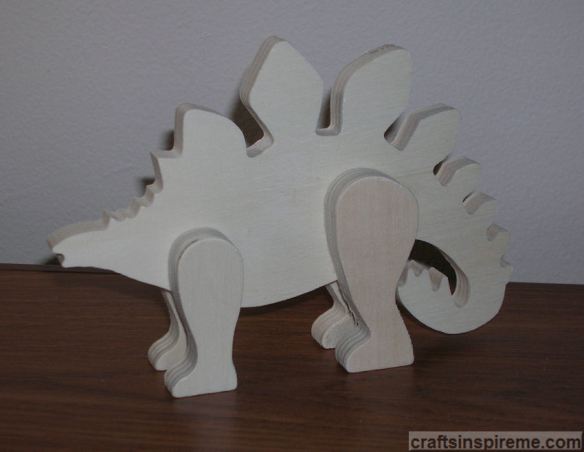
How to Paint a Wooden Stegosaurus
With a little paint you can design your own dinosaur. It can be as simple as a single coat of paint, or as detailed as you like. First we need a little inspiration.
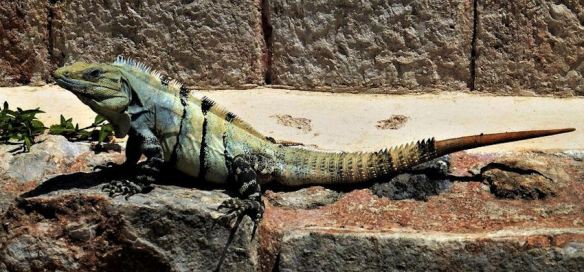
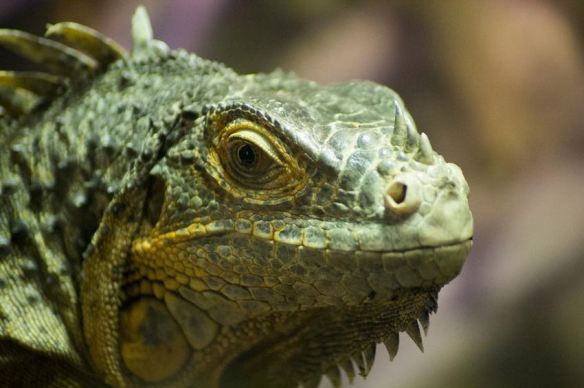
Since dinosaurs lived sixty-five million years ago, there’s no one around to tell us exactly what they looked like. For this project, photos of creatures living today, such as iguanas and lizards, can be inspirational. Check out those spines!
This carved wood stegosaurus, available at AC Moore, has sturdy legs, making it a freestanding, three-dimensional piece. Both sides and all the edges will need to be painted. Due to the raw nature of wood, it may require sanding, especially along the edges. (There are several types of animals in this carved wood collection. To see a painted flamingo project, please click here.)
Supplies:
Wooden Stegosaurus (4-1/4” high x 7-1/4” wide x 1-1/4” thick)
Acrylic Paints – black, brown & metallic green
1) Bottle fabric paint – brown
Paintbrushes
Sandpaper
Step 1 – Paint the dinosaur with green acrylic paint, including both sides and all edges. The great thing about paint is that it’s cheap. Feel free to experiment. If you don’t like the results, it can be easily changed.
Seeing it in color revealed a major anatomical mistake in the tail design. If you loved dinosaurs as a kid, you’ll remember that the stegosaurus has spikes on the top of its tail. The artist chose to curl the tail underneath, and as a result, mistakenly placed the spikes on the underside of the tail. This poor animal would have trouble walking because the spikes would continually get caught on the ground as it moved through the forest, making it easy prey.
Step 2 – To make it right, cut off the tip of the tail as shown.
Step 3 – Turn the cut tail piece around, and glue it in place. Paint the entire figure black as a base coat, which will help delineate the scales added in a later step. Looks much better doesn’t it?
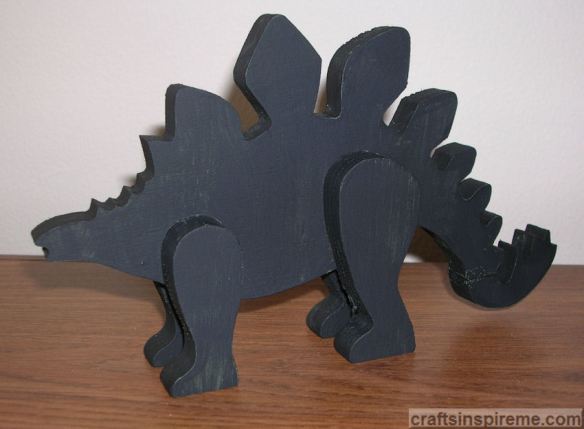
Step 4 – Paint the top of the head, the back plates, and the tail with brown fabric paint. Paint the sides of each plate with green fabric paint and add spikes along the sides of the tail. Brown acrylic paint was applied with a brush in between the back plates, because it was too narrow to fit the tube of fabric paint.
Step 5 – Add brown fabric paint on top of each leg and more spikes along the entire length of body. Create a scale pattern on the body using metallic green paint, and use the same color in the sides of the plates on his back.
Step 6 – Add a small dotted pattern to each leg. Paint the head brown, and add a few green scales along with the eyes. Congratulations! You now have your very own pet dinosaur. Fortunately for you, he’s a “Veggiesaurus,” unlike the one in the next photo.
What a view, right? Thank goodness this is only an observation tower! Because if it was real… It would be the last thing you ever saw.
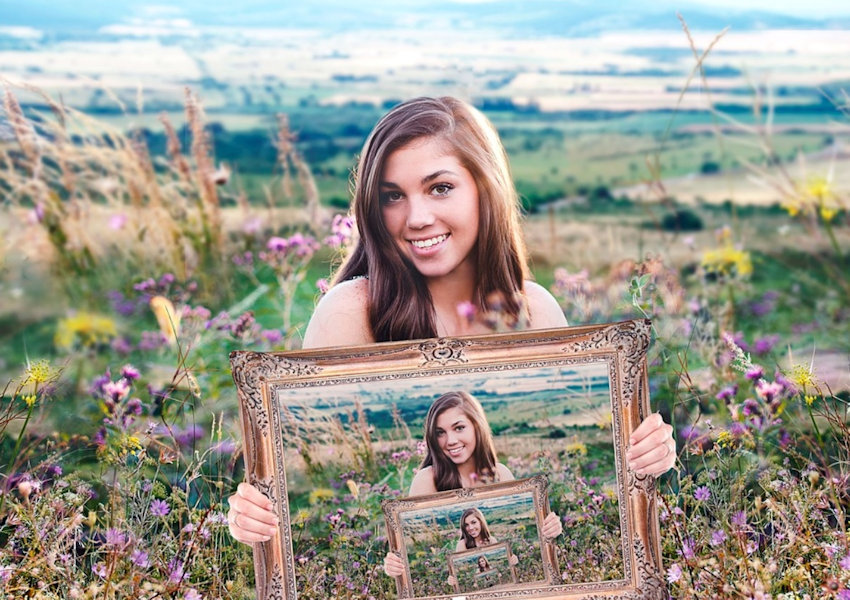
You finally found a photograph, painting, or drawing, which speaks to your soul, evoking special meaning in a style uniquely your own. Before rushing out to buy whatever frame you can find, you might be able to refresh a one you already own, or you could personalize a readymade frame.
Painted Frame
A room’s lighting & color scheme will have major effects upon your artwork. Be sure to view the item in the room you wish to hang it. The frame can be easily painted to match or contrast with existing décor.
Sponge Painted Frame
Sponge painting is easy and fun way to add color and texture. Paint the base color first with a brush and then apply two or three additional colors with sponges. Experiment with different colors and techniques on scrap paper first until you find the combination that works best.
Decoupage or Scrapbooking Frame
Decorative scrapbooking papers, wallpaper and contact paper offer infinite possibilities. Whether you decide to cover all or part of the frame, simply glue on your designs.
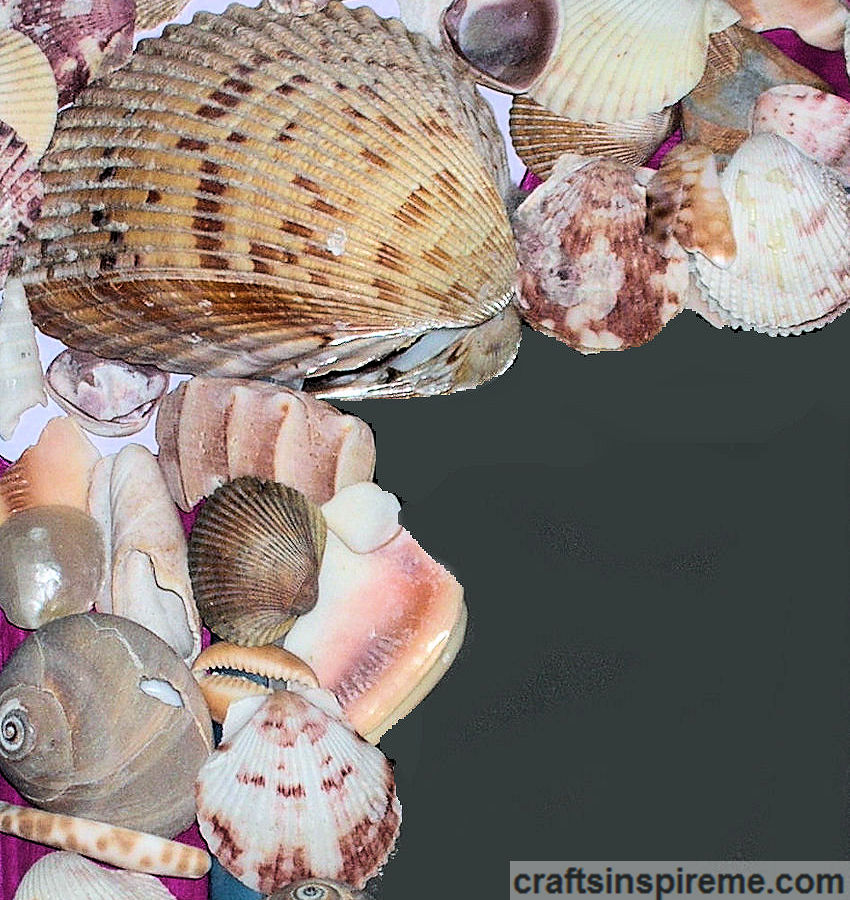
Seashell Frame
A plain picture frame gets a fashionable update with a seashell border. Beads, glass marbles, pom poms, flower petals, and anything else you imagine can be applied for a unique finished art piece.
Fabric Wrapped Frame
Textile designers continually push the limits of color, geometry, and texture, ensuring you will find fabrics you absolutely love.
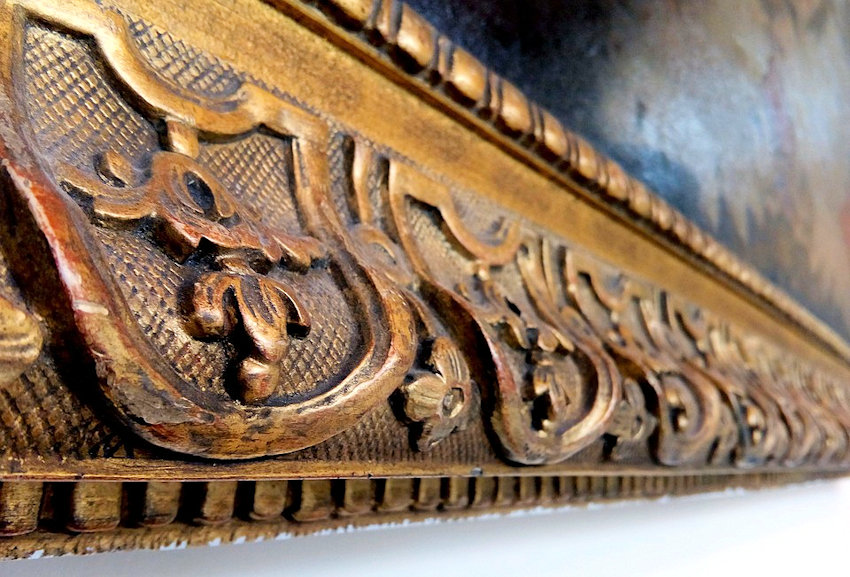
Gilded Carved Wood Frame
For a museum-quality finish, apply gold or silver paint on the surface details. The recesses will remain dark, while enhancing the three-dimensional carvings.
Background & Border Colors
Look for colors, patterns, and textures within the image, which can be coordinated with matboards, metallic trims, fabric wrapped edging for needlepoint, and decorative frames. The same applies to plaque mounted artwork.
Do’s & Don’ts:
Triple Matted & Framed -Options 1 & 2
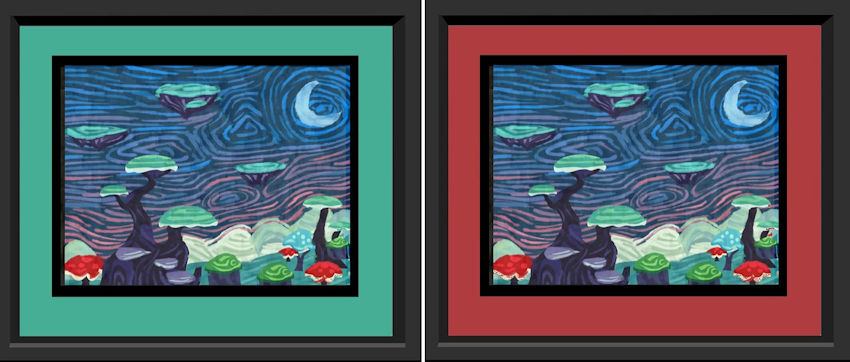
This neutral gray mat will work with any décor but choosing colors within the image, such as blue, creates a more dramatic piece of artwork.
Triple Matted & Framed -Options 3 & 4
Green is also a great border color to harmonize with the artwork. Although there is a small amount of red in the image, the red border pulls the viewer’s attention away from the image.
Carved Wood Frame
This field of wildflowers grows outward onto the floral, carved wood frame.
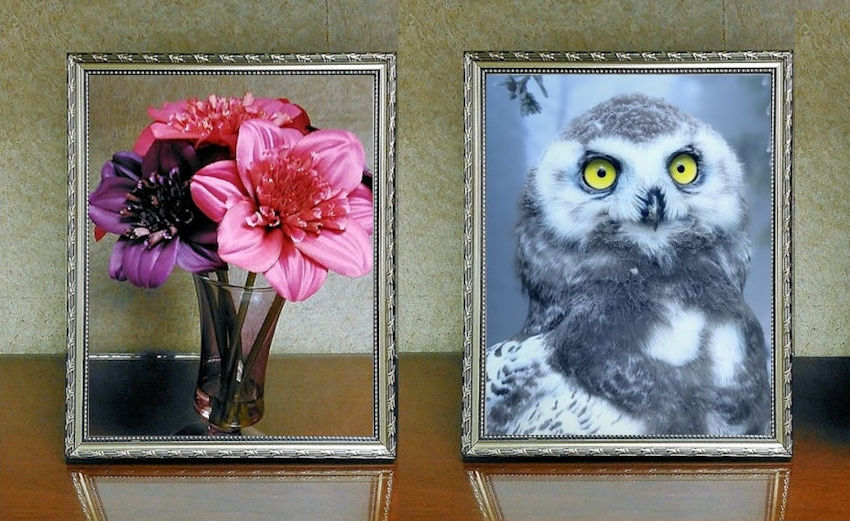
Metal Frame – Options 1 & 2
This frame is pretty, but the cool silver tone works in opposition to the warm pink flowers. The cool grays in the owl photo harmonize with the frame.
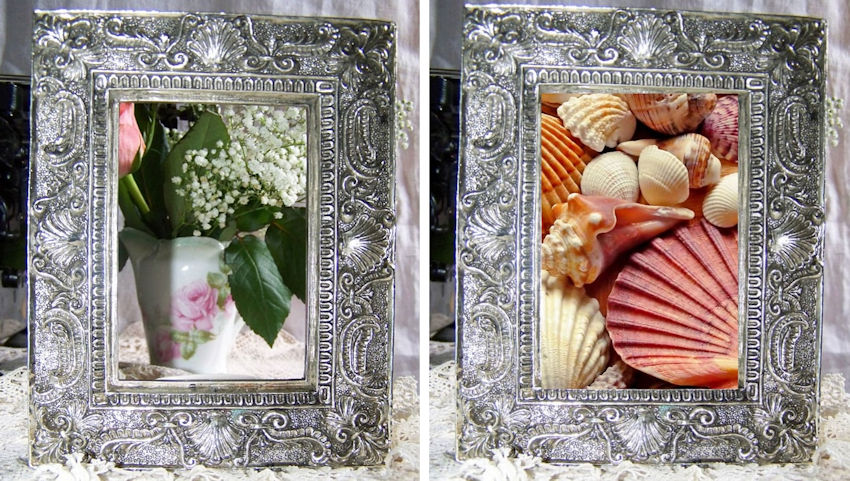
Ornate Metal Frame – Options 1 & 2
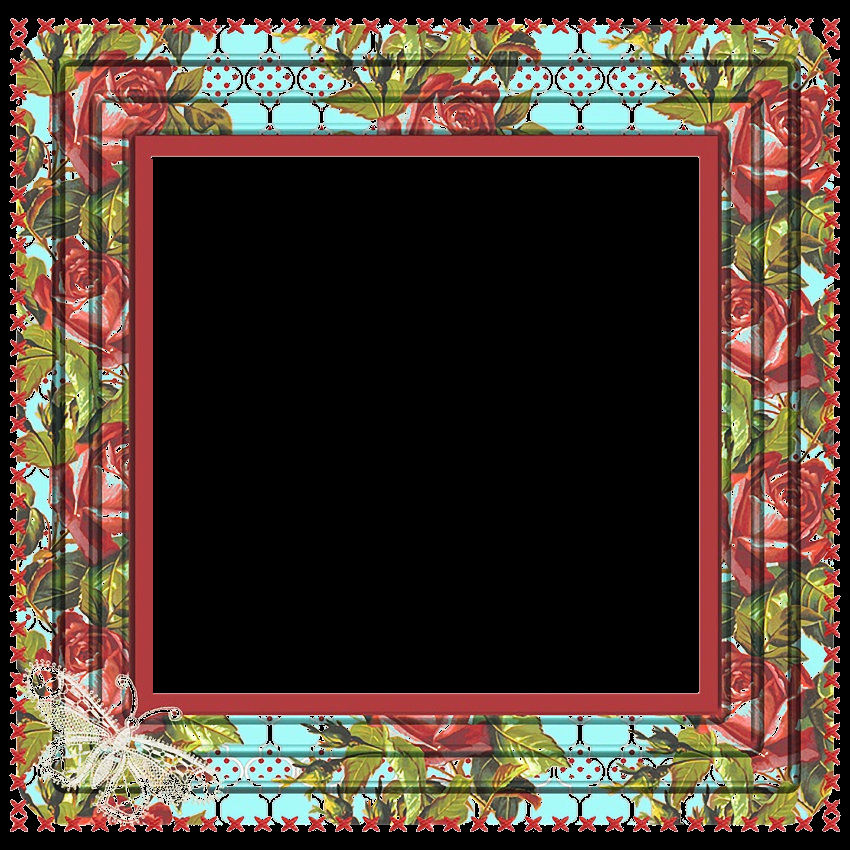
The bold silver frame overpowers the delicate baby’s breath flowers. The frame’s scroll designs resemble shells, while the strong geometry and saturated colors of the seashells hold your attention.
Floral Frame – Option 1
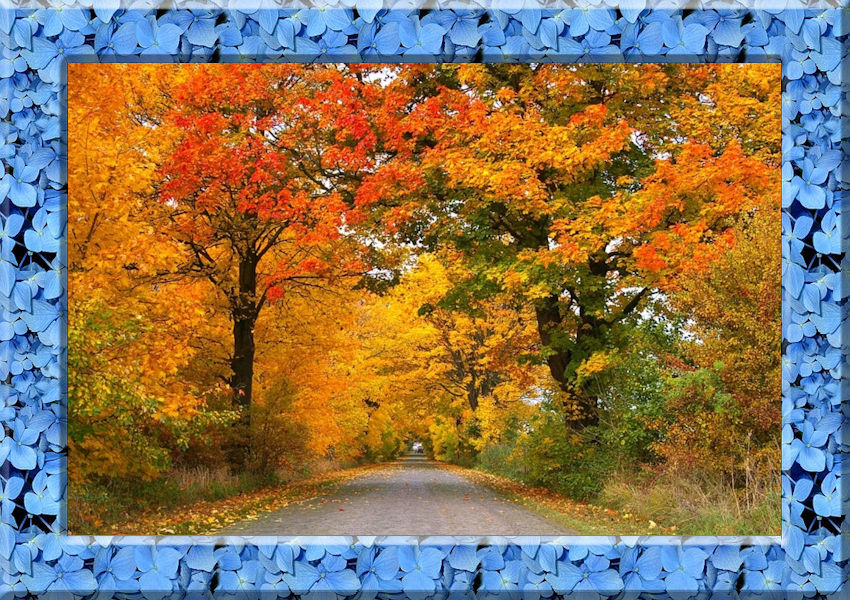
While orange provides the maximum contrast to blue, this floral frame is too “busy” for the multitude of leaves in the photo.
Floral Frame – Option 2
Here we see a perfect match between subject and frame. The bluebird and delicate crabapple blooms harmonize with the blue hydrangea frame.
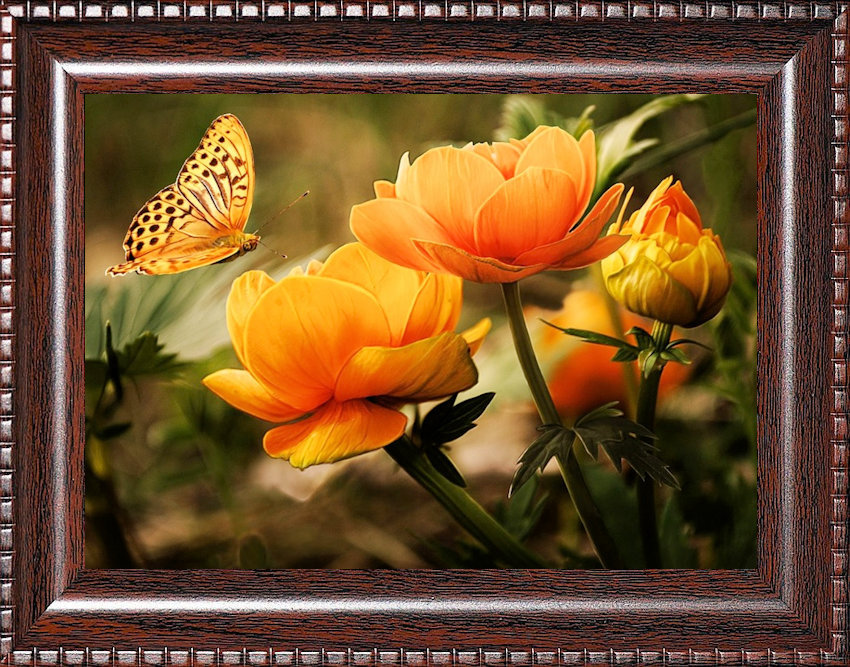
Wood Dentil Edge Frame – Option 1
The rigid geometry of the border and heavy appearance of the frame competes with the delicate butterflies and flowers in this springtime photo.
Wood Dentil Edge Frame – Option 2
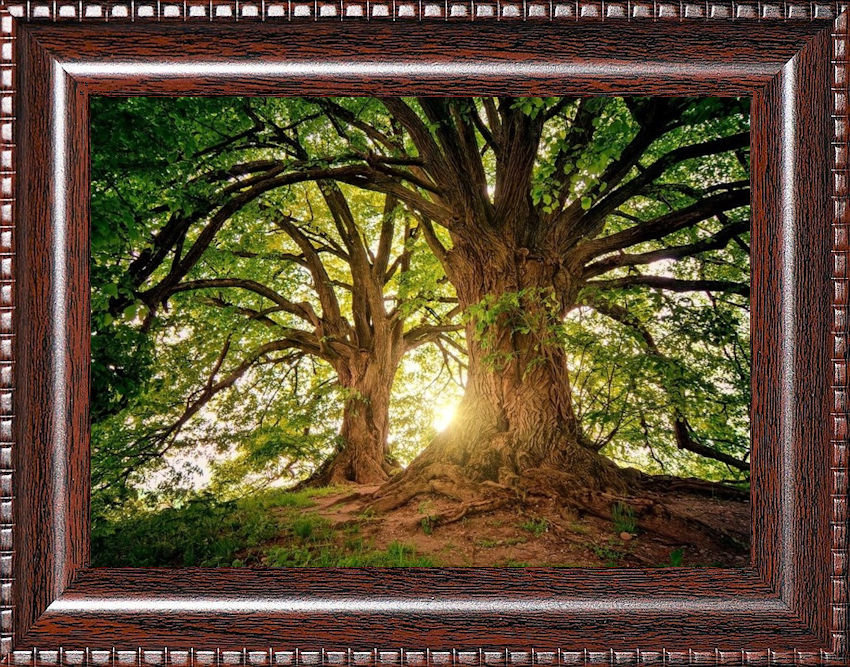
The rounded, faux wood grain frame borders resemble tree trunks in the forest.
Wood Dentil Edge Frame – Option 3
The warm wood tones coordinate beautifully with the soft orange and green in this nature scene.
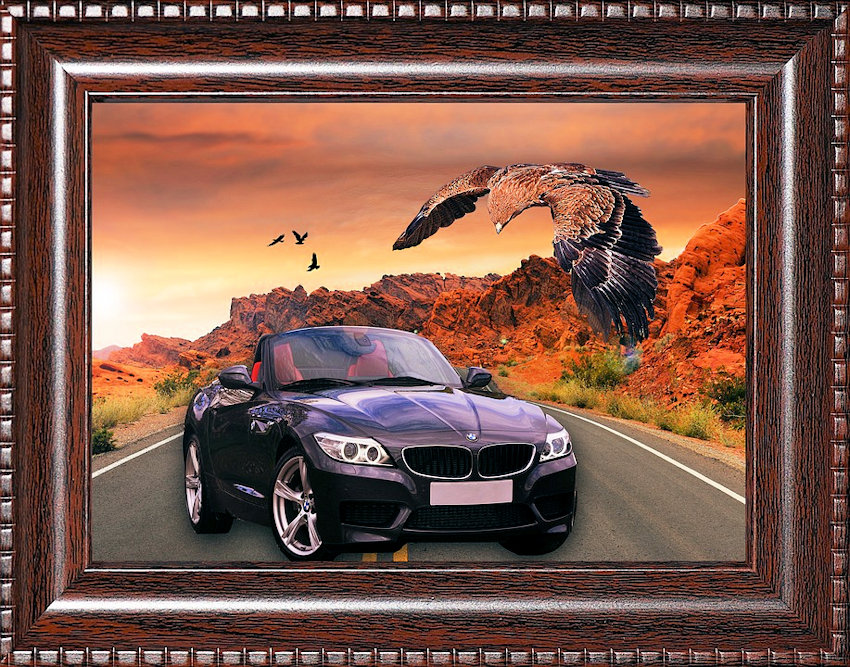
Wood Dentil Edge Frame – Option 4
There’s quite a bit of “masculine” energy in this photo, including the high-performance sports car, raptors in flight, and the rugged desert landscape, which are perfectly showcased in this tailored frame.
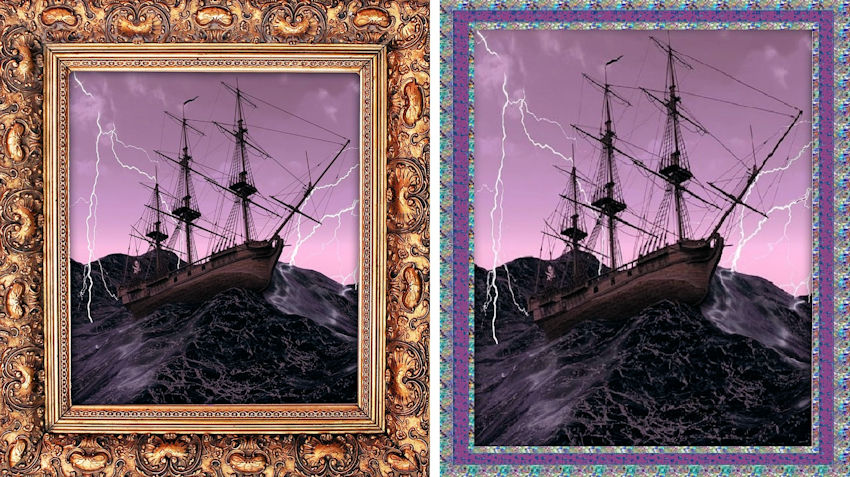
Gilded Carved Wood Frame vs. Color-Coordinated Frame
This ornate gilded wood frame freezes the motion of the ship upon the stormy sea, while the second frame extends the movement and accentuates the purple sky.
Gilded Carved Wood Frame – Options 1 & 2
The cheetah’s spots and the surrounding colors are echoed in the frame, as are the textures of the leaves and bricks in the second painting.
As you can see, choosing the right frame to showcase your artwork is easy to achieve. Let your artwork tell you what it wants by observing colors (warm or cool, pastel or bold, light or dark), patterns, textures, and themes. The most important thing your artwork should do is make you happy!
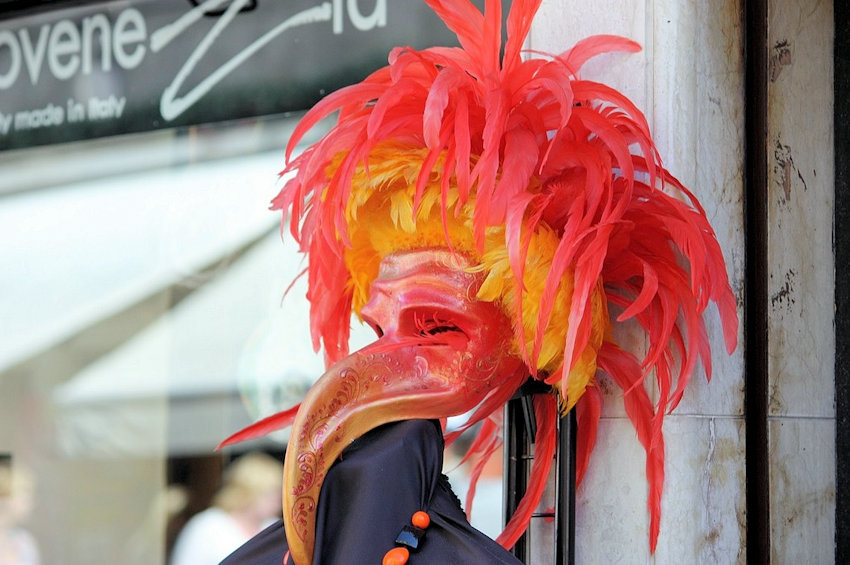
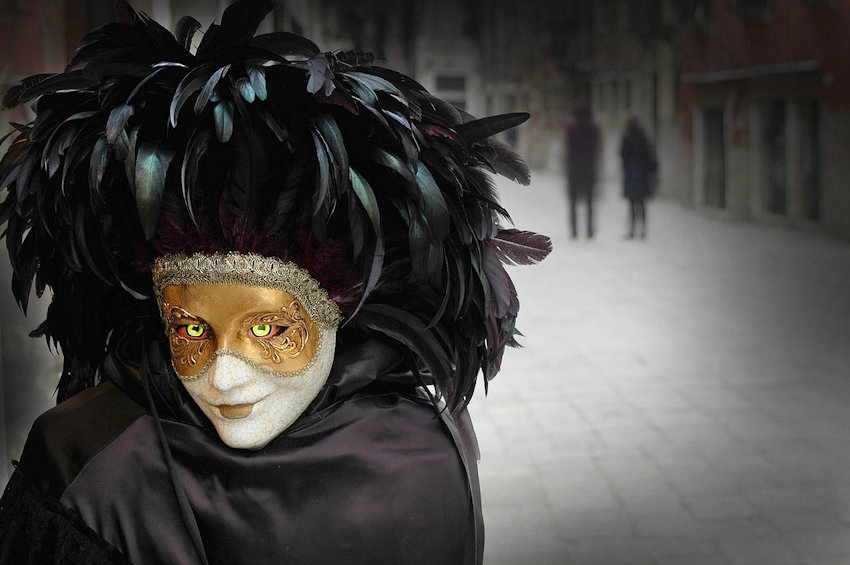
Carnival of Venice is one of the oldest pre-Lenten festivals in the world. Venetian masks and costumes are lavishly decorated with luxurious fabrics & braided trims, feathers, beads, intricately hand painted designs, and touches of gold or silver leaf. Together, let’s explore this magical celebration.
Bold & Beautiful:
It’s All in the Details
A fantastic location like Venice calls for equally dramatic costumes. Every intricate detail in these opulent red velvet and gold costumes mimics the delicate lacelike architecture.
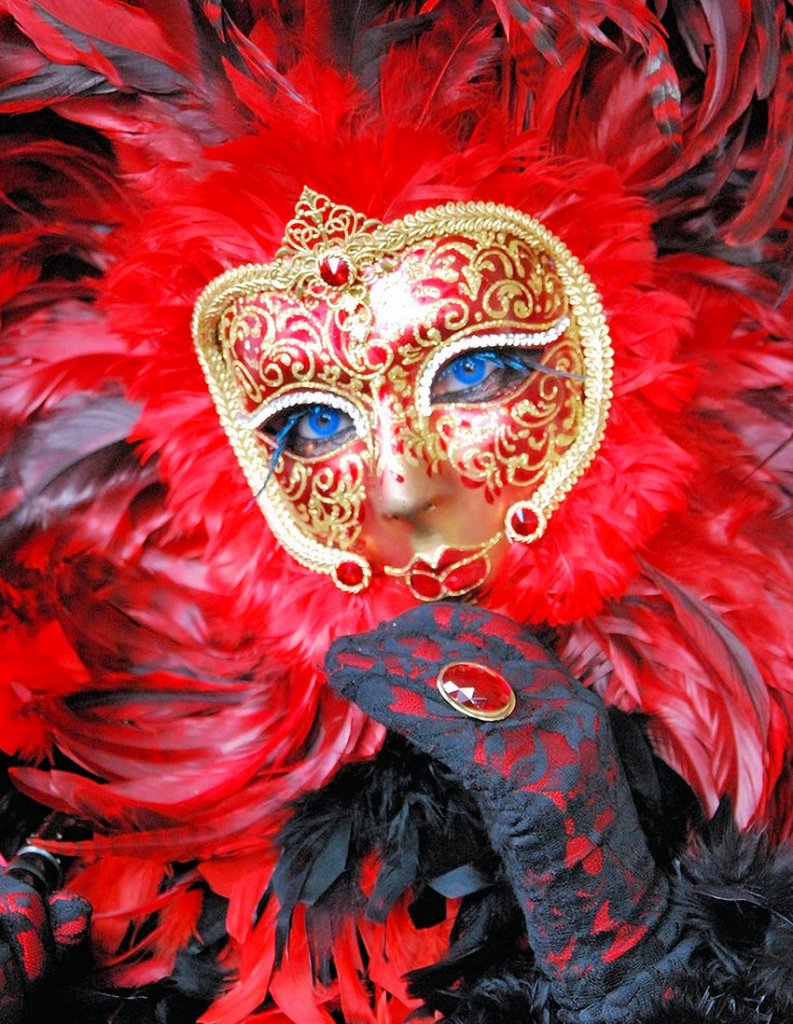
Lady in Red
“All eyes on me” is the message of this feathered beauty. With mesmerizing blue eyes and matching lashes, it is impossible to look away.
Flirtatious Orange & Black
Who is the flirtatious woman behind the mask? You may only catch a glimpse of her, but the impression will last a lifetime.
Pretty in Pink
Mirror Mirror…who is the fairest of them all?
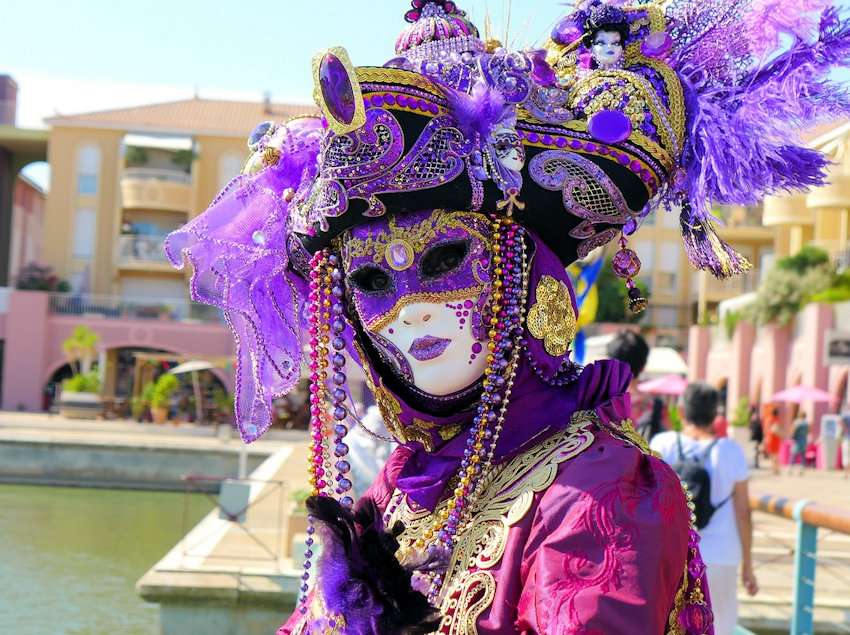
Passionate Purple
From sequins and beads to feathers and fabrics, this purple and gold ensemble stands out in a crowd.
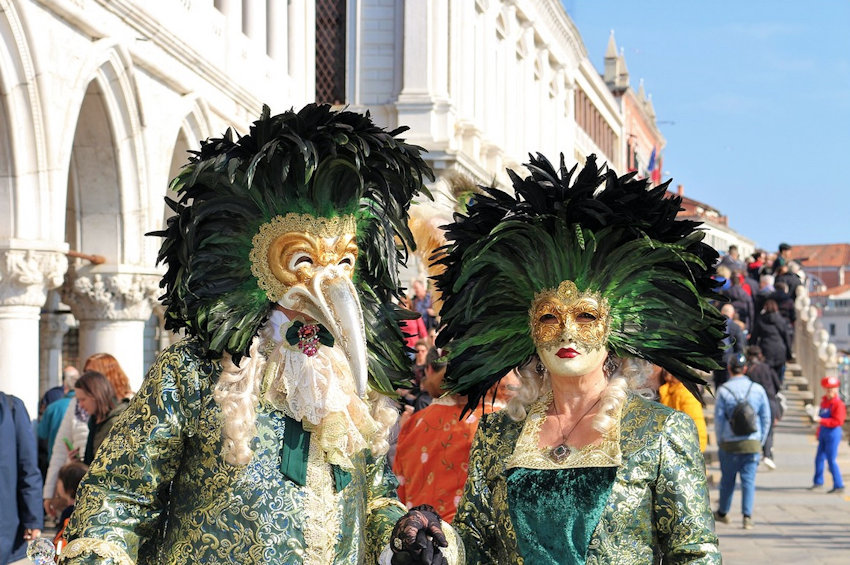
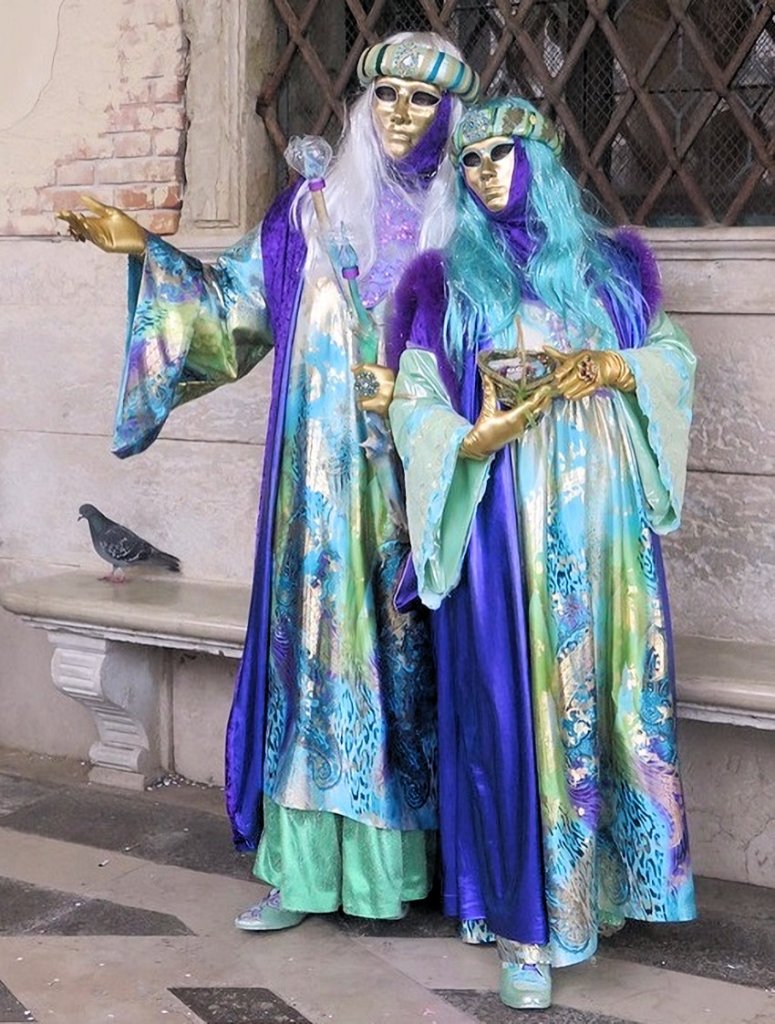
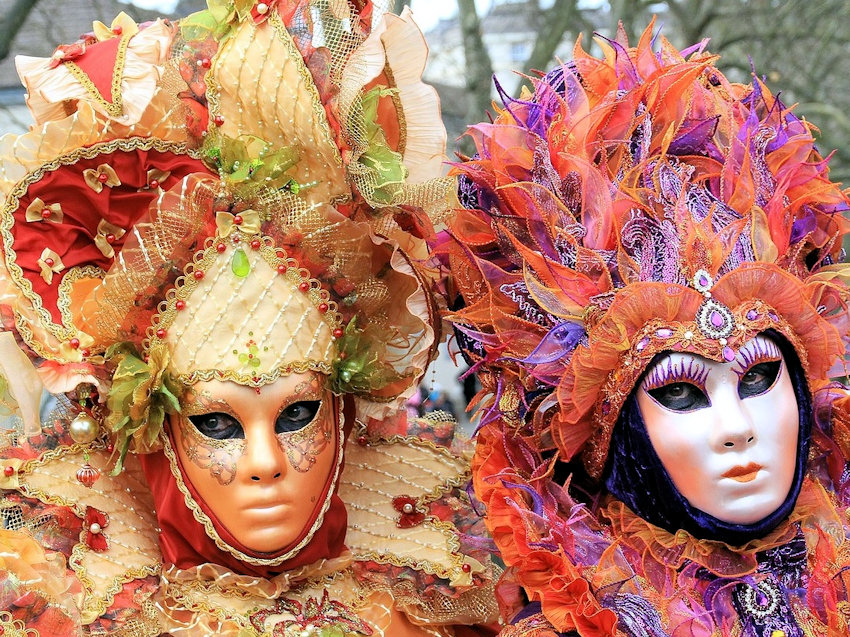
It Takes Two – Couples Costumes:
In Perfect Harmony
Although individual details vary, these costumes are perfectly coordinated by design. Lush green feathers create frames for showcasing their lovely golden masks.
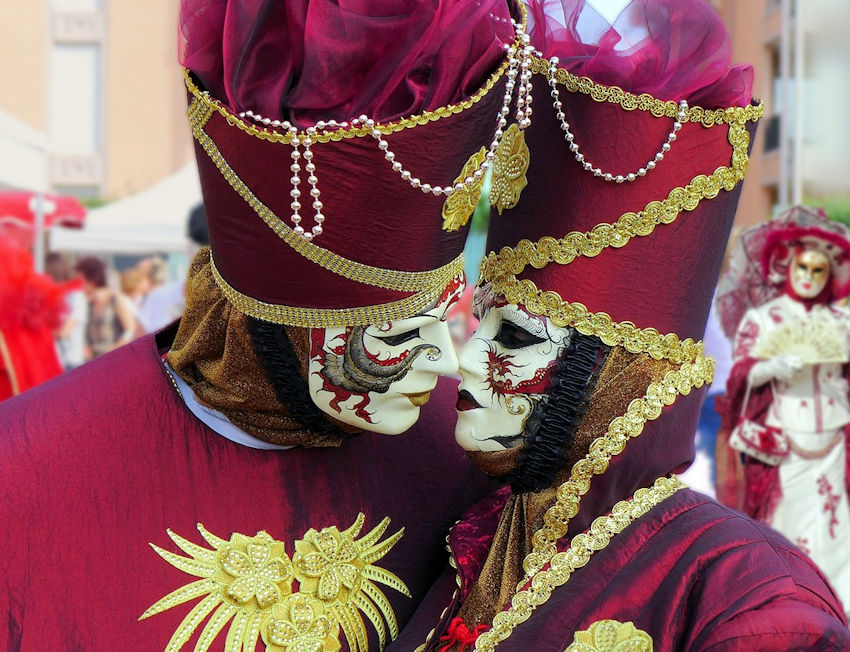
Too Close for Comfort
No matter how hard they try, these two lovers will not be able to kiss, but their body language makes us believe anything is possible.
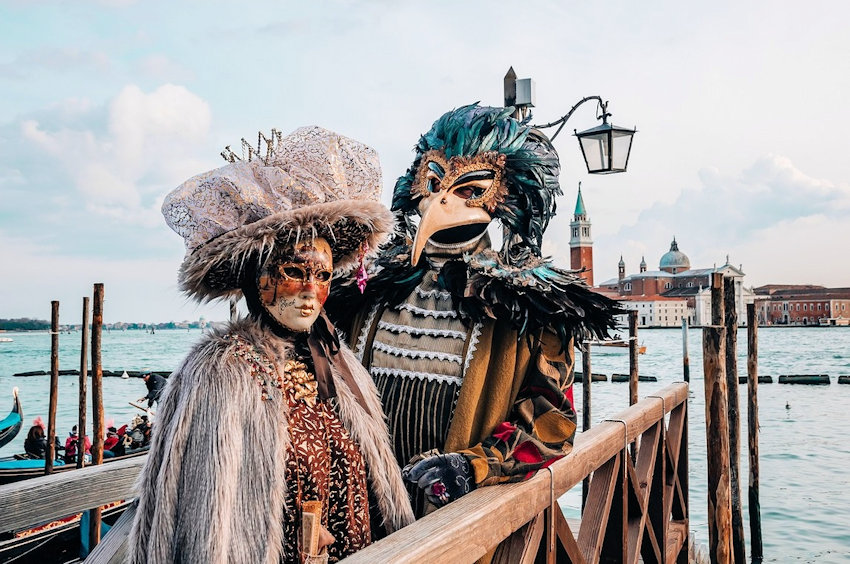
Somewhere in Time
Wearing vintage costumes, while standing upon a dock on the Grand Canal, time seems to stand still.
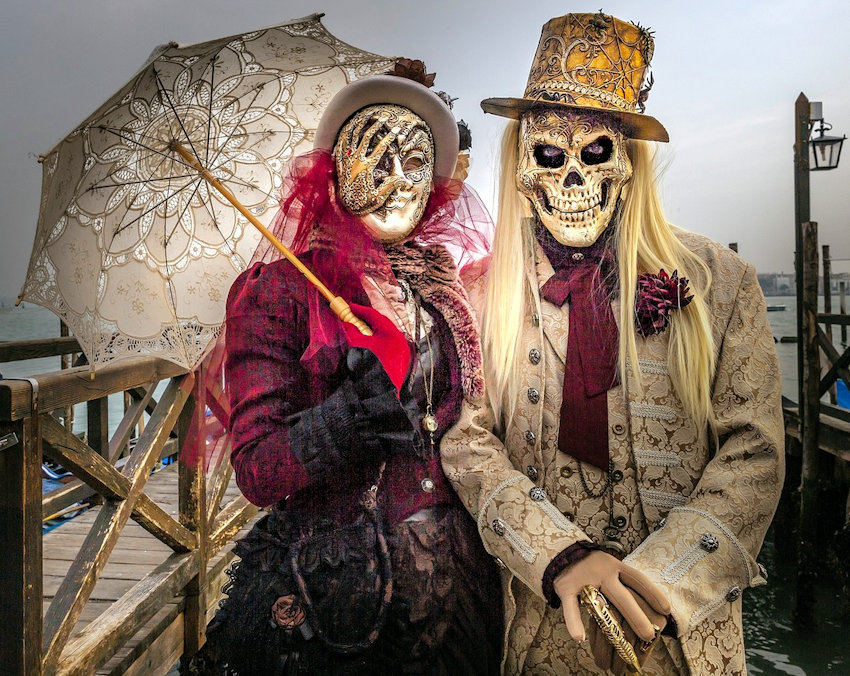
Eternally Yours
Most couples vow “until death do us part,” but this macabre pair are going above and beyond for eternity.
The Four Classical Elements:
Earth
In ancient times, it was believed that the world was made from four basic elements: Earth, Air, Fire, and Water. Layered in flowers, vines, butterflies and birds, this costume would please Mother Nature herself.
Air
Simply by walking, these voluminous feathers stir the air. Twinkling rhinestones, glitter, gold trim and sequins create the illusion of fluid movement in this light and airy mask.
Fire
Even from afar, it’s easy to recognize this fiery costume. While I appreciate all the work that went into making each of the individual flames, I think lighter weight reflective fabrics would be more successful in conveying the illusion of flickering fire.
Water
When you live in Venice, water plays an integral part of daily life. The shimmering, reflective, color changing effects of these costumes mimics the ebb and flow of this watery world.
Focal Points:
Gemstones & Beads
Faceted gemstones, iridescent beads, rhinestones and sequins adorn every inch of this one-of-a-kind dazzling costume.
Luxurious Fabrics
Everything from gossamer fabrics to lush velvets, adorned with braided trims, call attention to this interesting trio. The undecorated white masks and blank stares do not complement the design, causing the wearers to appear to be mannequins.
Exotic Feathers
Peacock feathers certainly make a statement. Metallic paints, faceted gemstones and glittering gold accents perfectly complement the natural iridescence of the feathers.
Intricate Layers
How many hours do you think it took to make these costumes? Both have layer upon layer of fabrics. The one on the left is adorned with pearls and gold trims, while the one on the right consists of sheer pastel fabrics wrapped upon soft wires, making each one adjustable in any position.
Earthy Textures
Cool metallic “half” mask with granulated glitter accents, soft tulle fabric, fluffy feathers, rhinestone studded trim, polished beads, and smooth porcelain come together in this beautifully textured ensemble.
Staying In Character:
Flamboyant Performer
Ready to perform at a moment’s notice, this performer awaits the first musical notes to set her feet in motion in the ancient art of dance.
Sassy Fashionista
This feathered headpiece reminds me of 1920’s fashions. Her sassy posture and look of confidence and curiosity in her eyes work in such harmony that it’s easy to forget she is wearing a mask.
Woodland Sprite
Like hummingbirds, fairies seldom stand still. The surprised facial expression combined with the sideways glance, tilt of the head and arm position imply she may dart off at any second.
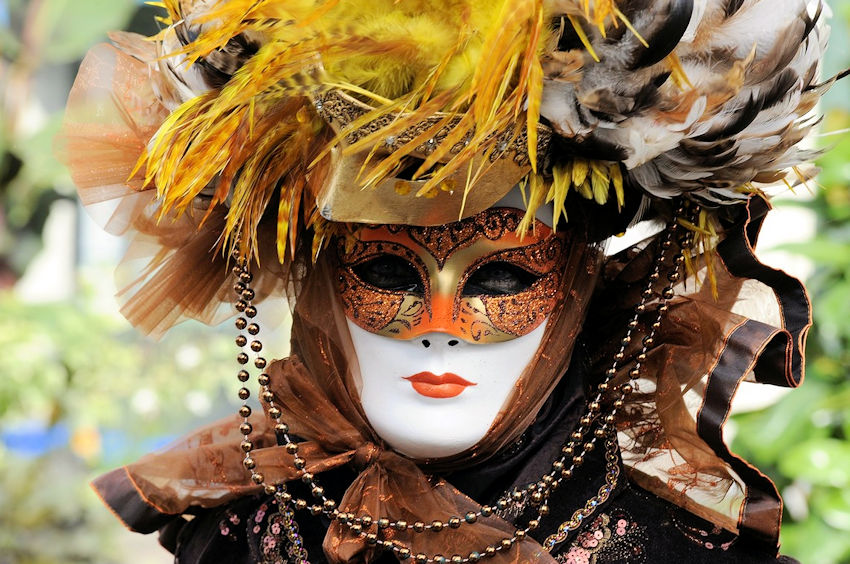
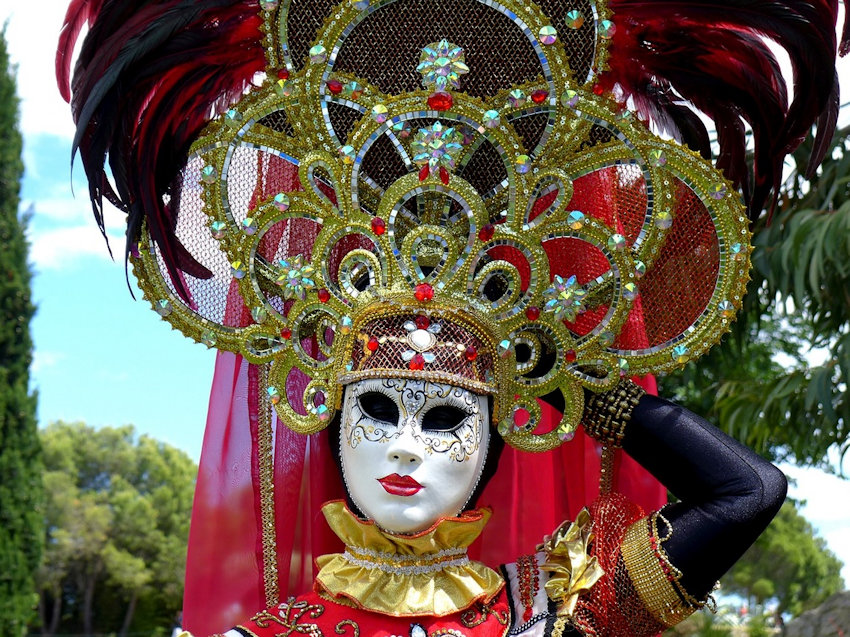
Masks with Personality:
Humorous
Want to be the life of the party? Without saying a word, this amusing mask will make you smile. Add a funny walk or a few bobbing dance steps and viewers will be laughing in no time.
Mischievous
Being naughty can be fun. Either of these masks will keep them guessing what you will do next.
Mysterious
Want to add a little mystery to your life? Glowing eyes, in the darkness, keep their secrets hidden. What lies beneath that sly smile?
Playful
If you have a warm and bubbly personality, or you are a cat lover at heart, this mask may be the “purrfect” choice for you.
Taking Center Stage:
Our Solar System
Until I saw this costume, I never realized one person could represent an entire solar system in an elegant and stylish fashion.
Color plays an integral role in our daily lives. It affects our moods, decisions and actions. Let’s take a look at our activities on a typical day to observe how influential color can be.
Most of us rise with the sun and sleep at night. Our internal clocks are preprogrammed for this routine. During the gray days of winter, it’s tough to get motivated. We need that burst of sunshine to jumpstart our morning activities. The longer days of summer encourage more outdoors events, bringing us closer to nature, which energizes our minds and bodies. Vacations are most popular in summertime.
In our homes, the walls, floors, and furnishings vary in color from room to room, often based upon our activities. For example, sunrooms are usually a cheerful yellow, while bedrooms and bathrooms promote relaxation in soothing tones. Choice varies by individual preferences, and emotional responses to those colors, which are affected by memories, experiences, upbringing, culture, etc. (Photo courtesy AMS Interiors, LLC.)
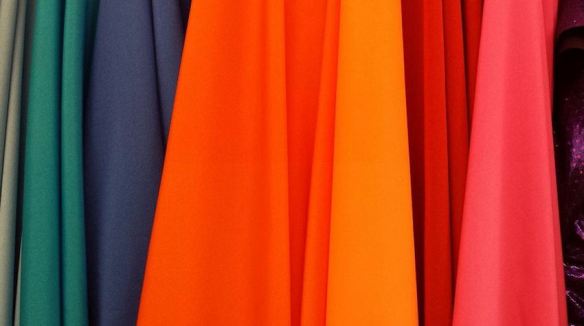
What about your wardrobe? What colors do you see when you look in your bedroom closet? Do you prefer the warm tones of red, orange and yellow, or do you lean more towards the cooler greens, blues, and purples? Perhaps more neutral colors, such as white, tan, brown, and black are to your liking? Whatever the colors, you feel good when you wear your favorites and it shows.
You start the day with breakfast, and a great view if you can get it. Fresh fruit brings a natural burst of color and sweetness to an otherwise ordinary bowl of cereal. Maybe you prefer bread or a bagel. It has to be toasted to that perfect shade of light tan or golden brown – nothing else will do.
If you’re a kid, you hope breakfast will look something like the photo above. Kid’s cereals are great examples of how color attracts attention, even from the younger members of the family. Hiding a toy inside the box doesn’t hurt, and if it’s part of a collectible set, boxes will practically fly off the shelves.
On the way to work, or running errands, drivers are directed to go on green and stop on red. Yellow seems to be a bit confusing. For some it means proceed with caution, but others believe it’s time to stomp on the gas pedal – some more successfully than others.
Depending upon your driving habits, you might see flashing lights like these in your rear view mirror. As you pull over to the curb, you breathe a sigh of relief when the police car flies past you. Whew! That was close!
Gas stations have installed color-coded gas pumps to ensure motorists select the correct type of gasoline for their vehicles.
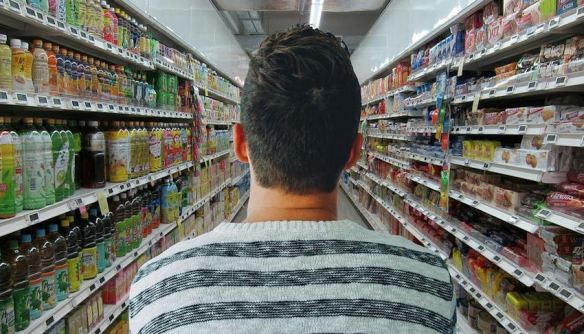
A quick stop at the grocery store offers a multitude of selections. With so many products competing for your attention, how will you ever decide?
When selecting produce, color is the first determining factor for freshness.
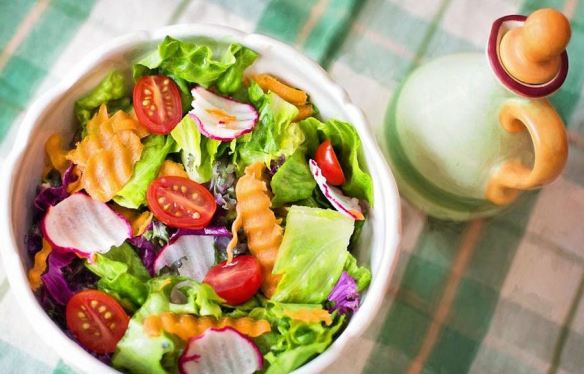
What’s for lunch? Maybe today you’ll have a salad. Notice the amazing combination of colors, shapes and textures. Remember we eat with our eyes first. Looks delicious!
How about a trip to the local mall? Finding your car in a crowded lot can be a nightmare. Color-coding in the multi-level parking garages saves us a lot of time and frustration. We might not notice what floor we parked on, but the color is easily remembered.
Inside the shopping mall, retailers vie for your attention and dollars with colorful displays and eye-catching signage.
A much needed jolt of caffeine to boost your energy through the afternoon. The brown cup and saucer, and use of aged wood countertops reinforces the natural connection of coffee beans growing in the forest, and builds anticipation for the rich creamy flavors of this hot delicious coffee.
The arrival of summer means it’s time to fire up the barbeque grill. Crisp lettuce, and juicy slices of tomato with two kinds of melted cheese on a soft bun make this hamburger a mouthwatering sight to behold.
Watching the sunset or sunrise is a worldwide activity. We may not speak the same language, but we share an appreciation of natural beauty. People go to great lengths, traveling vast distances to reach the best vantage points, often atop mountain peaks, where visitors have to stand in freezing cold temperatures, to watch the sun rise or set at the horizon in royal splendor. All those fiery reds, oranges, and yellows in the mornings and magnificent blues and purples at night flash across the sky in a dazzling performance remembered for a lifetime.
In the evening, most people unwind in a comfortable family room or great room, surrounded by colorful family mementos, sharing stories of the day and joking about the silly plots of whatever is on television. Earth tone walls, flooring, furniture and furnishings promote relaxation.
It’s time to get ready for bed. You wrap yourself in your favorite pajamas, or sweat pants and a t-shirt – you know the one from your first concert, 10 to 20 years ago. With that wild logo on the front and tour dates on the back, that t-shirt has outlasted the band that inspired it. The color may have faded, and it may be a little ragged around the edges, but it still has years of wear and lots of fond memories attached to it, and no matter what anyone says, you’re not going to part with it! Sweet Dreams!
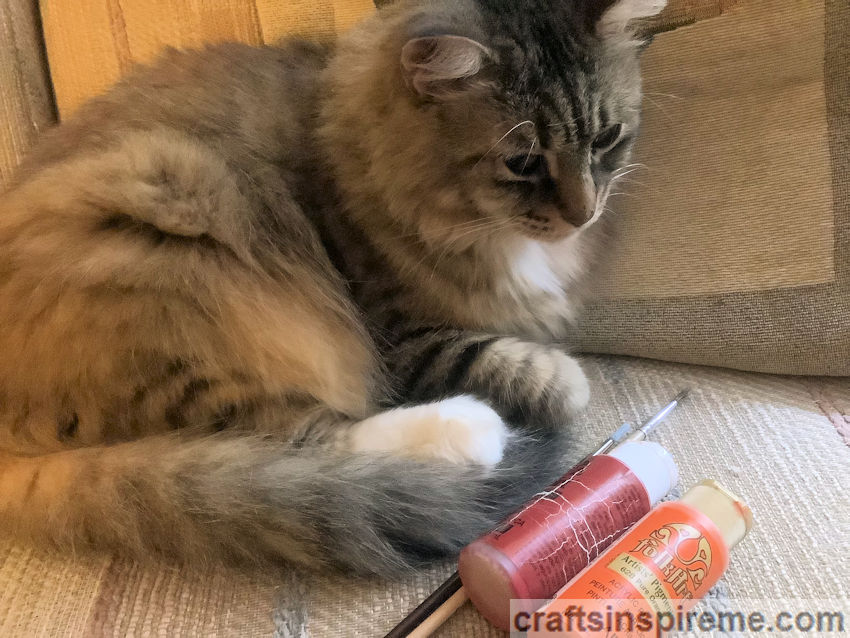
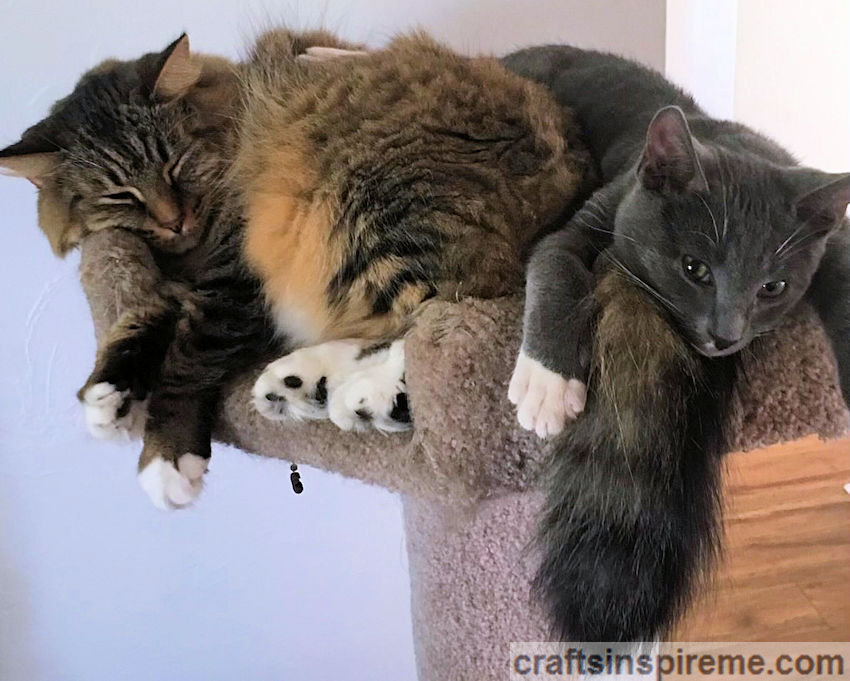
As a “dog person” for most of my life, I am amazed to find myself fostering not one but two cats. I foresee several amusing distractions during upcoming projects. You may be wondering how two cats could be helpful in an art studio. Let’s find out…
Quality Control
“I earned a master’s degree in watching paint dry.”
Inspiration
“I get some of my best ideas while doing yoga.”
Stress Relief
“Pet me and we will both feel better! And get rid of that dog pillow! It’s freaking me out.”
Design Development
“Remember, everything looks better with cat hair on it.”
Design Ideas
“Can we talk? Make more cat-themed crafts, which are edible and tuna flavored!”
In the best possible way, the art studio will never be the same
Hearts are universal symbols of Valentine’s Day. Mother Nature has surrounded us with hearts, but sometimes we are too busy to notice. In honor of Valentine’s Day, let’s look at heart shapes found in nature.
Anthuriums
Both the leaves and the flowers of this anthurium plant are heart shaped. These exotic looking flowers are available in vibrant reds, pinks, whites, and combinations, which also happen to be Valentine’s Day colors.
Bleeding Hearts
A beautiful flower should have an equally attractive name. “Bleeding hearts” sounds disturbing to say the least. Perhaps we could all agree to another more positive term. Have any suggestions?
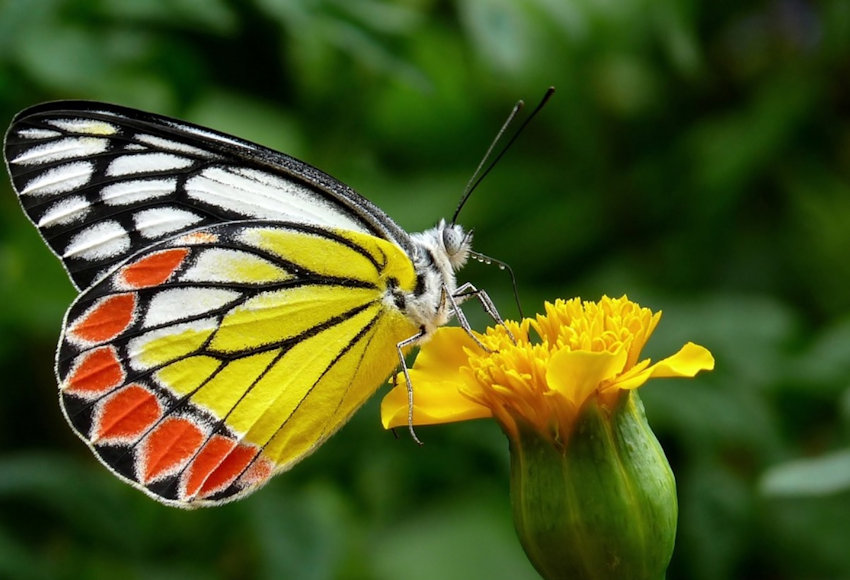
Butterfly
Typically, it is a butterfly’s bold colors that attract attention, but the overall shape of the wings surprisingly becomes a heart when folded.
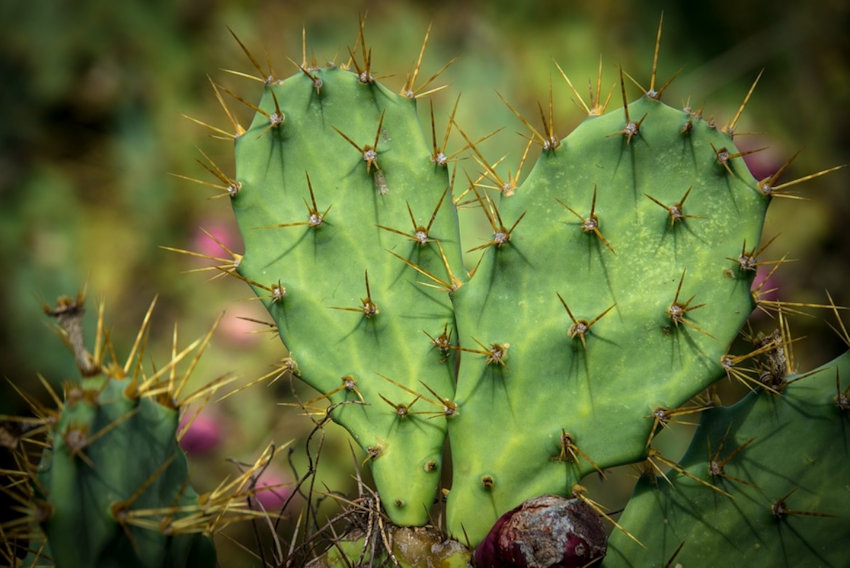
Cactus
When you think of cactus, warm and fuzzy thoughts do not usually come to mind, and yet here we see a big heart hidden beneath that prickly exterior.
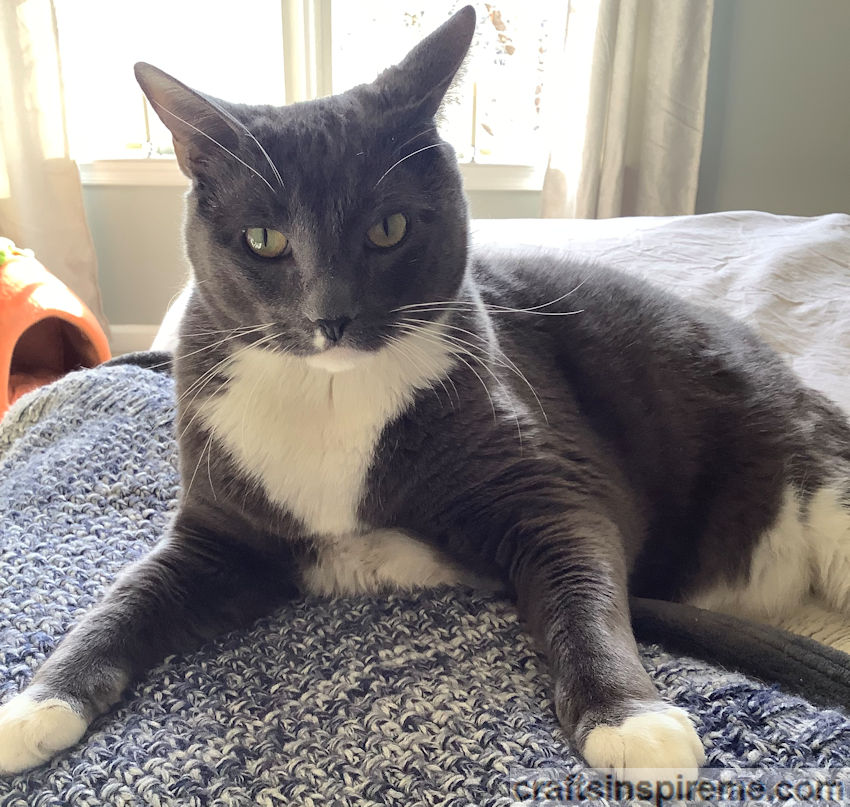
Cat’s Belly Fur
As demonstrated in this adorable cat photo, heart shaped patterns can appear almost anywhere, including animal fur.
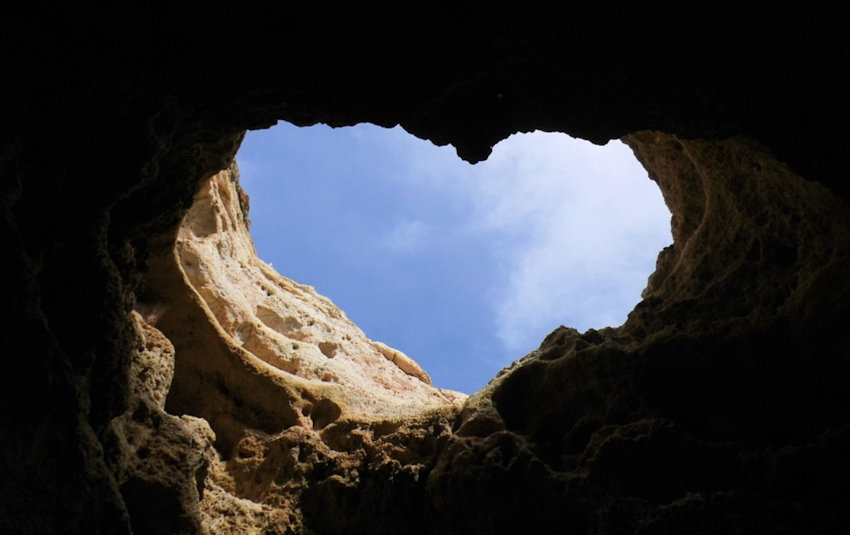
Cave Entrance
The clear blue sky has never been so appropriately framed.
Dragonflies
How sweet! Two mating dragonflies show their love for each other.
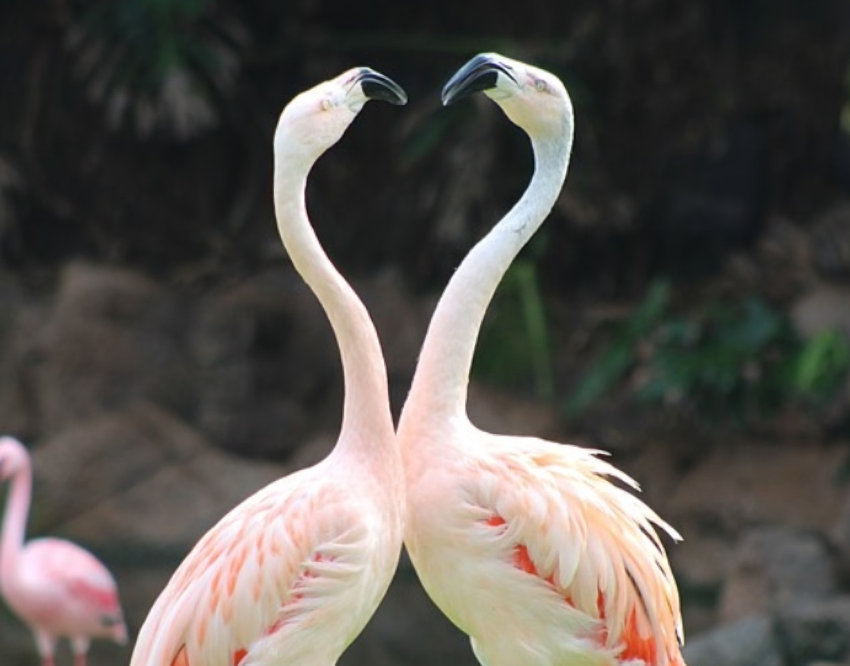
Flamingos
I wonder if flamingos believe in love at first sight.
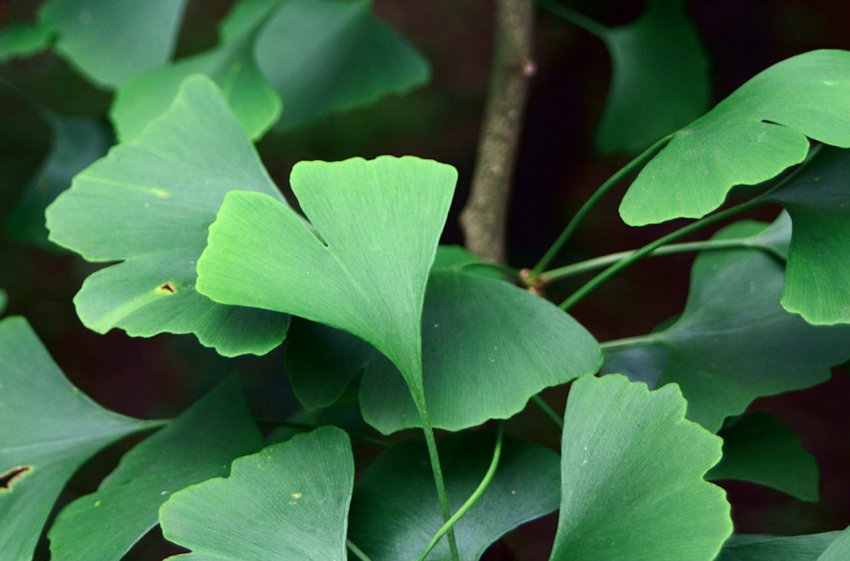
Ginko Leaves
In spring and summer, these hearts, hidden in plain sight, flutter in the breeze, and then fall at our feet in autumn.
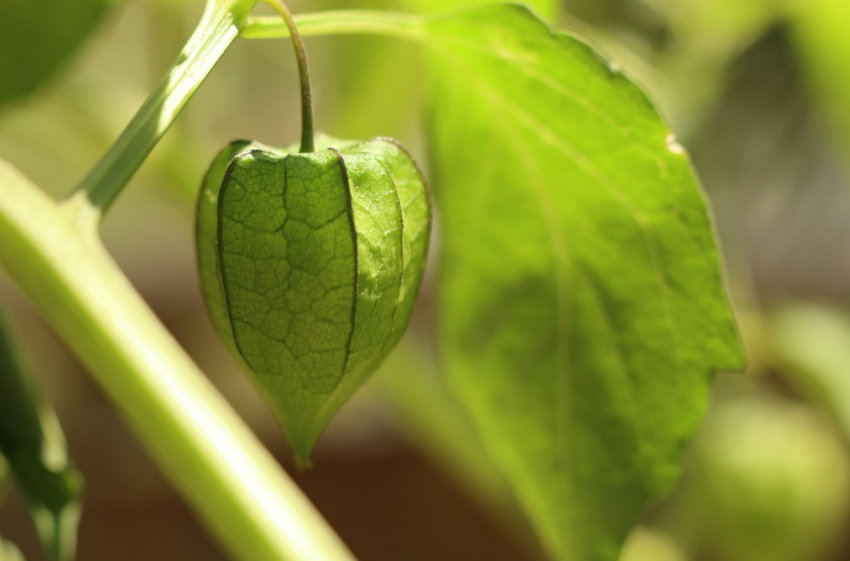
Chinese Lantern Plant
Seed pods on the Chinese Lantern plant range in color from green to orange and red.
Hostas
Some of the biggest hearts in the plant world can be found in a variety of hostas.
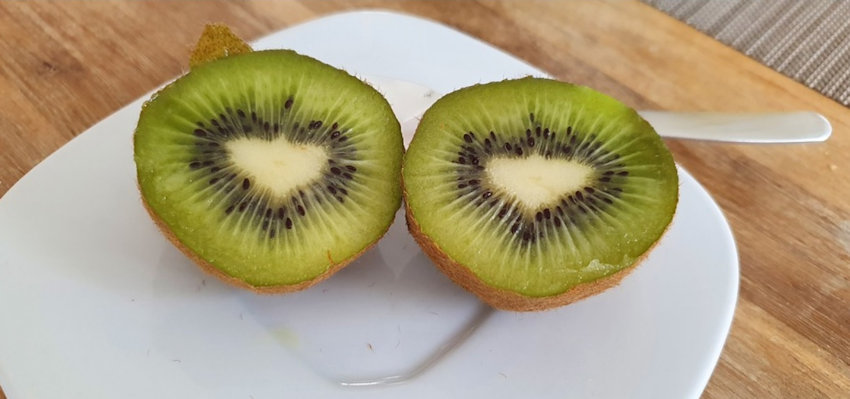
Kiwis
The drab tan skin of this kiwi conceals a sweet romantic center.
Lily Pads
These gigantic lily pads look like they were torn from the pages of a fairytale, and there is bound to be a frog prince or two.
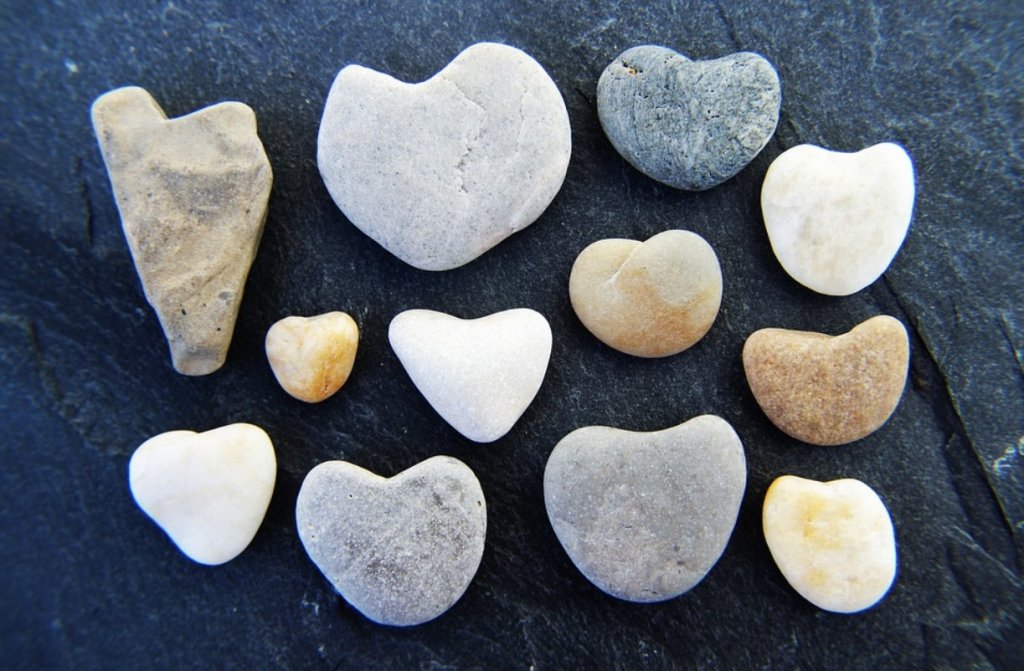
River Rocks
Nature polishes river rocks to smooth perfection in an amazing assortment of shapes and sizes.
Seashells
Not all treasures from the sea are gold or silver.
Snow Crab
From the heart of the sea comes this rich delicious catch of the day.
Strawberries
Chocolate-covered strawberries are a romantic treat, but Mother Nature’s originals are sweet as is.
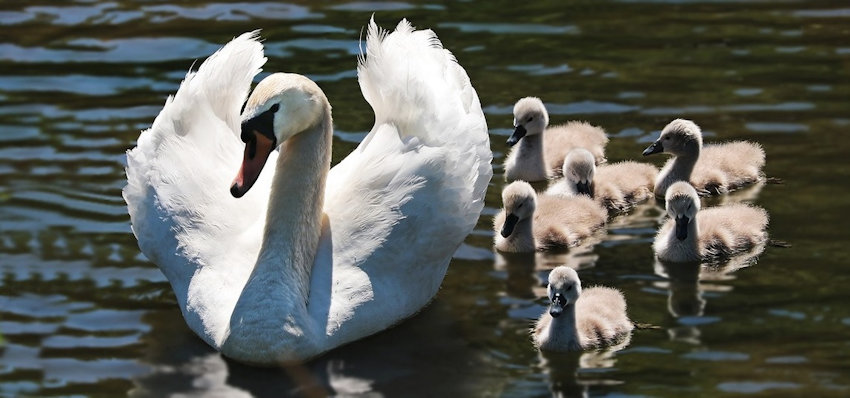
Swans
Here we have two heart shapes: First is the mother swan and the second is the heart-shaped formation of the swimming babies.
Whale Tail
Capturing a great photo of an elusive whale’s tail is a challenge to say the least. And so, with this last heart-shaped natural wonder, I wish you and yours a very Happy Valentine’s Day!