Crafting Day & Night

Eiffel Tower Day & Night

“As different as day and night” is a common expression. When we find ourselves stuck inside, we’re often looking for ways to be entertained. For many, crafting is the answer. A little effort goes a long way, and everyone loves seeing “Before” and “After” photos. These crafts will surprise and hopefully inspire you to create a little crafting magic of your own.

Sledding Centerpiece

Before:  Wooden Sled Wall Art.   After:  Snowman & Friends Centerpiece.
(Click here for how to instructions)

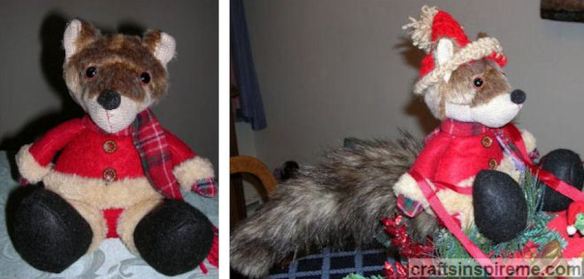
Foxy Santa

Before:  Misfit Christmas Decoration.   After:  Foxy Santa with new hat and tail.
(Click here for how to instructions)

Seashell Plaque

Before:  Drab Wall Art Print.   After:  Seashells, Sea Urchin & Starfish Framed Art.
(Click here for how to instructions)

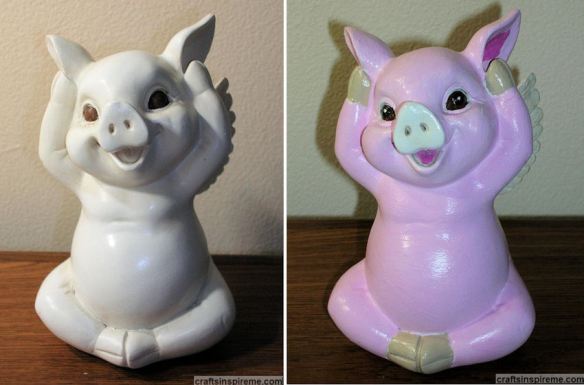
Piggy Before and After

Before:  Colorless Pig Statue.   After:  Pink Pig with lots of personality.
(Click here for how to instructions)

Before & After Pumpkins

Before:  Faded Lawn Decoration.   After:  Bold Halloween Jack-O-Lanterns
(Click here for how to instructions)

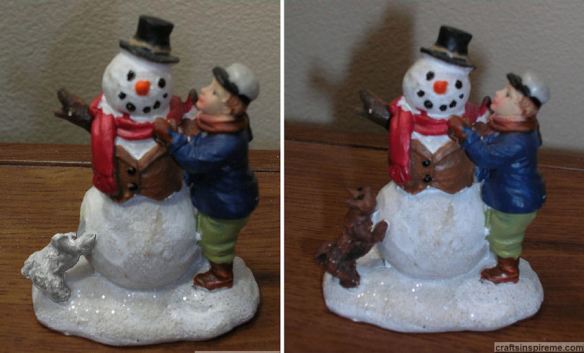
Headless Dog Before & After

Before:  Snowman with Headless Dog.   After:  Restored Dog.
(Click here for how to instructions)

Light House Before & After

Before:  Incomplete Candleholder.   After:  New Lighthouse Roof & “Light.”
(Click here for how to instructions)

Octopus Before & After

Before:  Monochromatic Candleholder.   After:  Blue Ringed Octopus Sculpture.
(Click here for how to instructions)

Candlestick Before & After

Before:  Difficult Candle Size.   After:  Candleholder for Taper Candles.
(Click here for how to instructions)

Leaves Before & After

Before:  Dull, “Muddy” Wall Sconces.   After:  Vibrant Tropical Leaves & Candles.
(Click here for how to instructions)

I hope you enjoyed these projects. Take a look around your home for any items that could use a little refreshing. You’ll be amazed at what you can accomplish. Good Luck!

Thanks for Reading & Happy Crafting!

Countdown -Top Six Posts 2023

Hourglass Countdown

It seems we are always keeping an eye on the time.  Busy schedules and ever-growing “To-Do” lists often prevent us from stopping to review our accomplishments.  Let us take a few minutes to look back at the highest ranked posts, as voted by you, the readers. Below is a list of the Top Six posts of 2023, in ascending order: (Likes for posts 4, 5 & 6 were tied)

Number 6: The Beauty of Origami

Origami Dragon

Origami is an ancient art of paper folding. Boats are one of the more familiar forms, but there is a wide variety of shapes, including animals, trees, and flowers.  To read more, please click here. 

Number 5: Eternal Spring

Painted Wood Butterfly Garden

As new blooms of spring dazzle us with their beautiful pastel or jewel tone petals, equally attractive butterflies gather the sweet nectar and flutter away like fairies in the wind.  To read more, please click here.

Number 4: Table Décor – Elements

Table Decor Color Scheme Red & Gold

Earlier this year, one of my followers requested a post featuring table décor inspirations for year-round events.  To read more, please click here.

Number 3: Muffin Fest 2023

Apple Cheddar Muffins

This week’s post celebrates the many flavors of muffins. Of course, we have all heard and hopefully tasted some of the classics, such as corn or blueberry muffins, but you may also find some new ones here to tempt your taste buds.  To read more, please click here.

Number 2: Table Décor – Designs for All Occasions

Table Decor Color Theme Red & Gold

Welcome to part two of table décor. Last week we reviewed the basic elements used in decorating tables. Today, we will see table designs for most occasions celebrated throughout the year.  To read more, please click here.

Number 1: Inspiring Cake Design

Sewing Machine Cake

A well-designed cake sets the tone (e.g., romantic, playful, humorous), or complements the theme (e.g., fairytales, natural wonders, hobbies, holidays) for every celebration.  To read more, please click here.

Seasonal Craft Projects

And there we have it – the top 6 posts of 2023.  We have a new year to explore the world of creativity.  There are always new ideas and I’ll be sure to include more of your favorites.  Your opinions are greatly appreciated, and I look forward to so much more this year.  If you have any suggestions for future posts, please let me know. 

Thanks for Reading, Happy New Year & Happy Crafting! 

A Crafter’s Nightmare Before Christmas

Snowman Detail
Many people enjoy expressing their creativity during the holidays, with decorations, gifts, etc. Although this happened at Christmas time, this funny story could happen any time of the year.  Did you ever buy something without noticing a major flaw?  I did, and it took a few days to notice.  I purchased several wintry figurines for use in a Christmas centerpiece.  There was a cardinal, a penguin, and an adorable polar bear.  I also chose a cute figure of a boy building a snowman, which resembled one of those warm family scenes in a Norman Rockwell painting.

Original Headless Dog
I set up the sleigh centerpiece and surrounded it with the new figures. There it sat in our family room for a few days. Occasionally I would look at it but didn’t notice anything amiss. Then one night, while watching television, I picked up one of the figures for a closer look. There appeared to be a snow-covered object leaning against the base of the snowman. What could it be? Maybe it was a tree stump or a rock?

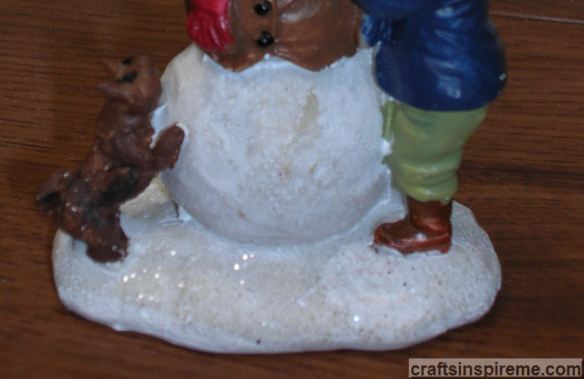
Close Up Headless Dog
Curiosity got the best of me. I held it under a lamp and was shocked by my discovery! It was a headless dog! Unless you happen to be Tim Burton, a headless dog is a little too macabre for such a festive season. The store where I purchased it was closing, and all sales were final. Maybe I could fix it myself, but how? I considered breaking off the rest of it, but that would most likely damage the snowman. I began wondering if I could create a new head using three-dimensional paint.

Headless Dog Painted Brown
Because the white dog was leaning against a white snowman, it was very difficult to see. To correct that problem, the first step was painting the dog’s body with acrylic brown paint. What a big improvement! He was actually a cute little dog if you overlooked the missing head!

New Dog Head
Next, using white three-dimensional paint, I built up a small head in proportion to the body. Because the dog was looking up at the snowman, the head needed to be angled upward. After allowing it to dry, I added the muzzle and the pointed ears with the same dimensional white paint.

Finished Dog
The last step was painting the new head with brown acrylic paint to match the body, and a toothpick was used to add black eyes and a nose. The completed dog looked very happy to be in one piece again!


The repaired snowman figurine had been restored to a Rockwell worthy appearance. Sorry, Tim, maybe next year – lol!

Did something like this ever happen to you? How did you fix it? Please share your experiences in the comments section.

Thanks for Reading & Happy Crafting!

This Little Piggy Gets a Makeover

Flying Pig
We’ve all heard the expression, “when pigs fly,” implying impossibility. Well, we won’t let that stop us from expressing our creativity!

Flying Pig Front
Sometimes you find your next art project in the most unlikely of places! I found this cute little winged pig at the local Rite Aid Pharmacy. Although it’s fine the way it is, I thought it would be nice to add some color. Break out your brushes and acrylic paints because we’re going to give this little piggy a makeover. In my excitement to get started, I had already painted the eyes when I realized I hadn’t taken a “Before” photo. In its original state, there was no color at all.

Flying Pig Back
Here’s a photo of the back. The wings are so cute.

Piglet
Before we get started, I found a photo of this piglet for inspiration. Please feel free to choose any colors you like. The mix of colors on the spotted pig featured at the top of this post would make a great color scheme as well.

Piggy Paints
To complete this project, you will need several acrylic paints and two paint brushes (1 large & 1 small). Clear spray paint is optional.

Painted Pig Details
Paint the details first, including the hooves, eyes, tongue, and the inside of each ear.

Closeup Facial Details
Here is a close up of his smiling little face. The eyes are painted brown, with black pupils and a dot of white in each eye to create a lively expression.

Pink Pig Front
Because the black hooves seemed to be too much contrast, I changed the color of the hooves to tan. In doing so, the eyes become the focal point. Mix white and fuchsia together to create the desired shade of pink, and use it to paint the entire body, except for the end of the snout, which is unpainted.

Pink Pig Back
Here is the back photo. The wings are also unpainted. If you like a challenge, you could come up with a unique scheme for the feathers, possibly using iridescent colors. To protect the acrylic paints, the entire statue was sprayed with clear spray paint.

Piggy Before and After
Before                                                             After

This fun and easy project is inexpensive and can be completed in a very short amount of time. All drug stores have a seasonal section, which is marked down after every holiday and at season’s end by as much as 50% -75% off. There are some great options for adults as well as kids.

Thanks for Reading & Happy Crafting!

Pineapple Dreams

Pineapple Beach
We all dream of fun in the sun at the beaches on exotic tropical islands. Until vacation time rolls around again, we can find ways to bring a little sunshine into our homes and maybe a smile or two along the way.  This week’s project is a painted wooden pineapple.  As usual, we’ll need a little inspiration courtesy of Mother Nature.

Pineapple Colors
It’s amazing how many colors can be found in the outer skin of a pineapple.

Pineapple Texture
The complex textures and geometric patterns are beautiful.

Golden Pineapple
Pineapples have long been a symbol for hospitality. What could be a better way to greet everyone to your home than displaying a bright welcoming pineapple?

How to Paint a Textured Wooden Pineapple:
Pineapple CloseUp
Pineapple has such a wonderful texture that needs to be touched. By using fabric paints, you can create thick, 3-D effects with very little effort.

Raw Wood Pineapple
Raw Wood Pineapple
Thick wood has been cut out in the shape of a pineapple and has the advantage of strong, rectangular base. Both sides and all the edges will need to be painted. Due to the raw nature of the wood, it may require a little sanding, especially along the edges.

Supplies
Pineapple Supplies
Supplies:
Wooden Pineapple (11-3/8” high x 5” wide x 1/2” thick) (Base is 5” wide x 2” deep)
Acrylic Paints – brown, yellow, green, tan
5) Bottles Fabric Paint – dark green, yellow, white (not shown)
Paintbrushes
Sandpaper
Black Sharpie Marker or pencil

Paint Base Colors
Pineapple Ptd Base Colors
Using acrylic paints and a brush, paint the leaves green, the remainder of the pineapple yellow and the base brown.

Define the Leaves
Draw Pineapple Leaf Details
Draw the leaf details with a Sharpie marker or pencil.

Texture the Leaves
Pineapple 3D Leaves
Trace the leaves with green fabric paint, including the perimeter edges. Allow the paint to dry overnight. Depending upon how thick you want the texture to be, it may require a second coat.

Texture the Pineapple
Pineapple Texture1
Starting at the base of the leaves, paint two horizontal rows of irregularly shaped rectangles with yellow fabric paint.

Directional Texture
Pineapple Texture2
Continue painting the yellow texture, working on a diagonal as shown. I started in the upper right corner and staggered the shapes, which get larger as you work toward the bottom.

Completed Yellow Texture
Pineapple Completed Texture
This photo shows the completed yellow texture. Allow it to dry overnight. If you accidentally get yellow paint on the brown base, simply touch up the paint as needed. It’s now ready for a few finishing touches.

Little Details
Pineapple Texture Detail
To complete the look, make a dot in the center of each yellow “block” and create an upward stroke of paint, which narrows to a point. Repeat this step across the entire yellow pineapple surface. Allow drying time. For the last step, use a tiny brush to apply tan acrylic paint to the tip of each white point.

Finished Pineapple
Pineapple Finshing Details
This completes the textured pineapple project. I hope you enjoyed it.

Have you painted any wooden home décor items? Do you have any secrets for creating texture? Please share your ideas in the comments section.

Thanks for Reading & Happy Crafting!

Eternal Spring

Butterflies & Flowers

As new blooms of spring dazzle us with their beautiful pastel or jewel tone petals, equally attractive butterflies gather sweet nectar and flutter away like fairies in the wind.

Butterfly & Flowers

Experiences like this make it easy to believe in magic.

Butterfly & Flowers

For our project this week, we will create a beautiful butterfly garden, which will always be fresh and colorful as a spring morning, and it never needs to be watered. Let’s get started…

How to Paint a Wood Carved Butterfly Garden:

Raw Wood Flower Garden

Raw Wood Flower Garden

When I first saw this wood carving, I didn’t notice the butterflies. As you begin to add colors, the butterflies appear almost like magic.

Markers

Markers

Acrylic Paints

Acrylic Paints

Supplies:
LED Wooden Flower Garden (7” high x 4-1/2” wide x 1-1/8” thick)
Markers – blue, lavender, green, fuchsia, red, yellow & black
Acrylic Paints – white & blue, plus metallic paints: gold, rust, blue, & purple
Paintbrushes

Color with Markers

Colored with Markers

Begin coloring the flowers and leaves. If you are undecided between two colors, try the lightest color first. You can always go darker, if desired. If you make a mistake, it can be covered with paint to match the wood and then try again with the markers.

Color Remaining Leaves with Markers

Add Marker Leaves

The butterflies really stand out now against the boldly colored leaves and flowers.

Paint the Butterflies with Acrylics

Acrylic Butterflies

I experimented with different base colors for each butterfly, depending upon how well they contrasted with the surrounding vegetation. To complete this project, you could paint the butterfly wing details with acrylics too, but I had already decided to use three dimensional paints, as shown below.

Advanced 3D Painting:

3-Dimensional Fabric Paints

3D Paints

Supplies:
Fabric Paints – red, pink, yellow, orange, green, blue, lavender & black

Paint the Butterflies with 3D Paints

3D Painted Butterflies

Create wings patterns with dots, stripes, contrasting colors, etc.

Paint the Flower Petals with 3D Paints

3D Painted Flowers

Define Details by Layering 3D Paints

3D Paints Layering

Finished Project

Finished Project

Define leaf veins, stems, and flower centers with 3D paints. I added vines and leaves in a few spots along the perimeter. Paint the outer edge and backer board with light blue acrylic paint.

Finished Project Lit

Finished Project Lit

The concealed LEDs give a soft purple glow in the dark, which serves perfectly as a nightlight.

I hope you enjoyed this transformative journey. Together, we have created a garden that will last for generations to come. What is your favorite flower or butterfly? Please let me know in the comments section.

Thanks for Reading & Happy Crafting!

At the Crossroads – Wall Art

Many people think the symbolic cross originated in Christianity, but the cross has been used for centuries by many ancient cultures, including the Egyptians and Babylonians.

Ancient Egyptian Ankh
In ancient Egypt, the ankh represented “Life.”

Compass on Ancient Maps
Compass
Crosses have been found in prehistoric cave paintings, most likely indicating astronomical events as well as the cardinal directions, much like the compass shown on the map above.

Crosses can be found in very diverse places, such as cemeteries, churches, clothing, and even jewelry. Before designing a cross, let’s take a look at a few more examples:

Greek Cross
Greek Cross
The ancient Greek cross had equal length arms and resembled the letter “X,” while the more modern version has the typical upright design and the addition of three lobes at each end.

Celtic Cross
Celtic Cross
The cross tombstone in the photo above illustrates the intricately woven knots, which are an integral part of every Celtic design.

Ornate Sterling Silver & Turquoise Cross
Silver Turquoise Cross
Silver or gold, jewel encrusted crosses reflect light and dazzle the eye with ornate patterns and precious gemstones of all kinds.

Contemporary Stained Glass Cross
Stained Glass Contemporary Cross
Brilliant stained glass in a kaleidoscope pattern twinkles in the sunlight in this very contemporary window.

Maltese Cross
Maltese Cross
The Maltese cross has four V-shaped arms. It has a more subtle cross design, which in this case could be easily mistaken for a flower.

How to Design Painted Wood Crosses:
Three Painted Crosses
Instructions for 3) designs are presented below: Celtic, Jeweled Gold, and Jeweled Silver.

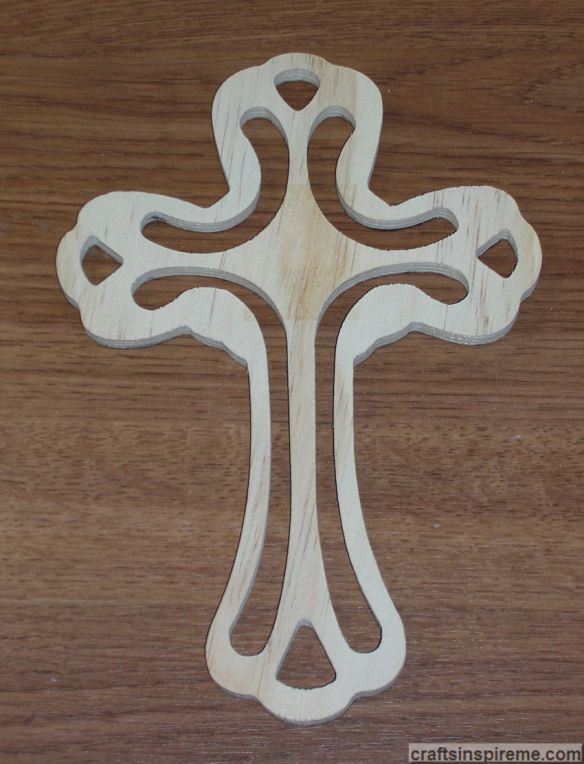
Raw Wood Cross
Raw Wood Cross
Each raw wood cross is sanded lightly, as needed. The supplies needed vary according to the design chosen. If you happen to have colored pencils or markers on hand, you might want to trace the cross onto sheets of paper and color a few samples to help narrow down your design choices.

Supplies
Supplies
Supplies:
Wooden Cross (8-1/4” high x 5-3/4” wide x 1/4” thick)
Acrylic Paints – black, metallic gold, metallic silver
5) Bottles Fabric Paint – dark green, medium green, blue, purple, & metallic gold
1) Package – 12mm round Jewel Tone Rhinestones
1) Package – 12mm round Pastel Rhinestones
1) Package – Clear Diamond-shaped Rhinestones
Paintbrushes
Sandpaper

Cross Painted Black
Cross with 2 Coats Black Paint
Each cross design in this project starts the same way, by applying 2 coats of acrylic black paint as a basecoat.

The Celtic Cross:
Celtic Knots & Infinity Symbols
Paint the perimeter details using medium green fabric paint for a 3-dimensional effect. Single lines and infinity symbols make up this pattern.

Celtic Cross Inner Details
Using the same fabric paint, paint the inner details including woven chains, and a large Celtic knot design in the center. Create pairs of large round “beads” of paint at each end (top, bottom, left and right).

Celtic Gold Accents Finished Cross
For a more 3-dimensional effect, carefully apply a second coat of fabric paint. After it has dried, add the gold details using metallic gold fabric paint.  This completes the Celtic Cross design.

Gold Jeweled Cross:
Painted Gold Accents
Your first decision is how much gold versus black you want to have in the design. Using metallic gold acrylic paint and a brush, I created a starburst at the center, which radiates outward to the ends. A studded detail was created using metallic gold fabric paint.

Gold Cross Jewel Layout
Experiment with different colors and placement of the rhinestones. Do not glue them down until a later step. After seeing this, I decided to increase the gold areas for a more opulent appearance and because the blue “sapphires” look better against the gold.

Gold Cross Enhanced Accents
Here you can see how the gold has been enhanced, leaving only a few key areas black. All the inside and outside edges have also been painted gold.

Gold Cross Jeweled Option 1
In this version, three colors of rhinestones, blue, green, and yellow, have been used.

Gold Cross Jeweled Option 2
Here the rhinestone colors were limited to blue and green.

Gold Cross Jeweled Option 3
This is the finished version with blue and yellow rhinestones. The deep yellow coordinates well with the rich metallic gold. Use Elmer’s glue to affix the gems. This completes the Gold Jeweled Cross Design.

Silver Jeweled Cross:
Silver Pastel Jeweled Cross
I had pastels in mind for this cross. I started out by testing different combinations of pastel colored rhinestones. I liked the light blue and purple with the green center.

Pastel Silver Accents
Metallic silver and black make a powerful combination with maximum contrast and reflectance. The rhinestone colors were carried into an alternating painted “gem” pattern created using dark green, blue and purple fabric paint in gemstone shapes.

Pastel Silver Enhanced Accents
The remaining inner portions, including the edges, are painted with acrylic metallic silver paint. Layout the rhinestones, but do not glue them down until a later step. Clear “diamond” rhinestones are glued in the center along with one round blue stone.

Pastel Silver Stripes Part 1
It felt like a little more silver was needed. I painted stripes at each end of the cross and then added more stripes along the outer edges.

Pastel Silver Stripes Part 2
Feeling good about the design, more stripes were added throughout the design. I have never been a big fan of stripes, so I’m not sure why I did this. The nice thing about paint is that you can easily change your mind and simply repaint.

Silver Pastel Jeweled Cross Finished
It took 2 coats of black to cover the stripes. Metallic silver was painted at the ends, and only those edges were painted silver, while the remainder was black. This completes the Silver Jeweled Cross design.

Finished Cross Designs:
Finished Crosses
Each of these crosses has its own unique style, but they barely touch the surface of design possibilities. Take a trip to the craft store to see what kinds of decorations appeal to you as well as the different styles of wood crosses available. In fact, you might have so much fun making the first one that you’ll have to go back to buy more.

Happy Easter & Happy Crafting!

Luck of the Irish

St Patrick's Day BannerLeprechauns and a pot of gold are certainly hallmarks of St. Patrick’s Day. Below are a few crafting ideas to help you get ready for this upcoming celebration of all things Irish.

Shamrocks
Ireland, known as the Emerald Isle, is famous for its shamrocks. If you are lucky enough, you may even find a four-leaf clover. Notice the almost woven effect created by the natural layering of these leaves. Irish knot work patterns, such as the one illustrated below, are inspired by the natural world.

Carved Marble Knots
Eternity knots can be found on everything in Ireland. The pattern shown here has been carved into marble. It could also be carved or burnt into wood, stenciled onto a wall, or drawn and/or painted onto t-shirts, handbags, or even a comforter. Jewelry makers include knot designs for their beauty as well as the symbolism of eternal love.

Cookies & Irish Coffee
A great way to celebrate St. Patrick’s Day is with a few shamrock cookies and a creamy mug of Irish coffee. In case you didn’t know, this coffee gets its high-octane kick from a shot of Irish whiskey.

Irish Soda Bread
Store bought Irish soda bread is usually made ahead of time and may be too dry. It’s best enjoyed straight out of the oven.

Jewelry Charms
The four-leaf clover is a very popular good luck talisman. A leather cord is a very inexpensive way to make a necklace. The cord can be cut to the desired length, and special cord tips are attached to the ends along with a spring ring or lobster claw clasp. Any charms with a large enough bail can be slid onto the cord and easily changed for a new look. Prefer ready-made jewelry? Ready to wear cords can be purchased with the charms of your choice.

St. Paddy's Day Parade
Of course you’ll need to wear something green to really get into the spirit of the holiday. A little green fabric is all you need – a hat, scarf, socks – anything will do.

Irish Icons
These icons are often found on everything from mugs and T-shirts to bumper stickers. Iron-ons are inexpensive and easy to apply. Craft stores also have stickers, as well as temporary tattoos, which have all the cool designs without any of the commitment.

Irish Embroidery
Embroidery is a great way to dress up any garment with lively, eye-catching graphics and funny sayings.

Shamrocks Crochet
If crocheting were your specialty, these three leaf clovers would make a very unique scarf or hat. They could also be used as decorative accents on a pillow or afghan.

Beer & Shamrocks
There are plenty of colorful holiday-themed sheets in the papercrafting aisle, or you might want to design your own. If there’s a subliminal message in this design, I suppose it would be: “I love shamrocks and beer!” Who doesn’t? (lol)

Art Clay
Working with art clay can be a fun activity for the whole family. Figures like these pictured above could be used as jewelry pendants, or attached to hair accessories or refrigerator magnets, just to name a few.

Irish Angel Stained Glass
Stained glass is a beautiful way to incorporate holiday themes and of course the color green and requisite shamrock for luck.

Ceramic Irish Bear
Belleek, is a well-known brand of Irish pottery, recognized by its neutral cream color, which often includes hand painted shamrocks. You can achieve the same look, at a fraction of the price, by visiting a ceramics studio to paint your own using a similar color scheme.

Lucky Horseshoe
An up-turned horseshoe has always been considered good luck. The addition of a four-leaf clover may be all that’s needed to amplify good fortune to the next level. well, it’s certainly worth a try.

On St. Patrick’s Day, everybody is Irish! So wear something green, enjoy a pint, and keep an eye out for a rainbow – there might just be a pot of gold under it waiting to be discovered!

Happy St. Patrick’s Day and Happy Crafting!

Pick Your Poison

Cocktails on a Bar

Regardless of whether you call it a bar, pub or saloon, bartenders frequently say to customers, “Pick Your Poison.”  If you are unfamiliar with this expression, it means what kind of alcohol do you want.  I found a “Pick Your Poison” sign, which will make a great addition to my brother’s bar. Let’s get started.

Unfinished Sign

Unfinished Sign

I purchased this sign at Michaels Arts & Crafts from their Halloween collection. Experiment with color schemes on scrap paper and then choose your supplies. Later in this post, you will see further experimentation using photo editing software.

Supplies

Markers & Paint

Supplies:
“Pick Your Poison” Sign (14” wide x 1” deep x 8” high)
Acrylic Paints – black
Magic Markers – green, black
Paintbrushes

First Line Colored Black

Letters Colored Black

Using a black marker, color the top line of text. It may require a few coats.

Second Line Colored Green

Letters Colored Green

Color the next line of text green. It may require a few coats.

Top & Bottom Trim Painted Black

Top & Bottom Painted Black

Paint the trim black. I wanted the word poison to really stand out but the marker just wasn’t enough. I switched to paints as you will see below.

Revised Supplies

Paints

Revised Supplies:
Acrylic Paints – black, metallic green
Paintbrushes

Painted Letters

Painted Letters

Paint the word Poison with several coats of metallic green. I considered adding drips of 3D paint to make the green letters appear to be bubbling or oozing but decided against it. You could stop at this point if you like the wood grain background.

Photo Editing – Experiment 1

Photo Editing Test 1

Using photo editing software, I experimented with different background colors. I was just dabbling so I apologize for the sloppy lettering. It was just what I needed to decide how to proceed.

Photo Editing – Experiment 2

Photo Editing Test 2

I also tested different color combos for the text against the new backgrounds.

Photo Editing – Experiment 3

Photo Editing Test 3

Because I liked the high contrast and implied sense of danger, I chose red as the background color.

Finalized Supplies

Paints

Finalized Supplies:
Acrylic Paints – black, metallic green, red
Paintbrushes

Painted Background Red

Background Painted Red

Paint the background red. Due to streaking, which did not appear until after the paint had dried, it took several coats of paint.

Finished Sign

Finished Sign

Here is the finished sign, ready to be hung above the bar.

I hope you enjoyed this quick & easy project as much as I did. Sitting here at the bar, I drink a toast to my readers. I’ll save the seat next to me in case you decide to join me.

Thanks for Reading & Happy Crafting!

Countdown – Top Six Posts 2022

It seems we are always keeping an eye on the time.  Busy schedules and ever-growing “To-Do” lists often prevent us from stopping to review our accomplishments.  Let us take a few minutes to look back at the highest ranked posts, as voted by you, the readers. Below is a list of the Top Six posts of 2022, in ascending order:

Number 6: Pumpkin Spice & Everything Nice

In Autumn, as the leaves begin to turn, pumpkin flavored items begin popping up everywhere, from coffee shops to fast food restaurants and even the local pub.  To read more, please click here. 

Number 5: Decorating Easter Eggs

Dyed eggs are a staple of any Easter celebration.  To read more, please click here.

Number 4: Collages: Old School vs. High Tech

Collages can be created by two different methods: 1) “Old School” Traditional, or 2) High Tech.  To read more, please click here.

Number 3: Inspiration: Lost & Found – Part 1

Sometimes it feels like inspiration is impossible to find. It hides in plain sight, masquerading as mundane items in our daily lives. To read more, please click here.

Number 2: Halloween: Naughty or Nice?

There are all sorts of Halloween themes and characters to help us celebrate this imaginative holiday.  To read more, please click here.

Number 1: Blogging Vacation

Throughout the summer, I usually take a break, by posting every other week.  This year there were so many inspirations to share I simply kept going. To read more, please click here.

And there we have it – the top 6 posts of 2022.  We have a new year to explore the world of creativity.  There are always new ideas and I’ll be sure to include more of your favorites.  Your opinions are greatly appreciated, and I look forward to so much more this year.  If you have any suggestions for future posts, please let me know. 

Thanks for Reading! 

All the best in 2023 and Happy Crafting!