Why Just Paint? Faux Finish.


Faux finishing is a great, inexpensive way to transform a room and can be easily done over a weekend, and sometimes in a few hours with minimal effort.

There certainly is no shortage of ideas and inspirations for faux finishing including: retail stores, restaurants, shopping malls, magazines, books, websites, videos, craft and paint stores. Instructional videos can be found on YouTube, but don’t forget to check paint manufacturers’ websites as well.

You may already have many faux finishing tools in your home without even realizing it. Paint can be applied using rolled up plastic wrap or fabric; synthetic sea sponges; brushes, sponge rollers; and trowels. Application methods include dabbing, rolling, splattering, brushing, and glazing. Additional supplies and advice are available through local craft stores, and home improvement or hardware stores.

                          Faux Marble                                               Faux Metal
Faux Marble and Faux Metal
Faux Marble has a mottled background and white veining applied using a feather.

Faux Metal is created using a specialty iridescent metallic paint applied on the diagonal for a hammered metal appearance.

                       Crackle Finish                                      Faux Venetian Plaster
Crackle Finish and Faux Plaster
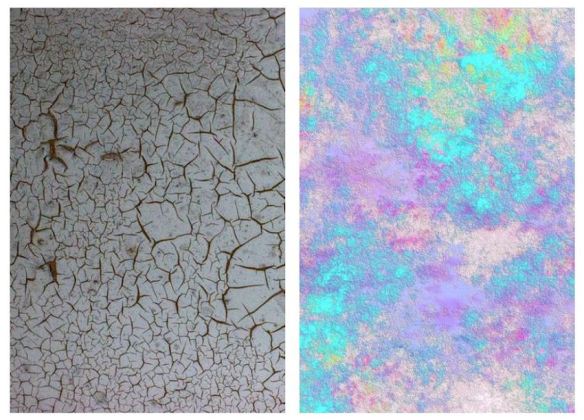
Crackle Finish involves painting a background color first, followed by a special antiquing medium, which cracks as it dries, revealing the color beneath for an aged, weathered look.

Faux Venetian Plaster has color and texture applied at same time with a trowel, which is a two step process, followed by a drying period, and sanded afterward to create a soft sheen finish.

Textured Wall Paint
Textured Wall Paint
Textured Wall Paint is probably the easiest faux finish to apply. No special skills are required. If you can use a paint roller, you can texture a wall. After it dries, the wall will resemble the texture of plaster, and the softness of wallpaper. With a bold punch of color, it can be used as an accent wall in a living room, dining room or master bedroom.

Textured Wall Paint
Textured Paint
Faux Plaster can be created simply by applying a thick layer of paint and using assorted “tools” to texture the surface while the paint is still wet.  Additional layers can be applied for greater texture and depth.

Faux Wood Grain over an Abstract Background
Faux Wood Grain
Faux Wood Grain requires the use of a stencil.  Paint the base coat first in a light or medium color.  When it has dried, go over it with the stencil using a darker color to simulate the natural wood grain, or try using metallic glitter paint as shown above.

These faux finishing techniques are not limited to walls. The same processes can be applied to ceilings, furniture, and just about any other surface.

How To Faux Finish A Room
Research faux finishing ideas and installation methods. Choose your design. Choose the paint colors. Having several color combinations is fine because the first step will help you narrow down the choices. Purchase the paints and corresponding application tools required for your chosen faux finish.

Trying something new for the first time can be a stressful experience. What if you make a mistake? What will you do if you fail halfway through the project? If the paint colors looked great in the store, why do they look so different in my home?

Sample Board
Paint Sample Board
Crafter Tip – Sample Boards are your best friends.
You need to experiment with your color schemes and methods of paint application. The simplest solution is creating a sample board. Sample boards give you a chance to get your feet wet, so to speak, without the overwhelming feelings that can come when faced with full-size wall or an entire room. Hone your skills on the sample boards. With proven skill and newfound confidence, you’ll be ready to take on the full project. Keep your sample board handy for reference while you are painting.

24” x 36” poster board is an easily manageable size. Another option is foam board, also known as foam core, which consists of two pieces of poster board with a piece of foam sandwiched in between for strength. The ability to pin inspirational photos is an advantage of foam core over standard poster board.

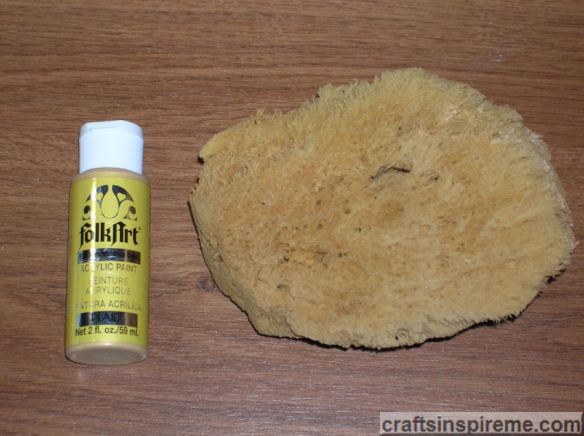
Gold Metallic Paint & Synthetic Sea Sponge – (2nd paint color, taupe, not shown)
New Bath Paint
For the technique demonstrated in the bathroom below, first paint a coat of the background wall color on the sample board, and let it dry. Apply each group of colors on different areas of the sample board, being careful to label or make note of colors used. Feel free to experiment with various brush and or sponge techniques. Let the paints dry.

Faux Finish Close Up Detail Sponge Painting
Sponge Painting Detail
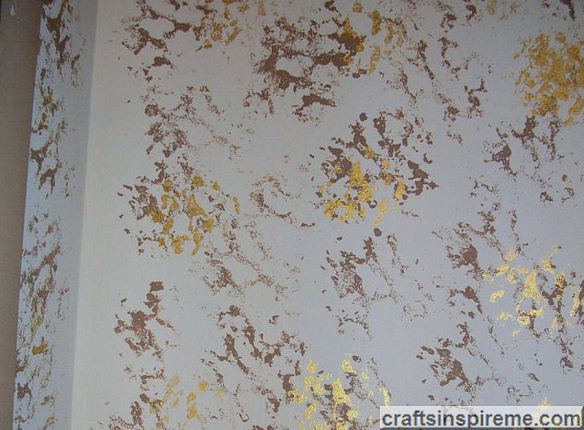
Now lean the sample board against a wall in the room to be painted. It is important to see the colors under the existing natural and artificial lighting. Begin the elimination process. Some will be very obvious missteps for one reason or another. A few usually rise to the top of your list. At this point, you can do some additional testing. You may want to create another sample board with larger samples of your top picks.

Sponge Painted Bathroom

Sponge Painted Bathroom
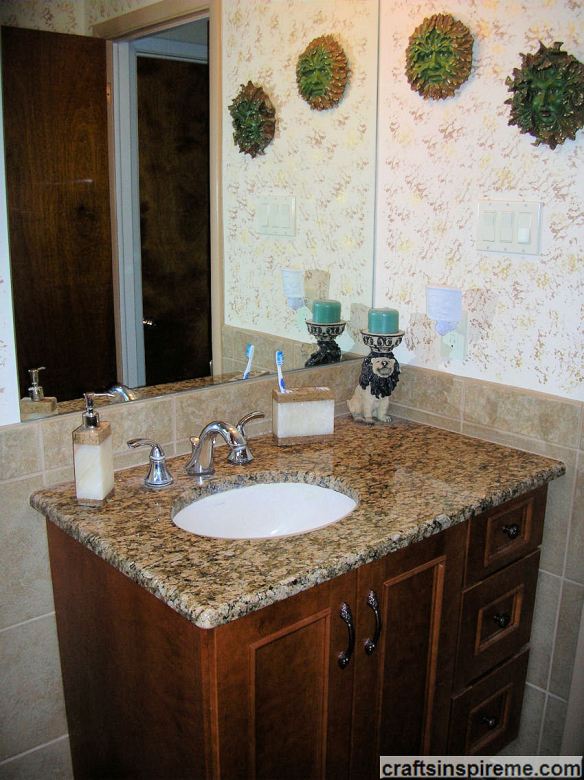
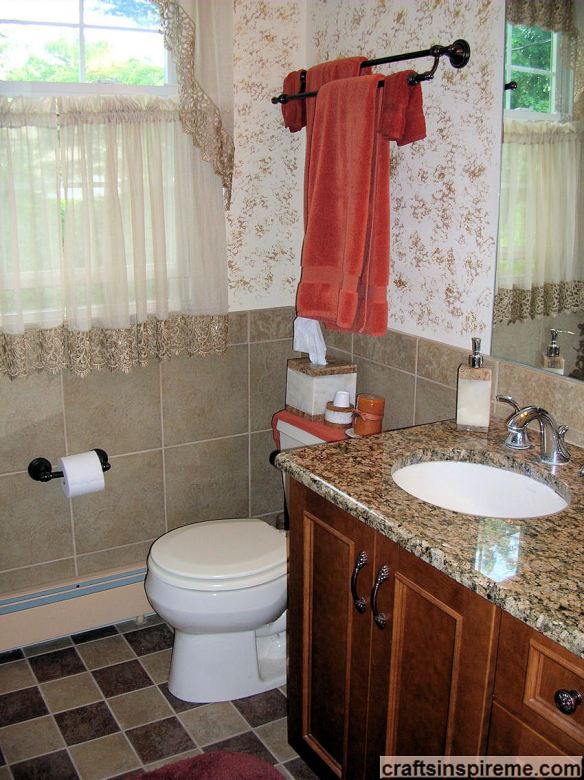
Once you have decided, it’s time to tackle the faux finishing of all the walls in that room. Take your time, and remember it doesn’t have to be perfect. The beauty of hand-applied finishes is the variation and artistry. If you are using multiple colors, apply one color at a time, and then repeat the process.

You can do this!

Thanks for reading & Happy Crafting!

How to Make an Ocean Themed Wreath

Fishing Net with Life Preserver
A day at the beach – the warmth of the sun upon your skin, seagulls chattering nearby, damp sand between your toes, the laughter of children, and the ebb and flow of the waves depositing tiny treasures upon the shore. Whether it’s sea glass or seashells, each has unique colors and patterns courtesy of Mother Nature. Creating an ocean themed wreath is a great way to display your shell collection and as a reminder of those days in the sun and a promise of vacations yet to come.

Ocean Wreath with Open Center
Ocean Wreath Version 1
The ocean’s creatures hitch a ride upon this wreath as it floats along the surface of the sea. All the items shown are small to medium scale to coordinate with the life-size fish and crab. (Alternate option: The open center reminds me of a life preserver. If you really want to play up the life preserver look, you could use a white foam wreath base, let some of the white show through the netting, and add a thick piece of rope around the perimeter similar to the one shown in the photo at the top of this post.)

Supplies:
16” Wire Wreath Frame
Fishing Net
Glue Gun with plenty of Glue Sticks
Old size 6 (or size G) Crochet Needle – to “fish” the twine through netting
Life-size Crab and Fish Figurines
Seashells – different sizes, shapes and colors
3 Starfish
Tan twine – to tie on larger shells, crab and fish
Faceted round diamond shaped rhinestones – glued upside down on starfish legs
Optional blue paint – to blend twine ties over bodies of fish and crab
Optional black foam core and painted wood sea horses for second version of wreath.
Anchor Wreath Hanging Hook

Crafter Tip: A word of caution about fishing nets – The netting is available through craft stores and online. If the product description includes the words “recycled materials,” it really means it was used for fishing! I’m sure it must have been rinsed, but the fishy smell may still be present. Air it out first before use. You may want to wear gloves while you are handling netting, and keep it out of children’s reach. Also fishing nets often contain mismatched patches, which add character and a bit of a background story for your finished project.

Crafter Tip: Before you start, cover your worktable with newspaper. You will be flipping the wreath over multiple times to tie the decorations. It’s helpful to have someone assist with this project. One person can hold wreath up on end while other ties the knots in back. That’s a real time saver.

Close Up – Twine Tie
Close Up Ties
Wrap the fishing net around the wire wreath frame. Be sure to make thick layers to completely conceal the wire. Use tan twine to tie the netting in place in multiple locations until you are satisfied with the fullness and coverage. Refer to the red highlighted rectangle in the above photo. Using the crochet needle, “fish” the twine through the netting to the back of the wreath. The twine forms single stitches upon the face of the wreath, which will blend with the natural color of the netting, and will be covered by shells. If you purchase white fishing net, use white string or twine. All ties for this project should be secured on the back, and tied in double or triple knots. Crafter Tip: To ensure ties remain tight, add hot glue to each knot.

Close Up – Crab
Close Up Crab

Close Up – Fish
Close Up Fish
Crab & Fish Figurines – Because these figures are the stars of this project, they should be attached first. Originally they were meant to stand as statues upon a shelf or mantelpiece, but in this case they were the perfect size, color and shape to use as wreath decorations. Due to their weight, be sure each is securely tied to your wreath. Crafter Tip: Because the underside of the fish might be seen from the side, it was painted blue to blend with the body or look like splashing water. The twine ties across the crab and fish figures were painted blue to be less noticeable.

Close Up – Starfish
Close Up Starfish
Attach the starfishes next. These three were positioned in an asymmetrical pattern, but you can add as many as you like. Crisscross ties over the center of the starfish and cover the twine with a seashell. To add a little sparkle, glue diamond shaped rhinestones onto each starfish, three per leg. Use glue or twine to attach the seashells. Lay them out and move them around to create an attractive arrangement. Work quickly with the hot glue, which dries fast. Larger shells may need to be tied instead of glued. Distribute accent colors evenly throughout the wreath to unify design.

The second option for this ocean wreath has a filled center with additional sea life.

Option 2 – Ocean Wreath with Solid Center
Finished Wreath Version 2
This version offers additional opportunities to display your shell collection. Use black foam core in the center with punched holes around perimeter to tie onto the wire wreath frame. Punch additional holes if needed to tie on large shells or figures. Cover the foam core with a layer of fishing net and glue on additional shells and sea horses. For instructions to create the painted wood sea horses shown in photo, please click here.

Close Up – Wreath Hanging Hook
Anchor Hook
This decorative anchor hook fits the overall ocean theme and will provide sturdy, heavy-duty support for this large, heavy wreath. Crafter Tip: Be sure to insert the hook through all the rings in the metal frame. Place a seashell over the tip of the hook.

Thanks for reading & Happy Crafting!

How to Decorate Wood Crafts

Fawn
When I was a little girl, my bedroom was decorated with Disney’s Bambi characters. Each wooden plaque was painted in full color and beautifully detailed. Before falling asleep at night, I would sit and admire each one, imagining they came to life before my very eyes. You can create painted wood art (and memories) for your home.

Raw Wood Owl
Wooden Owl
Wood cutouts, figures and plaques can be a fun, inexpensive project. The projects described below are ocean creatures, however, many themes are available, including sports, nature, and holidays. This owl is predominately raw wood, with just a little color to accentuate the face.

Painted Wooden Heart
Wooden Heart
Decorating can be done with magic markers, acrylic paints, fabric paints (for 3-D effect), stickers, and self-stick gems. Finished items can be used as wall art, Christmas ornaments, wreath décor, place cards, window charms, and refrigerator magnets. These techniques can be used for larger woodcrafts as well. Outdoor items will require waterproof paints, and you will want to consider the fading effects of the sun.

Seahorses:

Inspiration
Seahorse
It’s always helpful to refer to a few photos to inspire your color palette. Note how textured the body is and any patterns naturally found in this unique sea creature.

Raw Wood Seahorse
Raw Wood Seahorse

Turquoise Seahorse Supplies
Turquoise Seahorse Paints
Supplies:
Wooden Seahorse (5-1/2” high x 3” wide x 3/8” thick)
Acrylic Paint – turquoise, yellow, and metallic blue (plus black for the pupil)
1) Bottle Dimensional Fabric Paint – light blue
Paintbrushes

Seahorse Close Up Detail
P7 Turquoise Seahorse Detail
Seahorses – Step By Step Process: Apply base coat of acrylic paint over the surface, and be sure to paint over all the dark brown edges. When it’s dry, you may want to draw details to define your design.

Choose accent paints and begin working across the body, being careful not to smear the fresh paint as you go. Allow the piece to dry for several hours.

Dab a paintbrush in undiluted acrylic paint to create the subtle bumpy effect on the seahorse’s body. The metallic paint down the center of the body gives it an iridescent finish, which visually transforms the flat wood into a rounded, three-dimensional figure.

Finished Seahorse
Finished Turquoise Seahorse
Lastly, the blue fabric paint was applied to form spikes along the contours of the body. You may need to do a second coat on the spikes to achieve the texture as shown.

Purple Seahorse Supplies
Purple Seahorse Paints
Supplies:
Wooden Seahorse (5-1/2” high x 3” wide x 3/8” thick)
Acrylic Paint – orange, fuschia, and metallic light purple (plus black for the pupil)
1) Bottle Dimensional Fabric Paint – light blue
Paintbrushes

Seahorse Close Up Detail
Purple Seahorse Detail
Follow the same steps noted above for the turquoise seahorse.

Finished Purple Seahorse
For a more three dimensional look, please click here to see a more advanced version of these seahorses.

Dolphin:

Inspiration
Swimming Dolphins
Unlike the seahorses, dolphins have smooth, sleek bodies with a glossy sheen. To reproduce that wet-look, dimensional fabric paints will be exclusively used for this project.

Raw Wood Dolphin
Raw Wood Dolphin

Dolphin Supplies
Dolphin Paints
Supplies:
Wooden Dolphin (3” high x 5-1/2” wide x 3/8” thick)
3) Bottles Dimensional Fabric Paint – white, pearl silver, black
Paintbrush

Dolphin Close Up Detail
Dolphin Detail
Dolphin – Step By Step Process: You will be working across the body one color at a time, being careful not to smear the fresh paint as you go, and cover all the dark brown edges.

As you squeeze the bottle, apply the paint in a thick layer, using long “strokes,” to give the dolphin’s body depth. A damp paintbrush can be used to level the surface.

Allow the piece to dry over night. Be sure to wash the paintbrush with soap and water to remove fabric paint, which tends to adhere to the bristles like glue.

Finished Dolphin
Finished Dolphin
It may require several paint applications to achieve the look you desire. Don’t worry about getting a perfectly smooth paint finish. The irregularities look like water rippling across his skin as he swims through the ocean.

Sea Turtle:

Inspiration
Swimming Sea Turtle
Sea turtles having fascinating patterns on their shells as well as their heads and flippers.

Raw Wood Sea Turtle
Raw Wood Turtle

Green Sea Turtle Supplies
Sea Turtle Paints
Supplies:
Wooden Turtle (3” high x 5-1/2” wide x 3/8” thick)
Acrylic Paint – cream
2) Bottles Dimensional Fabric Paint – brown, green
Paintbrushes

Sea Turtle Close Up Detail
Sea Turtle Detail
Sea Turtle – Step By Step Process: You will be working across the body, one color at a time, being careful not to smear the fresh paint as you go. Apply a thick coat of brown fabric paint over the entire body to create depth. Allow the piece to dry over night. Now apply a thick coat of green fabric paint upon the shell. As you squeeze the bottle, apply the paint using long spiral “strokes” starting at the shell perimeter and working toward the center. Repeat this process several times to achieve desired thickness and raised dome shell shape.

Finished Sea Turtle
Finished Sea Turtle
The final step is applying the detailed scales on the head and flippers, and the pattern on the turtle’s shell using acrylic paint and a fine paintbrush.

I hope you enjoy painting woodcrafts in your own unique style. It’s a lot of fun for the child in all of us and makes a great souvenir from your creative journey.

Thanks for reading & Happy Crafting!

The Beauty of Woodcrafting

Wooden Heart Pendants
Painted Wood Hearts
Woodcrafts are a fun and inexpensive way to express your creativity. From birdhouses to toys and home décor, there’s something for everyone and these projects are great activities to do with the kids. With a few craft supplies and a little inspiration, you’ll be ready to create your next masterpiece. Here are a few ideas to get you started:

Blue Floral Birdhouse
Floral Birdhouse
Birdhouses are very popular, easy to complete woodcrafts. A quick coat of paint and a few freehand leaves and flowers were all that was needed to complete this project. A realistic looking feathered bird perched in front of the entrance would be a cute addition to this indoor decoration. Crafter Tip: For outdoor use, choose a birdhouse with an access door for easy cleaning.

Accessorizing A Birdhouse
Gingerbread Birdhouse
This artist took woodcrafting to the next level by layering multiple wood decorations, upon a simple birdhouse frame, including a gingerbread man, festive white picket fence, signage, and a miniature birdhouse hanging from the roof. Enhancing a ready-made item adds personality, and unique design flare. Crafter Tip: It is helpful to keep sandpaper on hand. Most woodcrafts are ready to be painted or stained, but sometimes rough edges need a little attention before additional finishes can be applied.

Painted Carved Wood Birds
These colorful fellows have wire attached to their feet for easy attachment on branches, or stakes. Be sure to always use the appropriate type of paint (indoor versus outdoor) depending upon where you choose to display your creations.

Painted Wood Relief Plaque
Wood Relief Plaque
This three-dimensional plaque proudly adorns a two-tone raised panel on an exterior door. Similar plaques would be a great way for kids to express their personalities on their bedroom doors.

Purple & White Heart Wall Hanging
Purple & White Heart
Hearts are a favorite décor item. Instead of using the usual red or pink color scheme, this crafter chose a pretty purple and black floral scrapbooking paper with a touch of lace. Although they can’t be seen in this photo, be sure to paint the edges to match the background color prior to attaching the paper. Crafter Tip: As a more romantic alternative, the edges could be wrapped with coordinating ribbon or lace.

Toy Train
Toy Train
If you are looking for an absolutely effortless craft store project, you could purchase a few train cars, set it up at home and call it done. Natural wood grain is beautiful just the way it is. There’s really no need to do any painting, but if you feel you want to add just a little color, stickers from the scrapbooking department will work just fine. Crafter Tip: Or let your kids handle it and everyone wins.

Jeweled Box
Jeweled Box
To create this jeweled box, start by painting the exterior iridescent purple, which will peek through the beads. Apply large mirrored pieces first and establish mid-size purple beaded borders. Fill in the remainder with tiny seed beads. The inside could be lined with velvet or satin fabric. Crafter Tips: Use full strands of beads for borders to make the gluing process easier, and ensure they are glued firmly in place at the edges of the lid because they may loosen over time with wear and tear.

Welcome Sign & Lawn Decor
Welcome Sign
Part of your exterior décor may include “Welcome” signs, house number plaques, and humorous lawn ornaments such as garden gnomes and sheep. Large-scale seasonal items are also ready to paint, such as pumpkins and reindeer.

Personalized Wall Clock
Wall Clock
After staining this wall clock, a floral and checkerboard scrapbooking paper was applied along with self-stick black numbers. Craft stores carry kits, which include clock hands and the battery operated mechanism for the back. The unfinished clocks in several shapes and sizes are sold separately.

Floral Letters Wall Art
Letters have become popular wall art. Simply use your initials, or any words you like. In this photo, silk flower petals were glued on the top and sides of each letter. It’s super easy to do and ready to hang up. Crafter Tip: As alternatives, you could use mini pom poms, glass marbles, or self-stick gemstones.

Decorated “Home” Wall Art
A distressed paint finish in four different colors, a few sprigs of silk foliage, and a butterfly create a casual, welcoming message. Hanging an antique key enhances the warm feelings associated with “Home.” Crafter Tip: To achieve this distressed look, allow the paint to dry, and then use sand paper to “age” the letters.

Freestanding Inspirational Art
Wooden Owls
Whether you work in an office or from home, it never hurts to have a little inspiration to lift you spirits and bring a smile to your face. These cute little owls fit the bill, along with an empowering message too.

Wooden Serving Tray
Wooden Serving Tray
A plain wooden serving tray was spruced up with some spray paint, and lined with a bamboo placemat. If necessary, trim the bamboo to fit. The dark gray paint, which peeks through the wood slats, contrasts nicely with the light color bamboo. Crafter Tip: Pier 1 has a large variety of unusual placemats, which can be used for many crafting projects.

Please stay tuned for next week’s post featuring detailed instructions for painting woodcrafts.

Thanks for reading & Happy Crafting!

Celebrating 100th Post

100th Post
Today marks a very important milestone – my 100th post! It has been a wonderful experience, and I thank all my readers and followers for taking this journey with me. Below are photos and links to each category of arts and crafts covered to date. Please take a few minutes to peruse your favorites.

Baking & Candy Making

Beaded Jewelry & Gemstones

Color Theory
Color Theory

Floral & Home Decor
Floral & Home Decor

“How To” Projects
How-to Projects

Inspiration
Inspiration

Miscellaneous Crafts

Painting – Decorative Techniques
Decorative Painting

Seasons & Holidays
Seasons & Holidays

Wood Crafts
Wood Crafts

Please let me know, in the comments section, if you have any suggestions for future arts and crafts topics. I am looking forward to the next 100 posts. This achievement would not be possible without all of you! Thank you!!

Thanks for reading & Happy Crafting!

Spring Wreath Making 101

Snow Daffodil
Ah, the first blooms of spring! It’s that time of year again when Old Man Winter steps aside to make way for an abundance of beautiful flowers. Our thoughts turn to backyard barbecues and fabulous days in the sun. Spring is a popular time for cleaning the house and updating our décor. Making a new wreath for the front door is a nice way to celebrate the warmer weather.

Pink & Fuchsia Floral Spring Wreath
Pink Spring Floral Wreath

Periwinkle Blue Floral Spring Wreath
Blue Floral Wreath

Pink & Blue Floral Spring Wreath
Pink Blue Wreath

Pink Berries Wreath
Pink Berry Wreath

Orange & Yellow Floral Wreath
Orange & Yellow Wreath

How To Make A Multi-Color Butterfly Spring Wreath:
Detail Butterfly Wreath
Butterflies are a hot trend this year, and you can easily incorporate their brilliant colors in many ways around your home on tablecloths, napkins, pillows, and floral arrangements. This wreath was not only fun and easy to make, but it was also inexpensive. Similar ready made wreaths sell for $60, and even when there is a sale or discount coupon, it can still cost $24 to $30. The project described below cost approximately $12, and it’s just as pretty as the more expensive versions.

Supplies:
Grapevine Wreath, 18” diameter
Floral Butterfly Garland, 6’ long
Scissors
Brown Twine

Grapevine Wreath
Grapevine Wreath

Choosing a base is the first step in wreath making. There are multiple options, including wreaths made from foam, standard or wispy grapevines, metal wire, and straw.

Butterfly Floral Garland – (sample)
Butterfly Floral Garland
In terms of ornamentation, you can use flowers, berries, seashells, or leaves. A flower garland with attached butterflies makes this project quick and easy to assemble.

Detail of Tying Garland
Detail Tying Garland
This garland has large plastic chain links. Choose a starting point on the front and tie the garland to the grapevine, arranging the flowers and hiding the ties with leaves as you go. Repeat this process until the entire grapevine base is covered. Stand back to look at the wreath, and then make any adjustments by shifting the garland and adding ties.

Back of the Wreath
Back of Wreath
As you can see from the above photo, only the ties are visible from the back, while all the flowers have been placed on the front of the wreath. This makes the most of your garland by creating thick layers of flowers where they will be most appreciated.

Finished Butterfly Spring Wreath
Finished Butterfly Wreath
A piece of twine or ribbon can be used to hang this wreath on the door. Compliments are sure to follow.

Tip: You could use a glue gun, in lieu of twine, but I would advise against it. Glue can be messy and stringy, which can create havoc with the vines. By using twine, there’s no mess, it is easily adjustable, and best of all, if you decide want to make something new, simply cut the ties, remove the garland and reuse the grapevine wreath. You could also reuse the garland for another project.

Even on a cloudy day, this finished wreath is a colorful way to welcome spring with pretty blooms and butterflies.

Welcome Spring & Happy Crafting!

Countdown – Top Six Posts of 2019

Clock
Where does the time go? There’s always another post to be written, another project to develop, and another inspiration to explore. I thought it would be interesting to take a look at the 2019 Top Six posts, in ascending order, based upon Likes. Without further ado, here are your favorites:

Number 6: Daily Dose of Color
Beautiful Sunset
Color plays an integral role in our daily lives. It affects our moods, decisions and actions. Let’s take a look at our activities on a typical day to observe how influential color can be. To read more, please click here.

Number 5: Walk on the Wild Side
Stegosaurus
We love dinosaurs. Want proof? Look at all the books, movies, television shows, and merchandise. At some point, every kid draws and colors his or her favorite dinosaur. Here’s your chance to feel like a kid again. Grab some paints and brushes and let’s go! To read more, please click here.

Number 4: The Beauty of Yarn Crafts
Yarn Crafts
Yarn has come a long way over the years, from single color wool skeins to multicolored, textured fibers, made from manmade and natural sources, suitable for clothing, home décor and accessories. Let’s look at a few of the types of crafts made with yarn. To read more, please click here.

Number 3: Baking for the Holidays
Holiday Baking
Santa Claus isn’t the only one hoping for some holiday goodies. We all love dessert. If you get a head start on your baking, you’ll have plenty to share with your family and friends throughout the long holiday season. Baked goods make great gifts too. To read more, please click here.

Number 2: Birds of a Feather
Flamingo
For some reason, I often find myself drawn to the wood crafts aisle at my local hobby store. Maybe it’s the quick reward for very little effort at an inexpensive cost. Who doesn’t enjoy a little instant gratification? There’s always something new to discover. Learn how to make this adorable flamingo. He may not take flight, but the bright colors and cheerful expression are sure to make you smile. To read more, please click here.

Number 1: Creative Stress Relief
Computer Stress
With such fast-paced lives, we all need a break from our daily stresses. These demands have physical, mental, emotional and spiritual effects. The best solution is a vacation, but that may not be possible. Instead, indulge in a hobby or two to take your mind and body to a happy place. Every day you do things for everyone else. It’s time to put yourself first! You’ll be so glad you did, and you’ll have a lot of fun while doing it. To read more, please click here.

Word Press Blogging
Upcoming posts will include new projects and crafting inspirations. I’ll be sure to include additional articles based upon the above interests, as voted by you, the readers. Your opinions are greatly appreciated, and I look forward to so much more this year. If you have any suggestions for future posts, please let me know? Thanks for reading!

All the best in 2020 and Happy Crafting!

How to Make a Painted Wooden Snowman

Snowman Closeup Photo

The solstice officially marked the start of winter. The long range forecast here in the northeastern U.S. calls for cold temperatures, but less snow. That could be a problem for those outdoor-enthusiasts, who love cross-country skiing, ice skating or simply building a snow fort in the backyard. It wouldn’t be winter without a snowman or two. Why not build a snowman that will never melt? This is a simple, inexpensive project for the whole family. I made two snowmen to display in my living room windows.

Unfinished Wood
It all starts with unfinished wood snowmen, purchased at AC Moore.  The perimeter holes are for lights in a later step.

Snowmen Painted White
Spray paint all sides, edges and base with white paint.

Painted Details
With an artist’s paintbrush, add the details (buttons, eyes, and a smile) with black paint.  Instead of painting the details, you could hot glue round and square plastic buttons, and draw the smile with a Sharpie marker.

Hats Scarves & Carrots
Accessorize with hats and scarves. If you enjoy crocheting, you can quickly create this fashionable look with whatever color yarn you have on hand. Bright red is a great seasonal color, and reads well from a distance. If needlework is not your thing, craft stores have snowman building kits and accessories. For the nose, I created the look of a carrot by squeezing a foam, packing peanut into the correct shape, and painting it with bright orange acrylic paint.  Use hot glue to attach carrot nose.

Stick Arms
Making the arms is as easy as collecting a few sticks from your yard, and attaching them to the sides. You could glue them in place. I decided to use self-stick Velcro instead, because I wanted the arms to be removable for easy storage.

White Lights
Those pre-drilled holes around the perimeter were made to hold a strand of twenty white lights, also available at AC Moore. Crafter Tip: The lights can only be pushed through from one side of the wood frame. You may need to secure the last light at the bottom with a piece of tape to keep it from pulling out from the weight of the electrical cord.

Lights at night
I turned off the flash on my camera to give you an idea of how these cute little snowmen look when lit at night. When the holidays are over, these snowmen can remain on display throughout the winter to bring a little whimsy to your home’s decor. The lights are very bright, and can be easily seen by passersby.

As an additional aside, I made these snowmen two-sided. Because they are standing on a windowsill, they can be seen from inside and outside. The lights can only be seen from the front, but seeing that smiling face when I walk by the window makes me smile too.

Happy Crafting!

Pumpkin – Baking with Seasonal Flavor

Pumpkins
After Halloween has come and gone, you might be wondering what to do with all those leftover pumpkins. Whether you prefer fresh or canned pumpkin, there are plenty of delicious ways to enjoy this seasonal favorite. There’s nothing like the mouth-watering aromas of homemade cookies and pastries, straight from the oven. It may be a cold fall and winter, but you can warm hearts and bellies with a lot of love and a few easy recipes.

Iced Pumpkin Donuts
Iced Donuts
To save you time and ensure success, the baking section of your local craft store has a large selection of pans, including bundt cake, cupcakes, muffins, jelly roll, etc. One of the more unusual pans is for baking donuts. Since no deep fryer is required, anyone can bake donuts at home, and the same pan can be used to make bagels too.

Pumpkin Bundt Cake with Vanilla Frosting
Bundt Cake
A fluted pan is the secret to the bundt cake. This photo shows the standard version of a bundt cake with icing drizzled over the top. If you really want to impress your guests, prepare an unexpected surprise by adding filling. To do this, pour half the batter into the pan. Spread the filling around the pan, ensuring it does not touch the inner or outer edges of the pan. Pour the remaining batter on top and bake. When the cake is sliced, the unusual profile of the slice will be enhanced by a colorful creamy center.

Homemade Pumpkin Bread
Pumpkin Bread
Pumpkin bread needs to cool before slicing. By refrigerating the loaf, the bread becomes moist like a cake. Toasted pumpkin bread is delicious with melted peanut butter. Metal pans are fine, but for baking bread I prefer a ceramic loaf pan. I don’t know about you, but the sound of metal scraping makes my skin crawl. Ceramic cleans up easier too.

Spiced Pumpkin Roll with Orange Cream Cheese Icing
Pumpkin Roll
A spiral design is the hallmark of this impressive dessert, but it’s easy to make, and will melt in your mouth. Bake the cake in a jellyroll pan lined with parchment paper. After baking, lay the cake face down on a towel. If necessary, trim any ragged edges. Starting with a long side, roll the cake in the towel and cool completely on a wire rack. Unroll and remove the towel, and lay cake flat. Spread the filling over the top within 1/2” of the edges. Suggested fillings include whipped cream, pie filling, and pudding. Carefully roll the cake and place it with the seam side down on a platter. Garnish as desired.

Pumpkin Muffins
Pumpkin Muffins
Pumpkin muffins are delicious as is, or shake a little powdered sugar over the top. Sometimes the simplest version is the best.

Pumpkin Cheesecake with Whipped Cream & Graham Cracker Crust
Pumpkin Cheesecake
Cheesecake is a dessert menu staple. The only bad thing about pumpkin cheesecake is that it’s only available from October through January, or February if you’re lucky. Beyond that you’ll have to wait until the next pumpkin season.

Walnut Pumpkin Pie with Whipped Cream
Walnut Pumpkin Pie
A pastry bag and fresh whipped cream will dress up any baked goods, but it’s just as easy to use a can of whipped cream. For best results, practice a few floral shapes first before tackling the final product.

Traditional Pumpkin Pie with Homemade Crust
Pumpkin Pie
Pumpkin pie typically has a delicious flaky crust. This baker created a pretty undulating pattern with the crust and garnished the top with a leaf cut from the same pastry crust. There are some really cool baking tools, such as fluted piecrust cutters for edging, and spring-loaded piecrust cutters to create cutouts or appliqués, like the leaf shown in the photo above.

Chocolate Drizzled Pumpkin Pie with Chocolate Crust
Pumpkin Tart
This contemporary pumpkin pie has a chocolate graham cracker bottom crust, and a pumpkin cream cheese filling. For a no-bake version, buy a ready-to-use crust.

Savory Pumpkin Soup
Pumpkin Soup
Like butternut squash, pumpkin soup gets its savory flavor from rich heavy cream and just the right amount of seasoning from ginger, cinnamon, onion and celery.

Pumpkin Pancakes
Pumpkin Pancakes
Do you love pancakes but are bored with the same old taste? Boost the flavor and your taste buds by adding 1/2 cup of canned pumpkin for every 2 cups of batter.

Homemade Pumpkin Pudding
Pumpkin Pudding
Deep-dish pumpkin pudding tastes delicious while still warm from the oven, or chilled and served with fresh whipped cream. If you’ve never had it, the top and edges have a cake-like texture, but the rest is creamy pudding with that awesome pumpkin flavor. If your favorite part of a pumpkin pie is the filling, this pudding will be your new go-to dessert.

Baking is a fun and rewarding activity to be shared with the whole family. Enjoy the process and remember you can always eat your mistakes.

Happy Crafting!

Glowing Eyes in the Darkness: Jack-O-Lanterns

Spooky Pumpkin
It just wouldn’t be Halloween without a few carved pumpkins, also known as Jack-O-Lanterns. Patterns are readily available online, or you can flex your creative muscles by coming up with your own designs. What does your pumpkin say about you? Here are a few ideas to get you started.

Carved Pumpkins
From the goofy to the spooky, there’s something for everyone.

Pumpkin Trio
There are numerous options for lighting your pumpkins: Lit candles flicker in the breeze. LEDs produce high intensity and sometimes color-changing light. Glow sticks give off softer, otherworldly light. Spotlights and flashlights light up the face while also creating some eerie dark shadows inside the pumpkin.

Awestruck Pumpkin
Even pumpkins have moments of surprise and awe. I wonder what he sees?

Monster Pumpkin
Little details make all the difference. This carved pumpkin owes its devilishly good looks to the absence of a nose. That one little detail, plus the intensity of the light within, gives him a more ghoulish appeal.

Jaws Pumpkin
This one brings a whole new meaning to the name “Jaws.” After carving the teeth, the orange skin around the perimeter of the mouth was removed to reveal the white flesh beneath. If that seems like too much work, you could use a white Sharpie marker to define the mouth.

Jack Skelleton Pumpkin
Nightmare Before Christmas is a very popular Halloween movie and decorating theme, and this pumpkin doesn’t disappoint. A little dry ice, or a fog machine takes the spooky vibe to a whole new level.

Cat & Spider Pumpkin
Cat lovers will appreciate this creative design. Black cats and spiders are staples in Halloween décor.

Scary Pumpkin
This frightening character has menacing eyes surrounded by flames above and below.

Scary Ghost Pumpkin
This ghoulish ghost is another Tim Burton inspired design from his nightmare movie.

Pumpkin Happy Hour
It’s Happy Hour for Jack-O-Lanterns only! Honestly, if I saw a gathering like this in my backyard, I would probably run away! It looks like a scene from a Steven King movie.

Pumpkin carving isn’t for everyone. There’s also nothing wrong with displaying your pumpkins “as is” with the added bonus of being able to keep them on display for Thanksgiving too.

Painted Pumpkins
If you like to paint, you could paint designs on real or artificial pumpkins. These decorated pumpkins can be accomplished with a few Sharpie markers, and they will last longer than the carved variety.

Lamppost Pumpkins
Another great option is painting a wooden plaque like the one shown above. It can be used for years and is very inexpensive to make. Over time, the sun, wind and weather can take their toll. Whether you are painting a brand new pumpkin, or giving a makeover to an existing one, the steps are the same.

How to Paint and /or Repaint a Wooden Outdoor Halloween Decoration:

Supplies:
Wooden Pumpkin Decoration (30” high x 22” wide x 1/2” thick)
Orange Outdoor Spray Paint – OR – Orange Outdoor Acrylic Paint (See Step 2)
Outdoor Acrylic Paint – black, green & brown
Paintbrush
Sandpaper
Black Sharpie Marker

Faded Original Pumpkins
Step 1 – First you will need to clean off the dirt and debris, and lightly sand the surface and edges in preparation for paint.

Orange Spray Paint
Step 2 – You have two painting options here: Spray Painting versus Brush on Painting.
For Spray Painting: Apply multiple coats of orange outdoor spray paint. To be honest, I’m not a fan of spray paint due to the toxic fumes.  I also was not satisfied with the paint coverage. I’m not sure why, but the consistency was very thin like water.

Three Coats Acrylic
For Brush on Painting: – Apply 3 coats of orange outdoor acrylic paint with a brush. Be sure to coat all the edges and the back of the plaque as well to protect and seal the wood from water damage.

Green & Brown Details
Step 3 – Add details such as stems, leaves, and the surrounding ground at the edges. You may want to outline the details first with a Sharpie marker.

Black Lines
Step 4 – Draw the faces and add curved lines to give the pumpkins a three-dimensional effect. Outline the leaves and stems in black to make them stand out better.

Black Paint
Step 5 – Fill in the faces with black paint.

Before & After Pumpkins
After spending a day at the spa, these pumpkins have been renewed, rejuvenated, and are ready to greet your guests at the door. The choice of pumpkins is up to you. Whether you decide to use real, artificial, or any other material, the enjoyment and celebration of the holiday will always come through in festive style.

Happy Halloween & Happy Crafting!