Feathered Bird Mask

Black & White Feather Mask

A mask is the perfect accessory to complement any Halloween costume. Feathers have gorgeous colors and patterns and are easy to work with, making them a great choice for mask making projects.

Humorous Bird Mask

Humorous Bird Mask

Masks not only coordinate with costumes, but can also express personality, subtle sophistication, and even humorous characteristics.

Unintentionally Humorous Bird

Oops Bird Mask

The colors and patterns in this mask are bold and confident, but there’s a problem…birds don’t have feathers on their beaks. To correct it, remove the beak feathers and simply paint it flat black, which will return the focus to the beautifully accented eyes.

How to Make a Feathered Bird Mask:

Assorted Supplies

Supplies

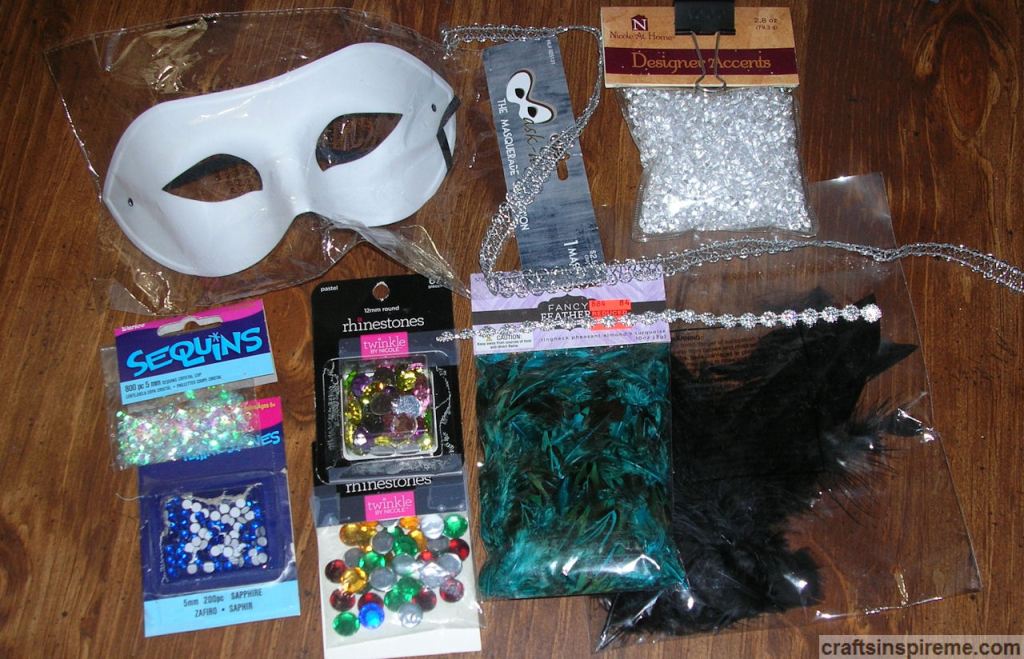
Crafts stores sell several mask styles, such as half masks, full face masks, and some with sculpted scroll or fleur-de-lis details. Decorations include feathers, rhinestones, sequins, faux diamonds, and fancy beaded or woven trims.

Paint Mask Black

Paint Mask Black

This half mask is made of plastic. Because spray paint can produce strong odors, I chose to hand paint it with acrylic paint to make this more comfortable to wear. Depending upon the mask material, it may require two coats of black paint.

Add Faux Faceted Diamonds

Faux Diamonds

Glue individual diamonds, flat side down, around the eye openings, ensuring the gems will not impede vision.

Begin Layering Black Feathers

Black Feathers

I started under the center point of the eye openings and worked my way around to the top, following the contours of the mask.

Create a Feathered Crown

Layer Black Feathers

Layer additional black feathers creating a beautiful crown, which extends above the top edge of the mask.

Layer Turquoise Feathers

Turquoise Feathers

Turquoise & brown tipped feathers are added, starting at the edge of the nose and continuing around the eye as shown. Repeat for the other side.

Completed Mask

Completed Mask Front

Add turquoise accent feathers on the top to contrast with the black. You may need to touch up the black paint due to scratches or nicks from handling. This completes the mask and it is ready to wear.

Completed Mask – Left Side View

Completed Mask Left Side

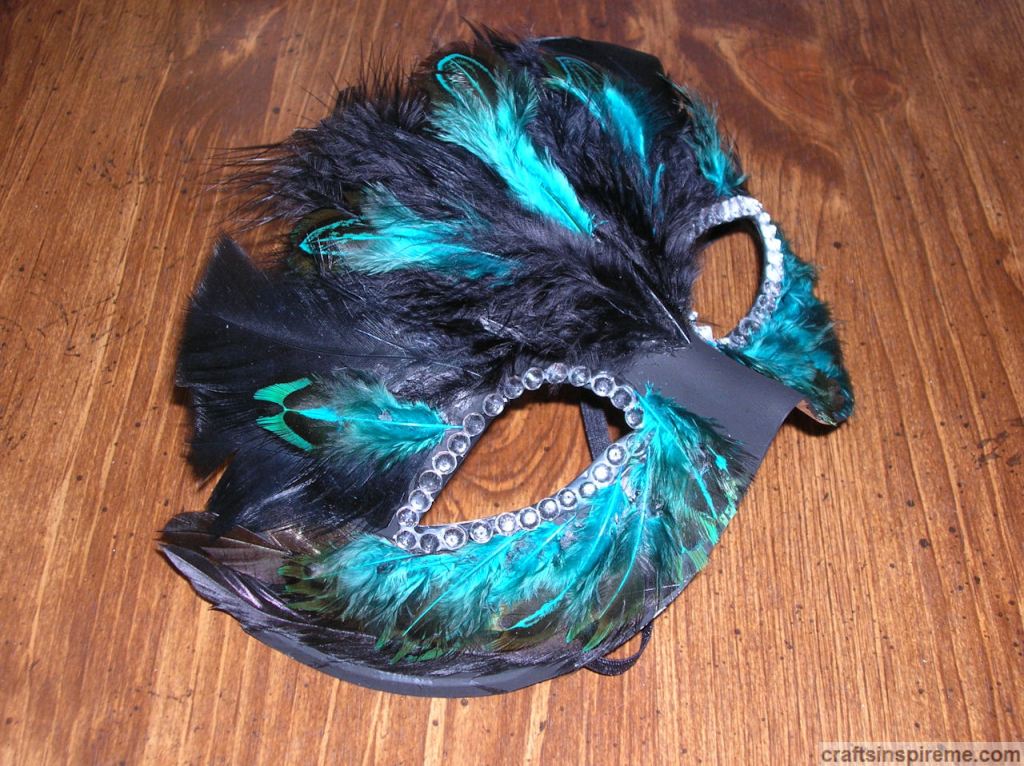
Because each feather is unique, there will be variations, but this will not detract from the design. I chose to create a balanced design, but masks can also be asymmetrical.

Completed Mask – Right Side View

Completed Mask Right Side

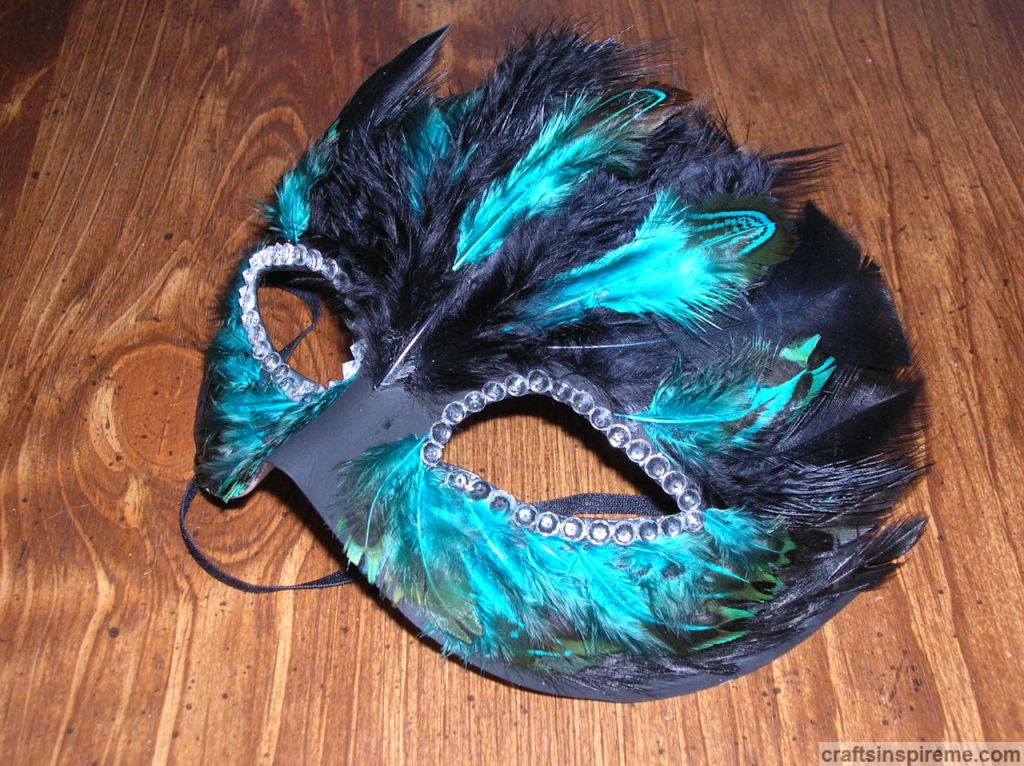
Completed Mask – Top View

Completed Mask Top

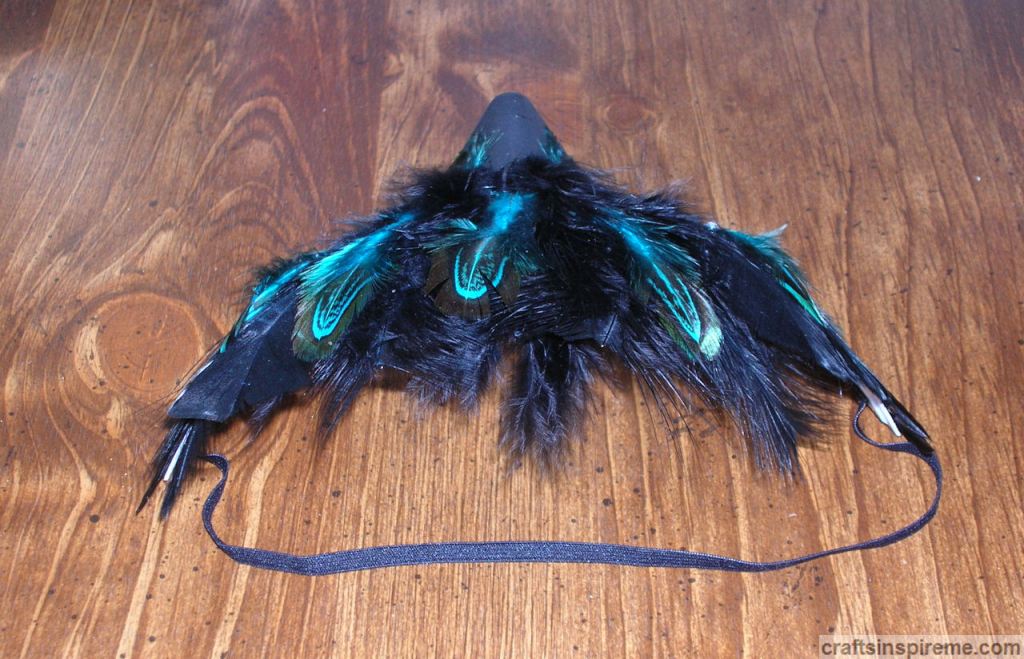
Raven/Parrot Costume

Raven Wings Costume

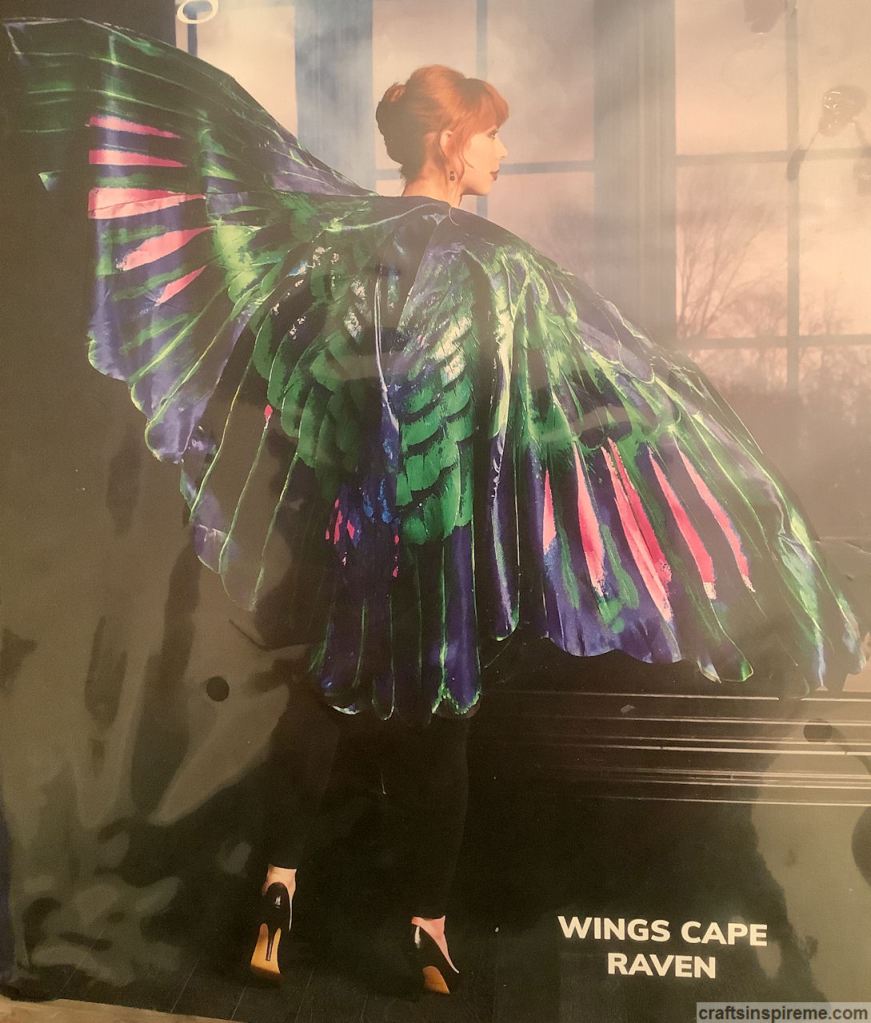
I made this mask for my mom to wear to a Halloween costume party. I had already purchased this cape, which resembles bird wings, from Grandinroad. She wanted an easy-to-wear costume. All she had to do was wear a black top and slacks, pull on the cape and complete the look with the feathered mask.

I hope you enjoyed this project. It’s easy and fun. Have you ever made a mask? Please let me know in the comments.

Thanks for Reading. Happy Halloween & Happy Crafting!

Halloween: Grins, Chills or Screams? Part 4

Witch Mixing Potions

When I was writing the first three posts in this series, I found myself constantly flipping back and forth between each of the Halloween themes within the Kid Friendly, Creepy and Nightmares levels. I thought you might like to see a side-by-side comparison. The results below are astonishing.

Halloween Themes:
Kid Friendly                                        Creepy                                     Nightmares

Jack-O-Lanterns

Pumpkins

Black Cats

Black Cats

Mummies

Mummies

Spiders

Spiders

Ghosts

Ghosts

Clowns

Clowns

Scarecrows

Scarecrows

Monsters

Monsters

Witches

Witches

Haunted House

Haunted Houses

Pumpkin Patch

Pumpkin Patches

Skeletons

Skeletons

Graveyards

Graveyards

Werewolves

Werewolves

Bats

Bats

Day of the Dead

Day of the Dead

Vampires

Vampires

As you can see, Kid Friendly characters are cute, almost cuddly. Creepy ones make you feel uneasy, wondering what it might do. However, if you encounter a Nightmare character along a lonely road at night, don’t waste time wondering… Run away!

This is the last post in the Halloween Grins, Chills & Screams series. In case you missed the first three parts, please be sure to read part 1 Kid Friendly, part 2 Creepy, and part 3 Nightmares for more inspiring ideas. I hope you enjoyed it. Please let me know your favorites in the comments.

Thanks for Reading. Happy Halloween & Happy Crafting!

Halloween: Grins, Chills or Screams? Part 3

Nightmares Midnight Rider

When decorating for Halloween, there are two decisions to be made:

1. Choose a Theme.  2. Choose a Fear Factor.

What is the fear factor? Think of it as how much you want to frighten people, based upon a 3-level scale. Level 3 is Nightmares. Halloween themes at this level provide good old-fashioned scares like when someone sneaks up behind you and yells Boo. You jump and maybe scream in shock…and then you tell them they’re grounded for life. (lol) Let’s see how the desired emotional reactions affect our choices in Halloween décor.

Nightmare Themes:

Jack-O-Lanterns

Nightmares Pumpkin

Black Cats

Nightmares Black Panther

Mummies

Nightmares Mummy

Spiders

Nightmares Spider

Ghosts

Nightmares Ghost

Clowns

Nightmares Clown

Scarecrows

Nightmares Scarecrow

Monsters

Nightmares Monster

Witches

Nightmares Witch

Haunted House

Nightmares Haunted House

Pumpkin Patch

Nightmares Pumpkin Patch

Skeletons

Nightmares Skeleton

Graveyard & Zombie

Nightmares Graveyard

Werewolves

Nightmares Werewolf

Bats

Nightmares Bat

Day of the Dead

Nightmares Day of Dead

Vampires

Nightmares Vampire

Haunted Corn Maze

Nightmares Haunted Maze

Haunted Village

Nightmares Haunted Village

Haunted Bog

Nightmares Haunted Bog

Onion Monster

Nightmares Onion Monster

Insects

Nightmares Insect

Headless Horseman

Nightmares Headless Horseman

Vampires & Werewolves (Extra Credit for Living Chess Pieces. lol)

Nightmares Vampire & Werewolves

Gremlins

Nightmares Gremlin

Nightmare Themed Foods:

Beverages

Nightmares Hot Beverage

Cakes

Nightmares Cake

Desserts

Nightmares Desserts

Pastries

Nightmares Breakfast Pastries

Let’s Toast to Halloween

Nightmares Skeleton at Bar

Halloween Nightmares themes explore the unknown and isn’t that mankind’s biggest fear? Being more complex, these characters appear out of the darkness via motion (costumed actors or animatronics), light, sound and fog, triggering screams or bad dreams for days to come.

Stay tuned for the fourth and final post in this series for a frightfully fun side-by-side comparison of Halloween themes. In case you missed the first two parts, please be sure to read part 1 Kid Friendly and part 2 Creepy for more inspiring ideas. Please let me know your favorites in the comments.

Thanks for Reading. Happy Halloween & Happy Crafting!

Halloween: Grins, Chills or Screams? Part 2

Black Cat & Haunted House

When decorating for Halloween, there are two decisions to be made:

1. Choose a Theme.  2. Choose a Fear Factor.

What is the fear factor? Think of it as how much you want to frighten people, based upon a 3-level scale. Level 2 is Creepy.  Halloween themes at this level are eerie and unsettling, resulting in spine-tingling chills & goosebumps. Let’s see how the desired emotional reactions affect our choices in Halloween décor.

Creepy Themes:

Jack-O-Lanterns

Creepy Pumpkins & Spiders

Black Cats

Creepy Black Cat

Mummies

Creepy Mummy

Spiders

Creepy Spider

Ghosts

Creepy Ghost

Clowns

Creepy Clown

Scarecrows

Creepy Scarecrow

Monsters

Creepy Pumpkin Monster

Witches

Creepy Witch

Haunted House

Creepy Haunted House

Pumpkin Patch

Creepy Pumpkin Patch

Skeletons

Creepy Skeleton

Graveyard

Creepy Graveyard

Werewolves

Creepy Werewolves

Bats

Creepy Bat

Day of the Dead (Extra credit for being fashionably frightening. lol)

Creepy Day of Dead

Vampires (Looks like Tom Cruise in Interview with a Vampire)

Creepy Vampire

Twisted Fairy Tales

Creepy Twisted Cinderella

Dolls (Reminds me of the little girls in Stephen King’s The Shining)

Creepy Doll Head Vase

Creepy Themed Foods:

Beverages

Creepy Coffee Art

Cakes

Creepy Wedding Cake

Candy

Creepy Candy

Serving Dishes

Creepy Food Display

Guests, craving the thrills of amusement parks, will appreciate the chilling surprises discovered around every corner with these Halloween Creepy themes. Please let me know your favorites in the comments.

Stay tuned for the third and fourth posts in this series for ideas on Halloween Nightmares themes and a comparison of all three. In case you missed it, please be sure to read part 1 for Kid Friendly inspiration.

Thanks for Reading. Happy Halloween & Happy Crafting!

Halloween: Grins, Chills or Screams? Part 1

Kid Friendly Witch & Full Moon

When decorating for Halloween, there are two decisions to be made:

1. Choose a Theme.  2. Choose a Fear Factor.

What is the fear factor? Think of it as how much you want to frighten people, based upon a 3-level scale. Level 1 is Kid Friendly. Halloween themes at this level are cute or funny, resulting in widespread grins. In this four-part series, let’s see how the desired emotional reactions affect our choices in Halloween décor.

Kid Friendly Themes:

Jack-O-Lanterns

Kid Friendly Pumpkin Witch

Black Cats

Kid Friendly Black Cat

Mummies

Kid Friendly Mummy

Spiders

Kid Friendly Spiders

Ghosts

Kid Friendly Ghost

Clowns

Kid Friendly Clown

Scarecrows

Kid Friendly Scarecrow

Monsters

Kid Friendly Monster Boo

Witches

Kid Friendly Witch

Haunted House

Kid Friendly Haunted House

Pumpkin Patch

Kid Friendly Pumpkin Patch

Skeletons

Kid Friendly Skeletons

Graveyard

Kid Friendly Graveyard

Werewolves

Kid Friendly Werewolf

Bats

Kid Friendly Bat

Day of the Dead

Kid Friendly Day of Dead

Vampires

Kid Friendly Vampire

Kid Friendly Themed Foods:

Candy/White Chocolate Marshmallows

Kid Friendly Dessert

Cupcakes

Kid Friendly Cupcakes

Cakes

Kid Friendly Cake

Cookies

Kid Friendly Cookies

Donuts

Kid Friendly Donuts

Guests of all ages will appreciate the playful, festive atmosphere created by these Kid Friendly decorations. Stay tuned for the next three posts in this series, exploring Creepy themes, Nightmare themes, and a comparison of all three. Please let me know your favorite Halloween themes and if you prefer amusing or frightening decor.

Thanks for Reading. Happy Halloween & Happy Crafting!

The Beauty of Feathers

Mayan Feather Snake

Feathers have been used for centuries as personal adornments, ceremonial costumes, wall art, and as the inspiration for freestanding sculptures and architectural reliefs. The photo above is a modern-day interpretation of the ancient Mayan & Aztec feathered serpent gods.

Woodland Feather

Light as a feather, each one is a fanciful treasure found.

Parrot Feathers

The finest feathers provide bold colors in unique patterns and soft textures.

Peacock Feather

Peacock feathers are highly sought for their fascinating colors, shapes and natural sheen. Peacock patterns are often used in clothing, home furnishings and finishes. Let’s explore some of the artistic possibilities for these delicate natural wonders…

Costumes

Carnival Costume

Dolls

Dolls

Dreamcatchers

Feathered Dreamcatcher

Easter/Spring Décor

Easter & Spring Decor

Digital Art

Digital Fantasy Feather

Quill Pen

Quill Pen

Fantasy Portraiture

Fantasy Portrait

Feather Boas

Feather Boas

Jewelry

Feather Earrings

Mobile

Feather Mobile

Photography

Feather Photography

Wall Art

Feather & Sea Shell Wall Art

Feather Wreath

Feather Wreath

Feathered Hats

Feathered Hat

Feathered Hair Accessories

Feathered Headband

Flower Arrangements

Feathers & Flowers

Cultural/Religious Ceremonies

Aztec Ceremony

Feathered Masks

Venetian Mask

As you can see, there are many ways to incorporate feathers in your life. I hope these ideas inspire you to give it a try. Please let me know your favorites in the comments.

Thanks for Reading & Happy Crafting!

Beach Bear Rita has a Sister

Twins

Those of you who follow this blog are familiar with a recent crochet project called Beach Bear Rita. Well, guess what? Rita now has a twin sister! Wouldn’t it be nice to simply use a crochet needle to bring a new sibling into your life? And here she is…

Rita II Preview

She’s feistier than the original and loves red, making her the center of attention wherever she goes. Please check out the photos below to see how this little lady came together.

In Progress: Body with Swimsuit, Arms, Head, Ears & Skirt

Rita II Body& Skirt Progress

Rita II has a red and white swimsuit with matching bracelets. The white skirt will have a red scalloped edge in a later step.

In Progress: Cardinal Inner Tube, Fish & Pail

Rita II Fish Pail & Cardinal

The fish needs a white dot in the eyes and the cardinal inner tube needs to be assembled.

In Progress: Completed Body, Swimsuit & Inner Tube but Needs a Hairdo

Rita II Before Hairdo

Rita II is close to completion. The arms, ears and head have been sewn on as well as the facial details. The swimsuit has red scalloped edges at the top and bottom. Red earrings and a red tie for the swimsuit have been added. The skirt and inner tube may need to be tacked in place. The next decision is what type of hairdo would she like?

A New Up Hairdo

Rita II New Hairdo

She may be a twin, but she has her own style, and an up-do seems to be a perfect choice. Bobby pins hold the style in place, while a vintage crystal bee pin tucked beside her ear provides the sparkle every fashionista craves.

Crocheted Bracelets & Scalloped Edge on Swimsuit Top

Rita II Upper Body

Cardinal Inner Tube

Rita II Midsection

Unlike her sister, Rita II likes cardinals. You can easily adjust the pattern to resemble any bird.

Side View

Rita II Left Side View

Back View

Rita II Back View

Finished Bear with Fish in Pail

Rita II Finished Bear & Fish Pail

Beach Bear Rita Twin Sisters

Beach Bear Twin Sisters

Just like their human counterparts, these two may have their differences, but they will forever be sisters!

I hope you like this adorable, crocheted bear. For additional information, please see my first post by clicking this link: “Beach Bear Rita.” The pattern can be easily found online. These bears make great gifts, which can be personalized for each recipient and they’re a lot of fun to make. Good luck with your future craft projects.

Thanks for Reading & Happy Crafting!

The Art of Quilling

Paper Strips

Quilling is a craft utilizing colorful precut strips of paper. After the paper has been rolled using a special slotted tool, the coils are shaped using your fingers to create teardrops, squares, diamonds, etc. and then glued into interesting compositions. Below are a few ideas to inspire your creativity…

Party Décor

Floral Hearts

Handmade Envelope – (Quilled card shown below)

Gift Envelope

Greeting Card

Greeting Card

Edible Quilling

Quilling Cake

Ceramic Easter Eggs

Easter Eggs

Collector’s Egg

Collectors Egg

Intricate Quilling Design Detail

Quilling Details

Portraiture – (Quilling & Illustration)

Portrait of Two Women

Wall Art

Stag

Freestanding Sculpture – (Requires substrate for support)

Horse

Tropical Wall Art – (Quilling & Illustration)

Tropical Portrait

Fantasy Wall Art

Solar System

Springtime Garden Wall Art

Garden

I hope you enjoyed seeing these beautiful examples of quilling and will consider giving it a try. Kits are available with all the supplies you need. Please let me know your favorites in the comments.

Thanks for Reading & Happy Crafting!

Hobbies for Everyone

Musician & Photographer

If you are searching for a new hobby, then this is the post for you. Because there are too many hobbies to fit into one post, arts and crafts can be found in my 3-part series entitled, “Creative Stress Relief.”

Surfer & Horse Rider

Sports, for the faint of heart as well as daredevils, can be easily found online.

Below is an eclectic list of hobbies to pique your interest:

Antiquing: furniture, home furnishings, jewelry

Antiquing

Aromatherapy: perfumes, body washes, sachets, scent sticks

Aromatherapy

Baking: cakes, cupcakes, cookies, pies

Baking

Board Games: monopoly, scabble, chess, checkers

Board Games

Collecting: sea glass, seashells

Collections Sea Glass & Shells

Collecting: stamps, movie memorabilia

Collections Stamps

Competitions: Christmas Tree Decorating

Competitions Christmas Tree

Competitions: Cosplay, Comic-Con, Anime

Competitions Cosplay

Competitions: Pumpkin Carving

Competitions Pumpkin Carving

Competitions: Scarecrow Making

Competitions Scarecrows

Craft Beer Making

Craft Beer Making

Dollhouse Building: design, construction, furnishing

Dollhouse Building

Food Preserves: fruits, vegetables, jams

Fruit Preserves

Haunted Corn Maze

Haunted Corn Maze

Historical Re-enactments: Renaissance fairs, famous battles

Historical Re-Enactments Renaissance

Kite Building

Kite Building

Model Airplane Building

Model Building Airplanes

Lego Building

Model Building Legos

Model Trains

Model Trains

Puzzles: Jigsaw, Crossword, Seek & Find

Jigsaw Puzzle Ball

Reading

Reading

Stargazing

Stargazing

Video Gaming

Video Gaming

Wine Making

Wine Making

As you can see, there is something for everyone. What starts as a hobby often blossoms into a new career. I hope you are inspired to try something new. Please let me know your favorite hobbies in the comments.

Thanks for Reading & Happy Crafting!

Tropical Splendor

Tropical Inspiration
Ah the tropics! I’m sure we all wish we could be basking in the sun on a tropical island -sand under your feet, a soft ocean breeze, and a cool fruity drink within reach. Our travel plans may be on hold for now, but we can dream. A tropical project may be just what we need to brighten the day and lift our spirits.

Inspiration
Tropical Inspiration
The thick vegetation and unusual wildlife is a constant reminder that this is a whole new world, and we are invited to come inside to explore.

Inspiration
Close-up Tropical Leaf
There’s an infinite variety of foliage and tropical leaves provide many interesting shapes, intricate patterns and vibrant colors.

Original Metal Leaf Wall Sconces
In this project we will be refinishing these metal, leaf-shaped wall sconces. Purchased from an online home furnishing store, it was a great disappointment to open the box and discover their color schemes were completely mismatched. Because we liked the size and shape of these leaves, we decided to keep them anyway, with hopes of one day fixing the problem. That day is today!

Supplies
Paints
Supplies:
Metal Leaf Wall Sconces (18” high x 11-1/2” wide x 6-1/2” thick)
Acrylic Paint – medium green, dark green, yellow, and brilliant blue
Paintbrushes
Clear Spray Paint – gloss or matte finish

Paint the Base Coat
Leaves Painted Green
Step 1 – Paint each leaf medium green. They look better already. As you progress, remember this is your chance to experiment with colors as well as painting techniques. If you don’t like something, you can easily paint over it with another base coat and try again.

Choose your Color Scheme
Blue Wash vs. Blue Stippling
Step 2 –On the left, a blue wash was applied over the surface, using very watered down blue paint. The right leaf has a blue stippled pattern, made by applying blue paint with short brushstrokes. I like the light and shadow effect of the wash technique on the left, which provides depth and richness in the color, while also helping to define the leaf’s structure. The texture on the right leaf is interesting, but visually breaks up the surface, making it appear to be clustered leaves as opposed to one large leaf.

Define Light & Shadow
Highlight & Veining
Step 3 – The position of the sun in the sky creates the marvelous effects of light and shadow. I chose to have the light coming from above on the left. This means the left side of each leaf is lighter than the right. Washes of blue and green were applied, with the darker hues upon the right side of each leaf. The veins were given dimension with blue shadows beneath, which lighten gradually as they approach the next vein below. The leaf photo on the right has light yellow veins. Other shades were tested as well.

Veining details
Finalized Colors
Step 4 – Bright green (a mixture of yellow and dark green) was applied to all the veins on both leaves. The beaded edge around the perimeter of each leaf was painted yellow.

Completed Flat Finish Leaves
Finish Option 1
Step 5 –At this point you could stop. I highly recommend spraying each leaf, front and back, with a matte finish clear spray paint to seal the paints. Before installing candles, please see the Crafter Tip below. For a gloss finish, please continue to Step 6.

Flat Finish versus Gloss
Step 6 – Tropical islands have high humidity and frequent rain. To achieve that wet-look, you will need to spray a few coats of glossy clear spray paint. This photo shows the dramatic difference between the flat and gloss finishes. Notice how much more vibrant the colors become with the gloss finish.

Completed Gloss Finish Leaves
Finish Option 2
These are the completed tropical leaves with new navy blue candles.

Crafter Tip: Each wall sconce has a metal spike to hold a candle. If you try to push a taper candle down onto the spike, it will inevitably split the candle. How do I know? I broke two! To avoid this, pre-drill a hole in the bottom of each candle using a very thin drill bit.

I hope you enjoyed this makeover process. These steps can be applied to all kinds of home décor. You don’t have to settle for anything. Take out your paints and let your imagination bring crafts to life in your own personal style.

Thanks for Reading & Happy Crafting!