How to Make a Painted Wooden Snowman

Snowman Closeup Photo

The solstice officially marked the start of winter. The long range forecast here in the northeastern U.S. calls for cold temperatures, but less snow. That could be a problem for those outdoor-enthusiasts, who love cross-country skiing, ice skating or simply building a snow fort in the backyard. It wouldn’t be winter without a snowman or two. Why not build a snowman that will never melt? This is a simple, inexpensive project for the whole family. I made two snowmen to display in my living room windows.

Unfinished Wood
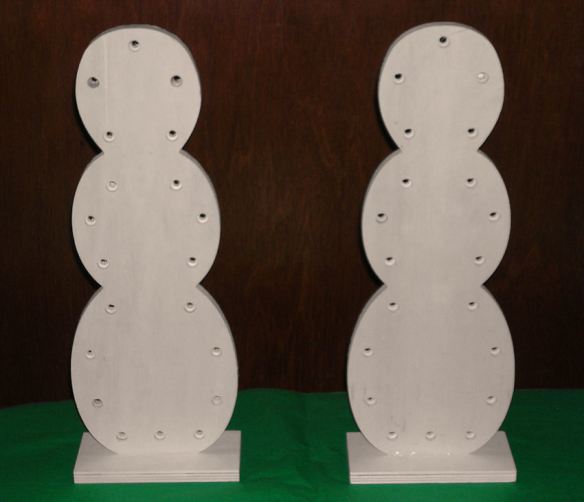
It all starts with unfinished wood snowmen, purchased at AC Moore.  The perimeter holes are for lights in a later step.

Snowmen Painted White
Spray paint all sides, edges and base with white paint.

Painted Details
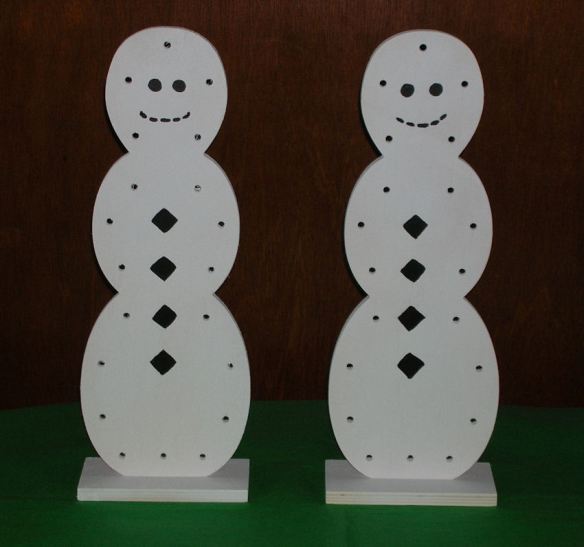
With an artist’s paintbrush, add the details (buttons, eyes, and a smile) with black paint.  Instead of painting the details, you could hot glue round and square plastic buttons, and draw the smile with a Sharpie marker.

Hats Scarves & Carrots
Accessorize with hats and scarves. If you enjoy crocheting, you can quickly create this fashionable look with whatever color yarn you have on hand. Bright red is a great seasonal color, and reads well from a distance. If needlework is not your thing, craft stores have snowman building kits and accessories. For the nose, I created the look of a carrot by squeezing a foam, packing peanut into the correct shape, and painting it with bright orange acrylic paint.  Use hot glue to attach carrot nose.

Stick Arms
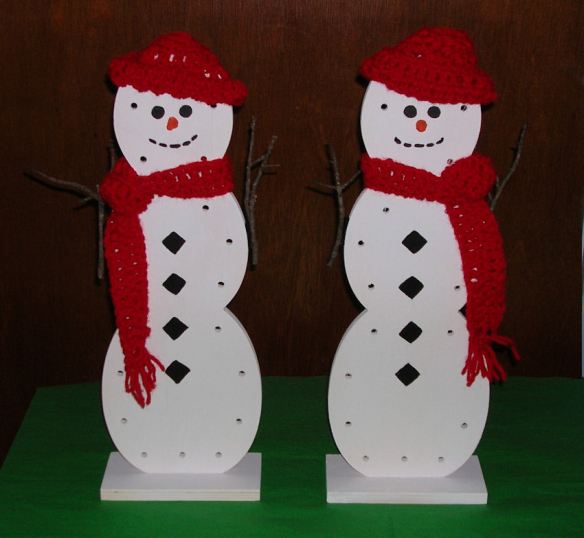
Making the arms is as easy as collecting a few sticks from your yard, and attaching them to the sides. You could glue them in place. I decided to use self-stick Velcro instead, because I wanted the arms to be removable for easy storage.

White Lights
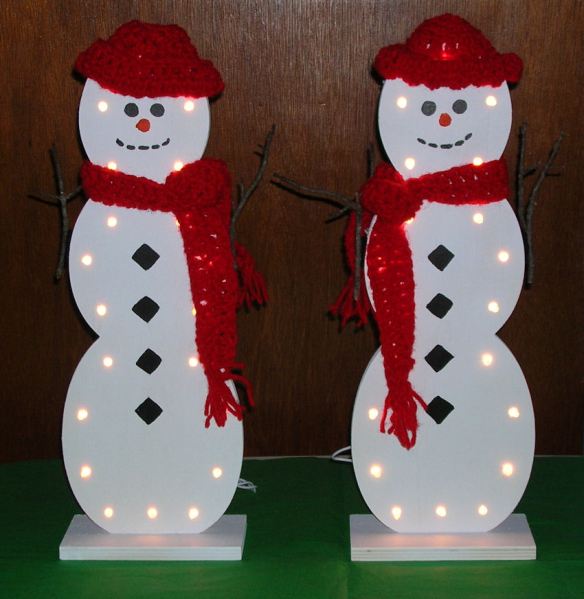
Those pre-drilled holes around the perimeter were made to hold a strand of twenty white lights, also available at AC Moore. Crafter Tip: The lights can only be pushed through from one side of the wood frame. You may need to secure the last light at the bottom with a piece of tape to keep it from pulling out from the weight of the electrical cord.

Lights at night
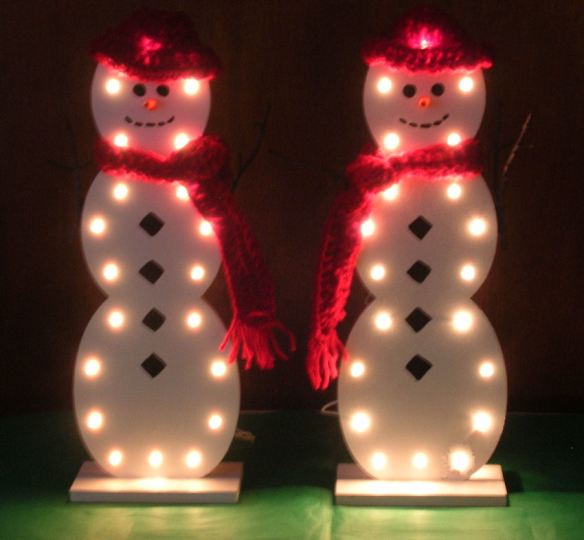
I turned off the flash on my camera to give you an idea of how these cute little snowmen look when lit at night. When the holidays are over, these snowmen can remain on display throughout the winter to bring a little whimsy to your home’s decor. The lights are very bright, and can be easily seen by passersby.

As an additional aside, I made these snowmen two-sided. Because they are standing on a windowsill, they can be seen from inside and outside. The lights can only be seen from the front, but seeing that smiling face when I walk by the window makes me smile too.

Happy Crafting!

Glowing Eyes in the Darkness: Jack-O-Lanterns

Spooky Pumpkin
It just wouldn’t be Halloween without a few carved pumpkins, also known as Jack-O-Lanterns. Patterns are readily available online, or you can flex your creative muscles by coming up with your own designs. What does your pumpkin say about you? Here are a few ideas to get you started.

Carved Pumpkins
From the goofy to the spooky, there’s something for everyone.

Pumpkin Trio
There are numerous options for lighting your pumpkins: Lit candles flicker in the breeze. LEDs produce high intensity and sometimes color-changing light. Glow sticks give off softer, otherworldly light. Spotlights and flashlights light up the face while also creating some eerie dark shadows inside the pumpkin.

Awestruck Pumpkin
Even pumpkins have moments of surprise and awe. I wonder what he sees?

Monster Pumpkin
Little details make all the difference. This carved pumpkin owes its devilishly good looks to the absence of a nose. That one little detail, plus the intensity of the light within, gives him a more ghoulish appeal.

Jaws Pumpkin
This one brings a whole new meaning to the name “Jaws.” After carving the teeth, the orange skin around the perimeter of the mouth was removed to reveal the white flesh beneath. If that seems like too much work, you could use a white Sharpie marker to define the mouth.

Jack Skelleton Pumpkin
Nightmare Before Christmas is a very popular Halloween movie and decorating theme, and this pumpkin doesn’t disappoint. A little dry ice, or a fog machine takes the spooky vibe to a whole new level.

Cat & Spider Pumpkin
Cat lovers will appreciate this creative design. Black cats and spiders are staples in Halloween décor.

Scary Pumpkin
This frightening character has menacing eyes surrounded by flames above and below.

Scary Ghost Pumpkin
This ghoulish ghost is another Tim Burton inspired design from his nightmare movie.

Pumpkin Happy Hour
It’s Happy Hour for Jack-O-Lanterns only! Honestly, if I saw a gathering like this in my backyard, I would probably run away! It looks like a scene from a Steven King movie.

Pumpkin carving isn’t for everyone. There’s also nothing wrong with displaying your pumpkins “as is” with the added bonus of being able to keep them on display for Thanksgiving too.

Painted Pumpkins
If you like to paint, you could paint designs on real or artificial pumpkins. These decorated pumpkins can be accomplished with a few Sharpie markers, and they will last longer than the carved variety.

Lamppost Pumpkins
Another great option is painting a wooden plaque like the one shown above. It can be used for years and is very inexpensive to make. Over time, the sun, wind and weather can take their toll. Whether you are painting a brand new pumpkin, or giving a makeover to an existing one, the steps are the same.

How to Paint and /or Repaint a Wooden Outdoor Halloween Decoration:

Supplies:
Wooden Pumpkin Decoration (30” high x 22” wide x 1/2” thick)
Orange Outdoor Spray Paint – OR – Orange Outdoor Acrylic Paint (See Step 2)
Outdoor Acrylic Paint – black, green & brown
Paintbrush
Sandpaper
Black Sharpie Marker

Faded Original Pumpkins
Step 1 – First you will need to clean off the dirt and debris, and lightly sand the surface and edges in preparation for paint.

Orange Spray Paint
Step 2 – You have two painting options here: Spray Painting versus Brush on Painting.
For Spray Painting: Apply multiple coats of orange outdoor spray paint. To be honest, I’m not a fan of spray paint due to the toxic fumes.  I also was not satisfied with the paint coverage. I’m not sure why, but the consistency was very thin like water.

Three Coats Acrylic
For Brush on Painting: – Apply 3 coats of orange outdoor acrylic paint with a brush. Be sure to coat all the edges and the back of the plaque as well to protect and seal the wood from water damage.

Green & Brown Details
Step 3 – Add details such as stems, leaves, and the surrounding ground at the edges. You may want to outline the details first with a Sharpie marker.

Black Lines
Step 4 – Draw the faces and add curved lines to give the pumpkins a three-dimensional effect. Outline the leaves and stems in black to make them stand out better.

Black Paint
Step 5 – Fill in the faces with black paint.

Before & After Pumpkins
After spending a day at the spa, these pumpkins have been renewed, rejuvenated, and are ready to greet your guests at the door. The choice of pumpkins is up to you. Whether you decide to use real, artificial, or any other material, the enjoyment and celebration of the holiday will always come through in festive style.

Happy Halloween & Happy Crafting!

What’s New in the Studio?


It’s that time again. You’re in a creative mood but aren’t sure where to start. The endless possibilities can be overwhelming. Sometimes it’s easier to look at a wide assortment of completed projects, to see if anything piques your interest. Below are photos of several projects for your review. When you find one you like, click on the link above the photo for a complete list of easy to follow instructions. Enjoy!

Harry Potter Monster Book

Bejeweled Box
Jeweled Box

Suncatchers
Mirror with Applied Suncatchers

For additional photos and instructional links, please click here to visit a new page on our website called “How to Projects.” From time to time, new projects will be added, so please stop by to see what’s new in the studio.

Happy Crafting!