Unknown's avatar

About Crafts Inspire Me

Arts and Crafts are my passion. Inspiration is everywhere. Each new project is a journey to be shared.

Designing Outdoor Halloween Displays

For many, Halloween is the most wonderful time of the year.  People go all out decorating their homes, and there is always something new to thrill and delight.  Let’s look at some decorating ideas for designing the Halloween display of your dreams…or should I say nightmares? 

Creatures of the Night:

Bats

Vampire Bat

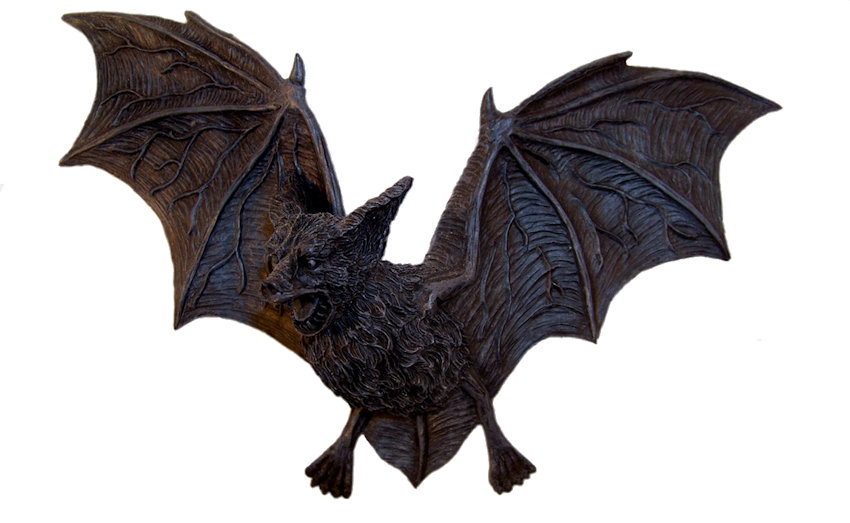
Bats certainly have a way of making humans squirm.  Keep your visitors on their toes by hanging bats upside down from tree branches, lightly swaying in the breeze on invisible fishing tackle. 

Crows

Crows

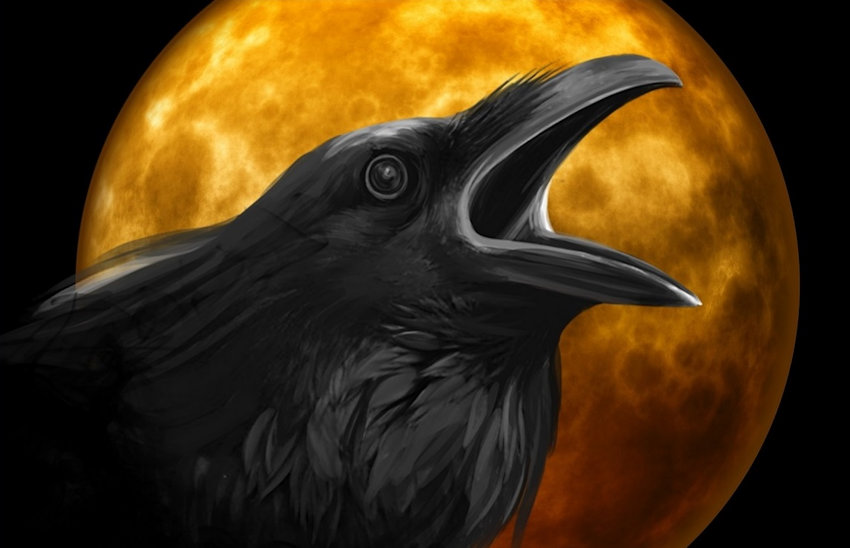
A crow’s habit of feeding upon dead animals and loud calls are bound to cause a shiver or two.  Mount a couple crows on tombstones or in a prominent spot, such as atop a wall or the edge of your roof. 

Owls

Owls

This predator silently soars across the night sky, seeing all with his glowing eyes.  There are some motion-activated owls that turn their heads and hoot. 

Spiders

Spiders

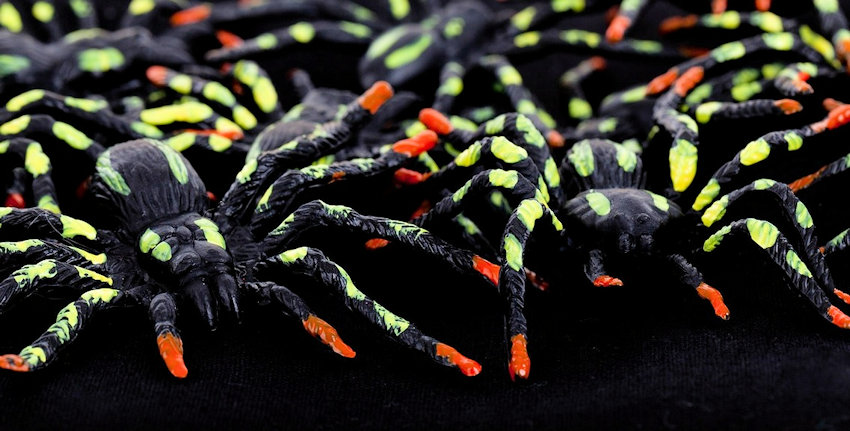
Most people instinctively shy away from spiders.  The tarantula-sized spiders shown above are painted with glow-in-the-dark paints.  Place them along porch railings or on the outer edge of steps.  You also might want to have several crawling up a wall near the front door. 

Dragons & Black Cats

Dragons & Black Cats

Many people are superstitious about black cats.  When lit from behind, cat silhouette yard stakes have an eerily realistic appearance.  Inflatable dragons glisten and change colors, while animated dragons have glowing eyes, frightening sound effects and “breath fire” courtesy of a fog machine. 

Rats

Rats

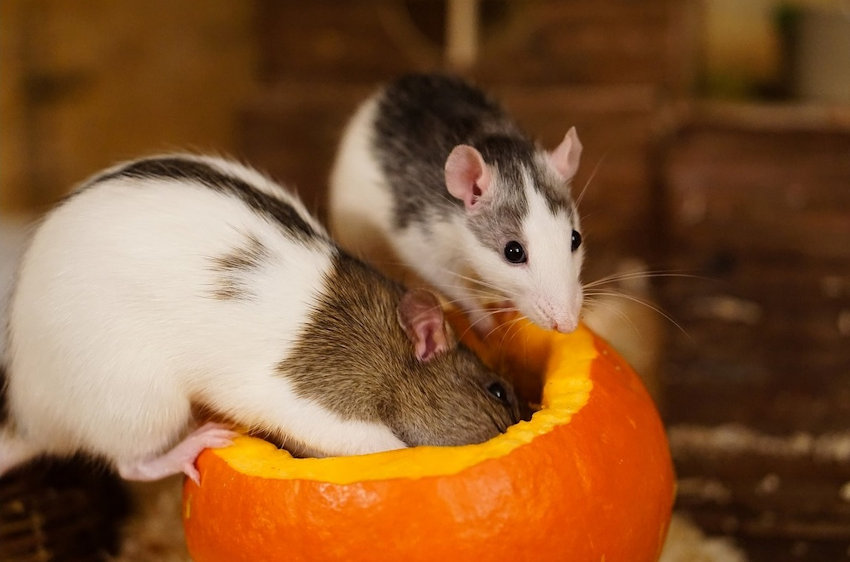
Sewer rats are bound to cause a few goosebumps.  Just like the photo above, place a few rats on or around pumpkins to create a creepy atmosphere. 

Witches

Witch

If you want to charm your guests, witches are sure to please.  Life-size, motion-activated witches greet visitors with glowing eyes, casting spells, and stirring cauldrons.  For a more humorous effect, a wall or tree-mounted crashing witch on a broom is sure to make everyone smile. 

Headless Horseman

Headless Horseman

“The Legend of Sleepy Hollow” is a classic.  Although you probably won’t have a horse on the lawn, you could create a dummy with a glowing pumpkin head.  New this year is an animated life-size headless horseman holding an axe in one hand and a talking pumpkin in the other. 

Legendary Movie Monsters

Werewolf

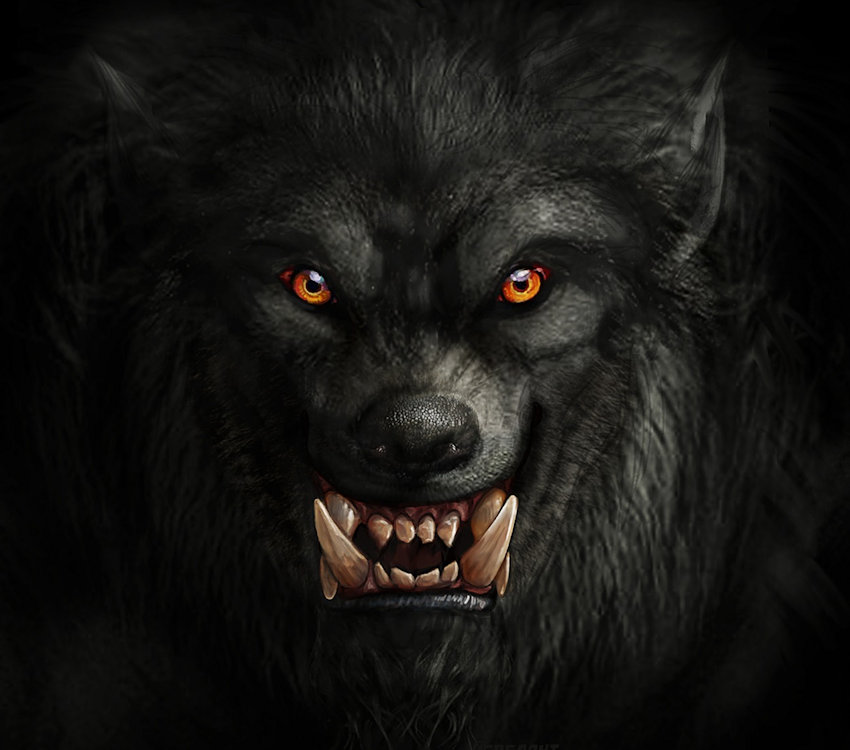
Wolfman, Frankenstein’s Monster, Count Dracula – so many possibilities.  You could make a dummy by stuffing an old shirt and pair of slacks and buy a rubber mask to create your monster.  If you or a family member are budding actors, dress up in costumes to unnerve visitors on Halloween night. 

Zombies

Zombies

“The Walking Dead” has been a popular television series for years, spawning a zombie craze in movies, merchandise, and Halloween décor.  If horror is your goal, zombies are the go-to characters. 

Ghosts

Ghost with Lantern

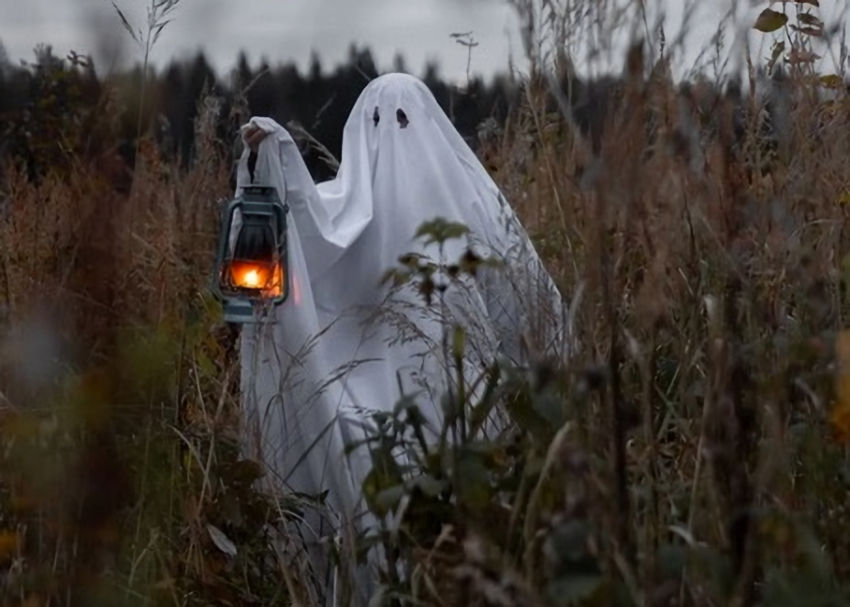
Ghosts can serve as props or as live action creatures.  Halloween night, if you really want to keep trick or treaters on edge, place a life-size ghost among your yard decorations.  Go outside several times wearing an identical costume to stir up chills and thrills as you move across the lawn.  Kids love theatrics like this and will return every year to find out what you will do next.

Scary Props:

Carved Pumpkins

Carved Pumpkin

Pumpkins are a Halloween staple.  Depending upon your preferences and skills, you can carve or paint designs to frighten or amuse your guests.  If you have had trouble in the past with squirrels eating fresh pumpkins, buy craft pumpkins, which can be carved and displayed for years to come. 

Tombstones

Tombstones

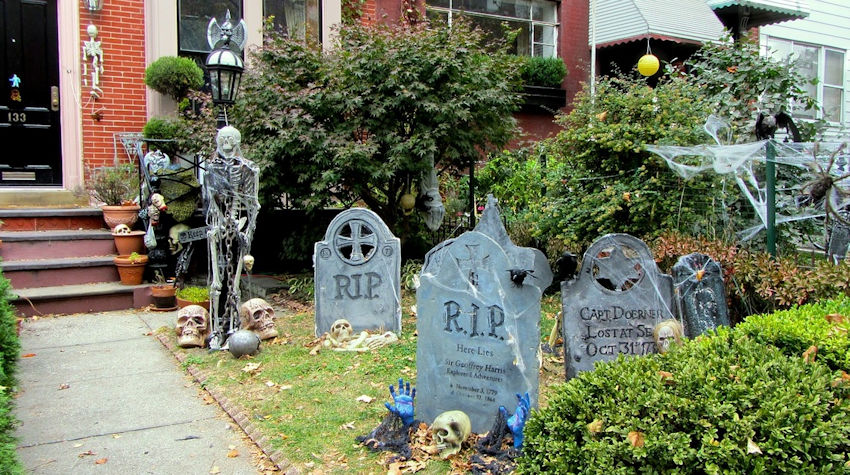
With tombstones, draped in spider webs, and scattered bones, this haunted cemetery is ready for visits from the living. 

Coffin & Skeletons

Coffin & Skulls

If you like working with wood, you could build a coffin and reuse it with different monsters each year.  If the weather cooperates, or if you have a covered porch, a cardboard coffin can be easily made.  Skeletons and skulls can be frightening or funny.  It’s all up to you. 

Kid Friendly Scarecrow

Scarecrow Kid Friendly

Scarecrows are easy to make and inexpensive to buy.  Secure them to tree trunks, or place a few on a bale of hay with pumpkins and a few crows for a bit of humor. 

Frightening Scarecrow

Scarecrow Scary

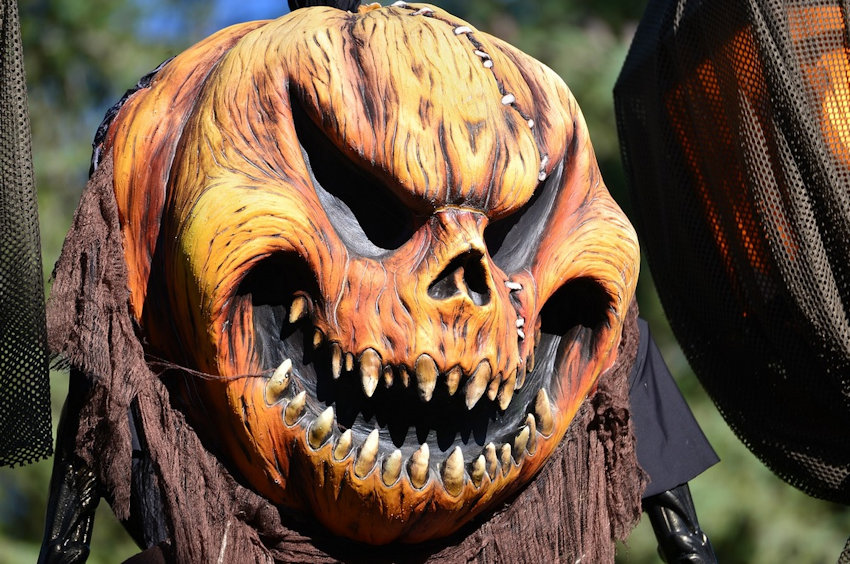
This horrifying scarecrow will keep crows, as well as people, at a distance.  The vicious teeth are an unexpected and unsettling detail. 

Spider Webs

Spider Webs

Our brains tell us that where there are webs, there are spiders.  Drape webs over bushes and railings.  A bag of plastic spiders has great impact or buy one large spider to instill fear. 

Lighting:

Halloween String Lights

Pumpkin String Lights

Pumpkins, Bats, Skulls, Witch Hats, and Ghosts are just a few of your string light options.  Some are the plug-in variety, but for more flexibility there are also battery-operated versions. 

Pumpkin Lamppost Cover

Lamppost Pumpkin

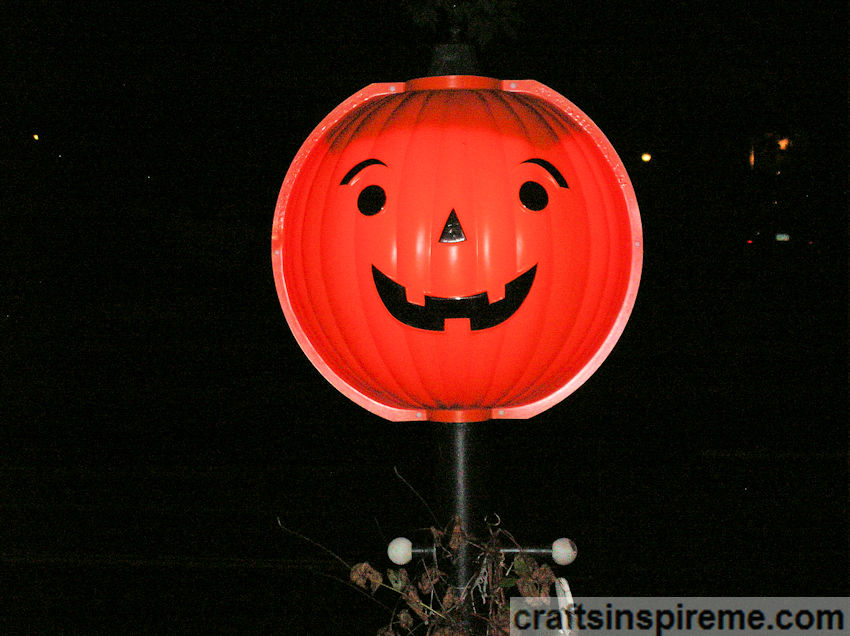
This lamppost cover is an easy way to show your Halloween spirit, and it acts like a beacon attracting Trick or Treaters like moths to a flame. 

Luminaries

Luminaries

Luminaries are easy to make by simply drawing Halloween designs, such as cats and bats, with Sharpie markers on glass jars.  For lighting, burn tealights or use battery-operated candles. 

Special Effects:

Spooky Sounds & Fog

Sound Effects & Fog

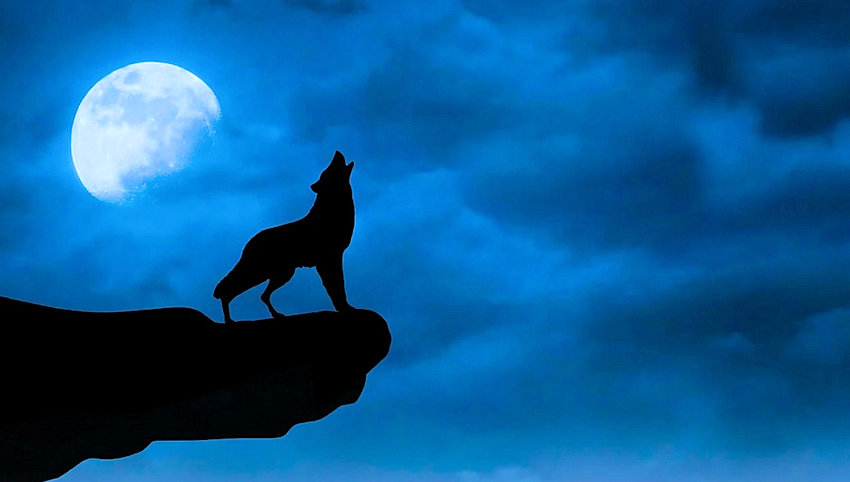
Sound is an often-overlooked element in Halloween displays.  Howling wolves, dragging chains, maniacal laughter, growling monsters, and high-pitched shrieks are among the many scary soundtracks.  Fog provides additional layers of Halloween ambiance. 

Lightning & Thunder

Lightning

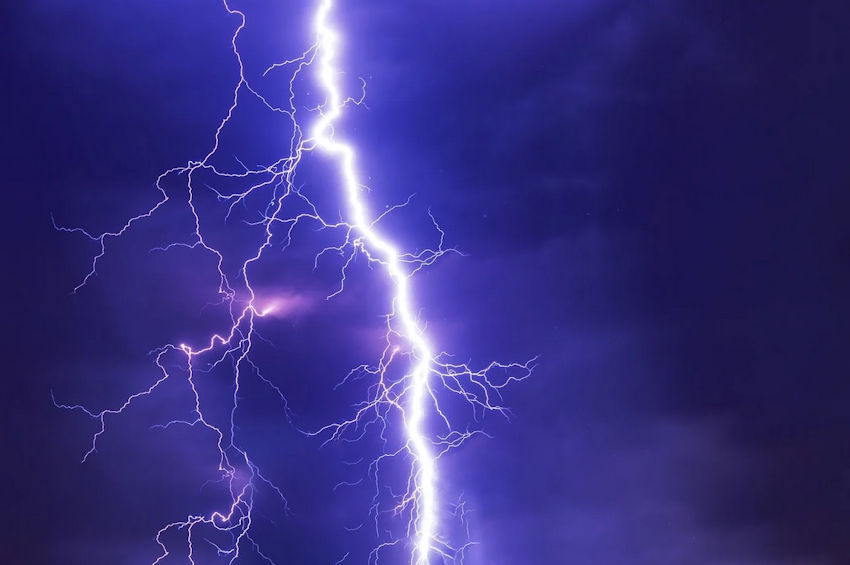
Conjure up the perfect storm by using theatrical spotlights, which project lightning bolts upon your house, accompanied by claps of thunder. 

Setting the Scene: Finished Halloween Displays

Witch’s Brew

Witch's Brew

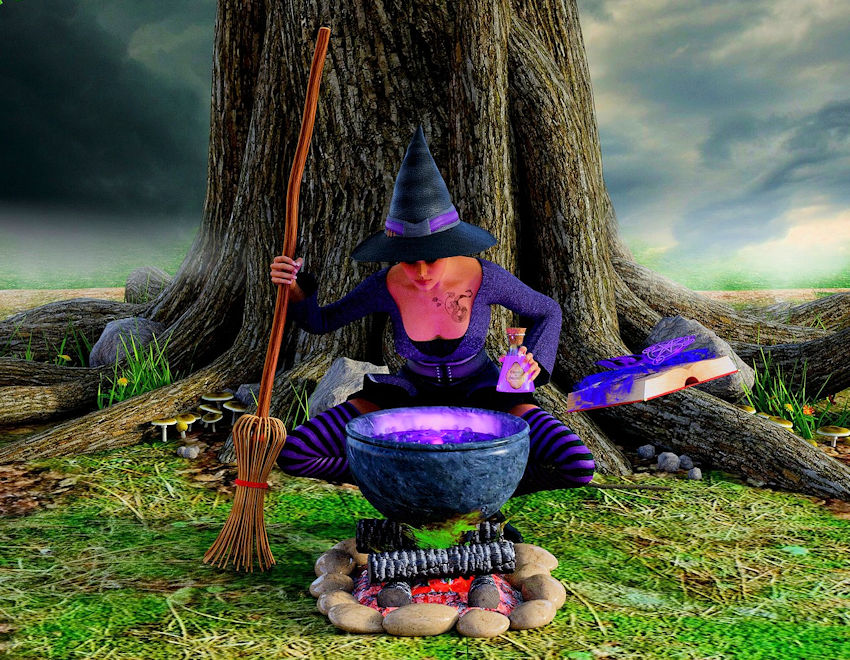
Wondering what it would be like to have a close encounter with a witch?  A cauldron, bubbling over with glowing fog, rests upon a flickering faux fire.  With an ancient broom, a book of magic spells and a bottle of her latest potion in hand, this witch chills and thrills guests of all ages.  Live action will astound visitors.  All you need is a costume and have a few clever “incantations.” 

Haunted Graveyard

Haunted Graveyard

How do you create a haunted graveyard?  Start with tombstones, and then add a red-eyed skeleton climbing out of an open grave, bathed from below by an eerie yellow light, as ghostly apparitions take shape in wisps of fog.  An orange moon in the nearby tree completes this otherworldly scene.  Michael Jackson’s “Thriller” would be the perfect theme song for this frightening display. 

Comical Family Fun

Kid Friendly Pumpkin Patch

Is it possible to celebrate Halloween in a kid-friendly way?  A pumpkin family reunion is a good place to start.  Trick or Treaters can pose for selfies with this cheerful, welcoming display.  At night, the bright orange glow will intrigue everyone, drawing them nearer for a closer look. 

If You Build It, They Will Come

Group Photo

Want to attract attention?  Consider your desired theme and select a fascinating focal point, such as the gigantic cat in the above photo.  With colors, shapes, textures, and proportions in mind, continue adding props and characters, creating a multi-layered composition to delight viewers.  Viewers will discover something new each time they see it.  Having a few characters spring to life would be the cherry on top of this theatrical masterpiece. 

Trunk or Treat

Trunk or Treat Decor

Are you participating in a community trunk or treat event?  Don’t forget to decorate your car.  There are Halloween decorations made specifically for trunk or treating.  If your furry best friend rides along, a pet costume would be adorable, and the kids will love it! 

Halloween brings out the kid in all of us.  Do you have a favorite decoration?  Have any suggestions to share with readers?  Please note your thoughts in the comments section.  Thanks for reading and sharing. 

Happy Halloween & Happy Crafting!

Painting with Light

Even on a gloomy midwinter’s day, sunlight filters through stained glass, dazzling the eyes and enlightening the mind with all its glorious colors.  Stained glass windows can be found everywhere, from churches and hotels to cruise ships and homes.  First and foremost, it is a beautiful art form, but there is more to this than meets the eye.  Let’s dig a little deeper into the world of stained glass. 

Traditional Stained Glass

There are two types of stained glass:

1. Traditional Stained Glass – Individual pieces of glass soldered together, as shown above.  This labor-intensive process is well-worth the effort, but it also adds to the expense of the finished piece.  Additional details may be painted by hand on the interior face of the glass. 

Painted Glass (aka Enamelled Glass)

2. Painted Glass – Designs are painted on glass with special pigments containing ground glass, which must be fired in a kiln to permanently fuse the colors to complete the process. 

With or Without

Minute details, such as this fish’s fins, scales, and lively expression, have been hand painted to create a one-of-a-kind aquatic treasure.  With bold colors and thoughtful design, the lovely rose, shown above, can stand on its own without the need for hand-painted embellishments. 

Close Encounters

This colorful contemporary glass reminds me of the musical light board in the movie, “Close Encounters of the Third Kind.”  The soft glowing colors and textured glass make you wonder what awaits inside. 

Forever Yours

Delicately painted white blossoms, set against a bold red and green background, will flower for eternity. 

A Rose by Any Other Name

Rose windows adorn many churches around the world.  If you ever wondered what it would be like to stand inside a kaleidoscope, this is your chance to find out. 

Stairway to Heaven

Stained glass panels entice the viewer to follow the spiral path upward toward the heavenly white light. 

Tell Me a Story

Truly a picture is worth a thousand words.  Today we take reading for granted, but in the past illiteracy was common.  Story telling with pictures enabled everyone to learn.  Some windows depicted detailed biblical scenes, while others were more abstract with easily understood symbolism. 

On the Grid

A strong rectilinear grid, repetitious patterns, and a soft blue background unify this harmonious ceiling design.  The free form, brilliant colors, and contrasting, copper architectural details provide an interesting focal point in this cruise ship lounge. 

Heads Up

Glass dome decorative motifs are complimented by the plaster architectural ornamentation.  The glass dome on the right is framed by metallic gold trim and adorned with metallic blue spheres, drawing the eye upward toward this playful stained glass focal point. 

In the Eye of the Beholder

Context & symbolism go hand in hand.  In a church, a white dove usually symbolizes the Holy Spirit, but in secular architecture it is a sign of peace or a celebration of nature.  Stained glass in churches is often donated as memorials.  Did you know the artist often painted the face of an angel or saint to resemble a deceased member of the donor’s family?  You and I see an angel, but the family sees Grandma Agnes. 

A Little Piece of History

Instead of painting on canvas or sculpture, historical figures and events have been honored in stained glass.

Eternal Spring

This beautiful Art Nouveau masterpiece includes a portrait as well as a very lush floral landscape in celebration of springtime. 

“Building” an Addition

This window visually expands the architectural space, making the building and property feel stately and grand.  It can also obscure an unsightly view, while providing scenic eye candy for the viewer. 

It’s a Jungle Out There

Several artistic tricks are used to create this lively wild jungle, including perspective, overlapping images, and the shape of the individual glass pieces. 

A Grand Illusion

Vibrant colors and clever design are the keys to this amazing stained-glass window.  The play of light and shadow, three-dimensional rendering, and concealing most of the lead strips, creates the illusion of Christ standing in front of the window. 

Let There Be Light

Stained Glass Wall Art

This may look like a painting in a frame, but it is all stained glass, including the “frame.”  You may not be able to tell from the photo, but this “window” is on an interior wall!  At this point, you probably have one question: How could the glass glow without sunlight?  I’m glad you asked!  A light fixture, either fluorescent or LED, is recessed into the wall.  A sheet of white glass conceals the light bulbs or tubes.  The stained-glass is the final layer.  Turn on the light and you will have the full colorful effects without the sun! 

I hope you enjoyed our little exploration and picked up a few ideas to incorporate stained glass into your life.  Until next time…

Thanks for Reading & Happy Crafting!

“C” is for Cookie

Cookie Monster

If you are a cookie monster, every day is “Cookie Day!”  Yum! 

Assorted Cookies

There are so many varieties – chocolate, butter, sugar, almond, and chocolate chip, just to name a few.  Maybe we could munch our way through the list of the most popular cookies and discover our favorites as we go.  You will probably be hungry before you reach the end of this post, so grab a few cookies and I’ll wait right here.  Okay, let’s begin…

Black & White Cookies

Black & White Cookie

Black & White cookies, also known as half-moons, may have frosting or fondant in those two signature colors. 

Butter Cookies

Butter Cookies

Sweet creamy butter makes these cookies irresistible, with or without decoration. 

Chocolate Chip Cookies

Chocolate Chip Cookies

Chocolate chip is probably the most popular cookie. Chocolate aficionados satisfy their craving by adding chocolate chunks or by mixing cocoa in the batter.  Instead of cake, many people celebrate their birthdays with 15” chocolate chip cookies decorated with icing and candles. 

Chocolate Crinkles

Chocolate Crinkles

To create the unique crackle patterns, chocolate dough is formed into a ball and rolled in powdered sugar.  The patterns appear during baking and no two are exactly alike. 

French Meringue

French Meringue

Egg whites are the main ingredient in this recipe.  The star shape is created with a piping bag. 

Gingerbread Cookies

Gingerbread Cookies

Gingerbread smells so great while it is baking.  The cookies can be cut into any shape and are often decorated with icing. 

Gingersnaps

Gingersnaps

Gingersnaps can be crunchy or soft depending on how long they are baked.  The crispy version is good for dipping in hot chocolate. 

Jelly Filled Cookies

Jelly Filled Cookies

To make these jelly filled cookies, you will need two cookie cutters – one small and one large.  Layer two cookies on top of each other, with apricot, strawberry, cherry, or raspberry filling.  The bottom cookie is solid, while the top cookie has a small cut out in the center.  To finish, shake powdered sugar on top. 

M&M Cookies

M&M Cookies

Follow the chocolate chip cookie recipe, substituting M & M’s candy instead of chocolate chips.  If you do not like chocolate, add cinnamon or peanut butter chips as a tasty alternative. 

Macarons

Macarons

Almond flour and confectioner’s sugar are the main ingredients in these sweet cookies.  The fillings come in a wide assortment, including fruit, chocolate, and vanilla. 

Oatmeal Raisin Cookies

Oatmeal Raisin Cookies

Soft and chewy oatmeal raisin cookies are a staple in kid’s lunches. 

Orange Cookies

Orange Cookies

These cookies have orange zest in the dough as well as the icing.  Substituting lemon or lime zest will provide sweet and tart alternatives. 

Peanut Butter Cookies

Peanutbutter Cookies

As kids, we eat peanut butter all the time, so it follows that this would be one of the most popular cookies for adults too.  Use either creamy or crunchy peanut butter, and you might want to try adding chocolate chips for that awesome peanut butter cup flavor. 

Snickerdoodles

Snickerdoodles

Snickerdoodles taste like cinnamon and sugar with a bit of a tang from cream of tartar.  The dough balls are usually rolled in cinnamon and sugar prior to baking. 

Sugar Cookies

Sugar Cookies

Sugar cookies are another classic.  With sugar in the batter and on top, this sweet treat is sure to satisfy. 

Thumbprint Cookies

Thumbprint Cookies

As you probably guessed from the name, use your thumb to make a divot in the top of each cookie, and fill it with fruit filling or a Hershey’s Kiss, as shown in the photo. 

So many cookies!  You simply cannot eat just one!  What is your favorite cookie? Let me know in the comments section. 

Thanks for Reading & Happy Crafting!

Fun with Photo Editing II

Jungle in the City

When it comes to photo editing, creativity truly has no limits.  You can make it rain, perform death-defying stunts, or build a civilization on the rings of Saturn.  That is a powerful tool!  With the right software, such as Corel Paint Shop Pro or Adobe Photoshop, you can turn the ordinary into the extraordinary.  Here are some fun photo-editing ideas to explore: 

Playful Wildlife

Spider & Bird

If you can find two animals or insects with similar coloring, combining the two will be more successful.  Placing the new creatures against a natural background enhances the believability of the illusion. 

Child’s Play

Kids with Butterfly & Giraffe

Kids do the most adorable things.  Photo editing makes the impossible possible.  All you need to do is find a cool background image and insert your family members for some entertaining results.

Guess What I did on Vacation?

Sea Cave

We all take vacation pictures, and of course sometimes they don’t quite come out the way we planned.  With software, you can straighten images and you might as well add a few embellishments just for fun. 

Sweet Dreams

Baby Napping on Swan

Babies are probably the most popular subjects for photography.  Have some fun with your child’s photos on cards, invitations, and to share with family and friends. 

A Great Read

Girl Reading with Wolf

Surprise the book lover in your family with a one-of-a-kind portrait, celebrating their favorite pastime.  The key to this illusion is the light and shadow throughout the composition.

A Trick of the Light

Lighting Irish Tree Tunnel

Lighting makes all the difference for this Irish tree tunnel.  The photo on the left has a fanciful, playful atmosphere, where you might expect to spot unicorns or leprechauns.  The image on the right looks and feels dark, desolate, and ominous – a perfect haunt for banshees. 

Project Runway

Airplane Fashions

Everyone is familiar with runway fashions, but this bride takes us above and beyond our wildest expectations.

By the Light of the Moon

Moonlit Prom

Going to a prom or a formal event is a milestone event.  Commemorate that special evening with an equally memorable keepsake.

Sleeping Beauty?

Sleeping Beauty

This photo looks so real that it gives me shivers! 

He Said She Said

Hiker & Velociraptor

She says: “If I remain very still, he won’t see me!”  He says: “Hey!  This must be my lucky day!  Breakfast is served!”

What is so Funny?

Lion & Girl Laughing

Instead of fear, this image is amusing.  The tilt of their heads, the sunlight upon fur and hair, and the clever way the weeds frame the subjects makes you wonder if they know something we don’t. 

Fairytales with Attitude

Fairytales

The neutral color palette unifies this otherworldly image.  The tiniest details, from the individual strands of her hair to the sunlight streaming through the leaves of a tree, have been meticulously rendered.  The light in her eyes and the special effects surrounding the apple imply fierce confidence and power.  In this version of the fairy-tale, Snow-White kicks the evil Queen’s butt. 

T-Rex Attack

T-Rex Attack

I realize high-definition technology is constantly evolving, but this is way over the top!  The woman looks terrified, and the T-Rex is equally menacing.  The stark walls keep your attention focused upon the action without distractions.  I think it would be interesting to shine light upon the T-Rex to cast a larger-than-life shadow upon the fireplace, which would tower over the woman. 

Motocross Racing

Motorcross Dirt Race Track

Tires grind the track surface in search of traction, sending dirt flying, as this motocross competitor races to the finish line in the palm of your hand!  Wow! Very realistic!

Motocross on Steroids

Motocross Ocean Race

In an alternate reality, why race upon a fixed dirt track when you can blaze a new trail across the waves, with nothing but white foam and sea spray in your wake?   

The Desert Meets the Ocean

Tortoise & Dolphins

Bringing water to the desert is no easy task, especially if you have to carry this heavy burden upon your back.  The well-defined tortoise shell, the bubbles in the water, and the swimmer with dolphins combine to create this amazing three-dimensional image.  The light penetrates the water, as if the sun is shining upon the ocean’s surface.  The stark contrast of the blues and browns draws the viewer into this fascinating image. 

I hope you enjoyed this exploration of photo editing software and feel inspired to give it a try.  You probably have lots of photos on your phone, tablet, or laptop right now, just waiting to be transformed into a treasured memory, a humorous gift, or a unique work of art.  What will it be?  You decide! 

For more photo editing, please read the first part of this series: “Fun with Photo Editing.”

Thanks for Reading & Happy Crafting!

A Change of Seasons – Autumn Wreaths

Colorful Leaves
It’s hard to believe the summer is over. Where did the time go? We pack away our beach toys and the kids go back to school. Autumn’s arrival signals the coming changes in nature. It’s time to change your décor and update your home with a few of your own handmade creations. Below are a few photos to inspire your next fall wreath project:

Fall Leaves Wreath
Silk leaves can be easily arranged from lightest to darkest. This decoration can be hung upon a door or used as a centerpiece on your dining table. Additional leaves can be sprinkled upon the table to enhance the autumn ambiance.

Leafy Wreath
This wreath has a red, green and yellow color scheme.  Coleus plants have the most beautiful leaves in blended shades of purple, burgundy, green, pink and red.

Berries & Peppers Wreath
Orange peppers and berries bring bursts of color to this lush green leaf wreath. In cooler climates, genuine fruits and veggies will last from several days to several weeks depending upon the type. Warm locations will require the use of faux produce, which will last for years to come.

Wreath with Heart
A straw or grapevine ring serves as a base for this festive wreath made from dried grasses and berries. Raffia ribbon and a simple wooden heart and nautilus seashell complete the look.

Wreath Pinecones
If you happen to have pine trees on your property, collect the pinecones to make this lovely wreath, with the addition of seedpods, and faux cherries and berries for pops of color.

Wreath Ribbon
This is a great beginner’s wreath and it’s easy to change for every season. Simply wrap a straw wreath with overlapping ribbon. The large bow also serves as a hanger.

Wreath Twigs
Whether you live near the beach or near a forest, driftwood or twigs are available in abundance. A little Spanish moss finishes this decoration in a style suitable for Mother Nature herself.

Wreath Wheat Flowers
This wreath is all about the abundant harvest, made with dried grasses, wheat, and a few silk flowers. If you have a wheat allergy, substitute corncobs or dried flowers.

Orange Floral Wreath
Celebrate Autumn’s favorite color with orange flowers and berries, accented with touches of maroon and green.

Gourds Pumpkins Wreath
Greet your guests at the door with a lovely fall wreath. To make one, start with a grapevine wreath base. Tie or glue on pumpkins, gourds, pinecones and berries. As an added burst of color, glue red and orange silk leaves on poster board and secure it to the back.

Mickey Mouse Wreath
Mickey Mouse fans will love this festive decoration, which will adorn your home with a bit of whimsy from fall through Halloween.

Floral Veggie Wreath
Hydrangeas, berries, and dried fruit adorn an English ivy wreath. As Thanksgiving approaches, replace purple and blue flowers with more seasonal reds and oranges.

Wreath Whimsical
While you are gathering your wreath making supplies, consider including something unexpected, such as this mushroom.

Hedgehog Wreath
How about this adorable little hedgehog? You could also use a squirrel, a baby fox or fawn, or any little woodland creature you can find at craft stores or online. In a place of honor, centered upon your front door, it’s sure to make your guests smile.

Purple Blue & Green Wreath
Who says fall wreaths must be particular colors?  This gorgeous purple, blue, and green wreath would look amazing all year long.  What is your favorite color?  There are no rules, so go for it!

So many fall decorations can be made with found objects, such as pinecones, acorns, leaves, etc.  It’s a nice time of year to take a walk and admire Nature’s changing colors.  Why not get the whole family together to enjoy the fresh air and collect a few twigs or ornamental leaves along the way?  Time spent with family is a precious gift, and the crafts you make will remind you of these shared adventures.

Thanks for Reading & Happy Crafting!

What is for Dessert?

Dessert Collage

Dessert is a wonderful thing.  Do you ever find yourself checking out the dessert menu before looking at the entrees?  I do.  In fact, I had a craving for something sweet while working on this post.  You have been warned!  Proceed if you dare!  Below, you will find lots of desserts to tempt your willpower. 

Baked Alaska

Baked Alaska

Wondering what Baked Alaska is?  Start with a slice of angel or sponge cake, add ice cream, cover it with a thick layer of meringue and bake until it lightly browns. 

Black Forest Cake

Black Forest Cake

Chocolate, whipped cream and cherries – does anyone have a fork?

Boston Cream Pie

Boston Cream Pie

Boston Cream Pie is actually a cake, made with two layers of vanilla sponge cake, a custard filling, and topped with chocolate icing. 

Cake Pops

Cake Pops

Undecided whether to have chocolate or cake?  Have both with chocolate cake pops. 

Carrot Cake

Carrot Cake

Shredded carrots, raisins, and crushed pineapple are the secrets to making this moist and delicious cake, topped with cream cheese frosting. 

Cherry Cheese Tarts

Cherry Cheese Tarts

Most people love cheesecake.  These tarts have the delicious flavor, and they’re finger foods as well.  You could purchase ready-made mini piecrusts and make your own filling.  They can also be made in a cupcake pan.  Line the pan with paper cupcake wrappers.  Drop a vanilla wafer in the bottom of each cupcake.  Pour in your filling and bake.  After they cool, top with cherries or strawberries and enjoy!

Chocolate Mousse

Chocolate Mousse

Who could resist the rich, creamy taste of chocolate mousse? 

Chocolate Tarts

Chocolate Tarts

Most people love chocolate, and this dessert does not disappoint.  Chocolate whipped cream is sandwiched between layers of cake and piped on top, garnished with chocolate shavings and raspberries. 

Crème Brulee

Creme Brulee

Creamy egg custard topped with a crunchy, caramelized sugar crust is the perfect combination for this mouthwatering dessert. 

Croissants

Croissants

Butter croissants are finger licking good, but they also come with delicious fillings, such as chocolate, almond, or raspberry. 

Fresh Fruit

Fresh Fruit

As the seasons change, fresh fruits appear in abundance, courtesy of Mother Nature. 

Ice Cream

Ice Cream Sundae

Ice cream is an easy dessert to keep on hand for unexpected guests.  Whether it is served in dishes, cones, or sundaes, you can’t go wrong with ice cream. 

Lemon Bars

Lemon Bars

Lemon bars are a popular treat for “kids” of all ages. 

Lemon Meringue Pie

Lemon Meringue Pie

Sweet and tart are perfectly balanced in lemon meringue pie. 

Napoleons

Napoleon

Napoleons consist of alternating layers of light as air puff pastry crust and vanilla cream, topped with powdered sugar icing swirled with chocolate. 

Pecan Pie

Pecan Pie

If you like sweet and salty, this is the dessert for you.  The filling is made with eggs, butter, brown sugar, and pecans.  For a rich caramel flavor, use dark brown sugar. 

Petits Fours

Petits Fours

Petits Fours are the perfect marriage of cake and candy. Fondant icing covers bite-size cubes of yellow, sponge or pound cake. While the fondant is still wet, decorations can be applied using piped icing, or a sprinkling of either candy or nuts. As an added burst of flavor, jelly or butter cream can be spread over the cake prior to applying the fondant.

Popsicles

Popsicles

Fruit juice and popsicle molds are all you need to make whip up this cool treat. 

Pumpkin Pie with Homemade Crust

Pumpkin Pie

Pumpkin pie has a delicious flaky crust.  There are some great baking tools, such as fluted piecrust cutters for edging, and spring-loaded piecrust cutters to create cutouts like the leaf shown in the photo above. 

Spiced Pumpkin Roll with Orange Cream Cheese Icing

A spiral design is the hallmark of this impressive dessert.  Bake the cake in a jellyroll pan lined with parchment paper.  After baking, lay the cake face down on a towel.  If necessary, trim any ragged edges.  Starting with a long side, roll the cake in the towel and cool completely on a wire rack.  Unroll and remove the towel and lay cake flat.  Spread the filling over the top within 1/2” of the edges.  Suggested fillings include whipped cream, pie filling, and pudding.  Carefully roll the cake and place it with the seam side down on a platter.  Garnish as desired. 

Rice Pudding

Rice pudding, fresh from the oven, is one of life’s great comfort foods. 

Strawberry Shortcake

Fresh fruit garnishes and a little powdered sugar is all you need to top off this summertime favorite.  

Tiramisu

Espresso, rum, cocoa, and creamy mascarpone filling make this dessert out of this world.  

Hungry for more desserts?  Please click here to read part one, “Save Room for Dessert.” 

Thanks for Reading & Happy Crafting!

One Craft Leads to Another

Colorful Sunset

Because we live in such a beautiful world, it comes as no surprise that we are inspired to create using every color of the rainbow.  Many people have not had the opportunity to explore or develop their artistic abilities.  Starting small enables you to build up your confidence while learning new skills.  Coloring is a fun and easy introduction to the world of arts and crafts. 

Let’s look at the coloring media options, and then we will explore different crafts where you can apply your coloring savvy.  

Thin Core Colored Pencils

Colored Pencils Thin Core

Thin core, colored pencils have hard lead, which is great for drawing fine details.  These are inexpensive and sold in sets.  If you are looking for saturated colors, or need to fill large areas with color, use thick core pencils shown below.

Thick Core Colored Pencils

Colored Pencils Thick Core

Thick core, colored pencils have soft lead, which is essential for shading and blending.  When purchased individually, these pencils can be expensive, but craft stores often have big sales on colored pencil sets, such as Prismacolor, at very affordable prices. 

Crayons

Crayons

Crayons have been kid’s favorites for decades.  If you have them on hand, grab your favorite color and plunge into the world of coloring. 

Gel Pens

Gel Pens

The fine points on gel pens can be used for drawing intricate details or color accents.  These pens include some unusual inks, including metallic, neon, iridescent, and glitter. 

Markers

Markers

Markers produce bold colors across large areas with only a few strokes.  You can also layer colored pencil over marker to create interesting effects.  Markers may soak through paper, so be sure to place a liner under the page to prevent damage to the surface underneath. 

Sketchbook versus Coloring Page

Blank Page vs Printed Lion Page

Now you could buy a sketchbook and start doodling.  However, the dreaded blank page can be intimidating.  Coloring books are a great place to start.  As you develop your unique artistic style, you might want to pursue new crafts, which will challenge your newfound skills.  Below are side-by-side coloring pages with related crafts. 

Coloring & Watercolor Painting

Coloring & Watercolor Painting

Do you enjoy blending colors to find that perfect shade?  Painting may be the perfect choice for you.  Watercolors can be transparent, translucent, or opaque, depending upon the amount of water used.  You may want to lightly outline your overall design with watercolor pencils prior to painting, but don’t press too hard as the lines might show through the paint.  Watercolor paper is strong enough to withstand being wet and dries flat.  Acrylic and oil paints are alternate options. 

Coloring & Mural Painting

Coloring & Mural Painting

Do you find yourself drawn to bold colors and designs?  Is your motto: “Go big or go home?” You might want to try mural painting.  If wall space is limited, paint on canvas. 

Coloring & Soft Pastels

Coloring & Soft Pastels

Soft dreamy palettes are easily achieved using soft pastels as shown above.  These pigments come in easy-to-use sticks, allowing you to draw and color at the same time. 

Coloring & Mixed Media

Coloring & Mixed Media

Do you tend to choose geometric images with sharp, clean lines?  Mixed media is up for the challenge.  Technical pens, markers and watercolors were combined to render this beautiful image of Notre Dame Cathedral. 

Coloring & Stained Glass

Coloring & Stained Glass

Nature is a common theme for stained glass.  The complex patterns, and bold translucent colors are illuminated by sunlight, creating a kaleidoscope of light. 

Coloring & Mosaics

Coloring & Mosaics

If you enjoy intricate designs, mosaics fit together like puzzle pieces, which work together to create a larger image, viewed at a distance. 

Coloring & Fantasy Portraiture

Coloring & Fantasy Portrait

Yes, fantasy portraiture is a thing.  With the appropriate wardrobe, accessories, hair, makeup, and special effects created with photo editing software, fantasy becomes reality.  Make someone’s dream come true. 

Coloring & Abstract Art

Coloring & Abstract Art

Abstract art is very popular, and can be created with any medium, including oils, acrylics, watercolors, and photo editing software. 

Coloring & Embroidery

Coloring & Embroidery

Bold solid colors, floral motifs, and three-dimensional details easily translate to needle crafts, such as embroidery or needlepoint. 

Coloring is relaxing, reduces stress, and provides instant gratification.  Who knows what crafts you might explore next?  One thing I have found to be true in all my artistic endeavors: “Draw or paint what you FEEL, not what you know.”  Follow this advice and you will never be disappointed. 

Special thanks to Trudy, a local crafter, for providing all the coloring pages! 

Thanks for Reading & Happy Crafting!

Abracadabra – Harry & Hermione’s Magic Wands

Hermione and Harry never go anywhere without their magic wands. 

Logo/Sign at Ollivander’s Wand Store, Universal Studios

Every Hogwarts’ wizard goes to Ollivander’s to choose his or her magic wand. 

Magic Wands at Ollivander’s Wand Store

While doing research, I was surprised to see that many of the wands in the Harry Potter series were rather lackluster.  I expected wizards to have exquisite, highly personalized wands to express their personalities as well as their power. 

Wooden Chopsticks

For this project, we will transform wooden chopsticks into magic wands for Hermione Grainger and Harry Potter.  Use these techniques to create a wand for any character and add whatever embellishments feel right to you. 

How to Make Hermione’s Magic Wand:

Inspiration

Hermione’s wand has a fairly simple design, consisting of English ivy wrapped around a monotone magic wand. 

Supplies

Supplies:
Wooden Chopstick (9” long x 3/8” thick)
Acrylic Paint: yellow ochre
Bottle fabric paint: glow-in-the-dark white
Paintbrushes
Clear Spray Paint: Matte Finish
Optional 1) Faceted rhinestone & Acrylic Paint: metallic peridot.  See “Advanced Painting” below.

Painting Chopstick

Step 1 – If the chopsticks are lacquer-coated, you may need to prime the surface first, and then apply two coats of acrylic paint.  Puncture a hole in a box to hold the wand upright for drying, but don’t forget to paint the tip later.  To prevent fingerprints and scratches, handle with a tissue. 

Painting Vines & Leaves

Step 2 – Starting at the top, use three-dimensional paint to create an ivy vine wrapping around the wand.  Add an interesting twist by using glow in the dark white paint, but if you prefer, you can use plain white.  If you want to be true to Hermione’s original wand design, wait until the 3D paint dries, and then paint the vines with yellow ochre to match the rest of the wand. 

Hermione’s Finished Wand

To seal the paints, spray the wand with clear spray paint.  At this point, the wand is complete.  If you have been following this blog for a while, you know there is usually an enhanced version, which is shown below in the “Advanced Painting” section. 

How to Make Harry’s Magic Wand:

Inspiration

Harry’s wand has a textured, two-tone design.  Rough “tree bark” at the top serves as a handgrip, and the rest is smooth wood. 

Supplies

Supplies:
Wooden Chopstick (9” long x 3/8” thick)
Acrylic Paint – licorice black, coffee bean brown
1) Bottle fabric paint – brown
Paintbrushes
Clear Spray Paint: Matte Finish
Optional – Glue gun & 1) Faceted rhinestone. See “Advanced Painting” below.

Creating Texture

Step 1 – Using three-dimensional paint, draw long lines at top to create the basic texture as shown above. 

Adding More Texture

Step 2 – Fill in with more texture, to create a rough tree bark appearance, including pointed edges across the top of the wand.  Allow paint to dry overnight. 

Painting Black

Step 3 – Paint the entire wand with black acrylic.

Dry Brushing Brown

Step 4 – Dry brush the rough bark with brown acrylic paint, allowing the black recessed areas to show through, as they do with real bark.  Seal the paints with clear spray paint. 

Harry & Hermione’s Finished Wands

This photo shows the two completed wands side by side.  I wanted to take this project to the next level by creating more texture on Harry’s wand and more visual interest for Hermione’s. 

Advanced Painting:

Hermione’s Wand – Defining the Leaves

Step 1 – Make the leaves more prominent by applying a thicker coat of the same three-dimensional glow in the dark paint on each individual leaf. 

Close-Up Vines & Rhinestone

Step 2 – Create a glowing cap on the end of the wand and place a rhinestone in the center as shown.  In case you didn’t know, fabric paint can be used in place of glue. 

Glowing Wand

Step 3 – After being exposed to light, the vines, and leaves glow in the dark.  You can test the glow by holding the wand under a bright light for several seconds and then switch off the lamp.  Adjust the paint as needed. 

Accent Painting the Leaves

Step 4 – Something still needed to be added, but I didn’t know what it was.  Finally, I decided to apply a soft pastel green to the leaves, providing color as well as a subtle shimmer.  Seal paints with clear spray paint.  By day or night, this wand has stylish and surprisingly powerful. 

Harry’s Wand – Creating Thicker Tree Bark

Step 1 – Using a glue gun, add long lines for more texture upon the handgrip. 

Roughening the Texture

Step 2 – Use brown three-dimensional paint to roughen up the smooth lines of glue, to resemble tree bark more closely. 

Painting Black

Step 3 – Paint the entire wand with black acrylic.

Dry Brushing Brown

Step 4 – Dry brush only the rough bark handle with brown acrylic paint, allowing the black recessed areas to show through, as they do with real bark.  Use glow in the dark fabric paint to attach a rhinestone to the end of the wand as shown above.  Seal paints with clear spray paint. 

Harry’s Finished Wand

The thickened “tree bark” looks better, and the sleek black wand is the perfect choice for a powerful wizard. 

Harry & Hermione’s Finished Wands

These two wands work well together, just like Harry and Hermione. 

Close-Up – Both Finished Wands

I hope you have found a few inspirational ideas to create your own wands.  Do you have a favorite wizard, or a favorite magical literary character?  What kind of magic wand do you think that character would choose?  Please let me know in the comments section.  Enjoy the creative process, and let your ideas run wild. 

For more Harry Potter crafts, please check out this post: “Harry Potter’s Magical Creatures.”

Thanks for Reading & Happy Crafting!

World of Color: Meanings, Perceptions & Expectations – Part 3

Mother Nature has an interesting way of mixing colors, which inspire our fashions, home furnishings, and interior design.  Check out the wolf photo above.  His fur is a perfect blend of black, brown, gray, and white.  We typically contrast neutrals with more vibrant colors, but as you can see, they can stand on their own.  Let’s explore the hidden meanings, common perceptions and our expectations of the neutral color palette. 

Color: BLACK

Mystery & Superstition – What is it about black cats that inspires other-worldly tales of witches, monsters and things that go bump in the night?  Everyone loves mystery and suspense, always wondering what is behind the curtain.  Black piques the interest and keeps them guessing. 

Fear of the Unknown & Protection – Ghost stories shared around campfires are a common summertime activity.  The human mind can imagine all sorts of things hidden within the shadows.  On the other hand, darkness offers protection, a type of shield, which is why black onyx was often carried by ancient travelers to ensure safe passage. 

Formal & Luxurious – Even if it is only for one special night, black tuxedos and evening gowns are luxuries, making the wearer look and feel like fashion royalty.

Exotic & Sexy – The “little black dress,” a staple in most women’s wardrobes, is the perfect example of this color’s attention getting, seductive nature. 

Color: BROWN

Comforting & Casual – The color brown invites you to come in, sit by the fire, and sip hot cocoa, while roasting marshmallows and enjoying the cozy atmosphere. 

Natural Beauty & Tranquility– The beauty and serenity found in nature fills us with feelings of awe and joy, inspiring new ideas and a fresh outlook. 

Relaxing & Soothing – You work hard and often play hard too.  Forget the world for a while.  Relax, unwind, and restore your body, mind and spirit.

Down-to-Earth & Self-Confident – Be true to yourself, grounded, levelheaded, and practical. 

Color: GRAY

Balance & Sophistication – Cool grays create sleek sophisticated style. 

Uncertainty & Ethereal – The warm grays, such as these trees, are earthy and grounding, while the cool gray fog produces a more ethereal quality. 

Wisdom & Maturity – They say an elephant never forgets.  Imagine the stories she could tell!

Timeless & Calming – Walking along the beach, we collect seashells formed eons ago, as we let the water wash our cares away. 

Color: WHITE

Simplicity & New Beginnings – Life doesn’t have to be complicated.  Feel footloose and carefree as the dawn brings new opportunities. 

Peace & Clarity – White doves are symbols of peace and the spirit world. 

Purity & Remembrance – White roses adorn bridal bouquets.  For some cultures, white flowers are memorials for deceased family members. 

Cool & Crisp – White clothing is commonly worn during the summertime because it not only looks cooler, but also reflects the heat of the sun, making you feel cooler too. 

The Great Film Debate:

Black & White Film versus Full Color Film

Black and white film was the standard.  The invention of color film was a real game changer.  Everything came to life in “living” color, resulting in an interesting question: Should the old black and white films be colorized?  The purists say no because black and white are an integral part of the story.  Adventurous movie lovers say give us vibrant colors and don’t forget the “CGI” special effects!  Do you have a preference?  Please write your thoughts in the comments section. 

In case you missed the two previous World of Color posts, Part One covers the warm color palette: red, orange, and yellow, and Part Two discusses the cool color palette: green, blue, and violet.

Thanks for Reading & Happy Crafting!

Birds of a Feather – Decorative Wood Crafts


For some reason, I often find myself drawn to the wood crafts aisle at my local hobby store. Maybe it’s the quick reward for very little effort at an inexpensive cost. Who doesn’t enjoy a little instant gratification? There’s always something new to discover. New trends and seasonal favorites compete for your attention on the shelves.

Painted Inspirational Words
The popularity of the television show, “Fixer Upper,” has brought farmhouse chic to the forefront of home design trends. As a result, oversize wood letters and words have become very popular wall art. If a particular word or phrase has special meaning for you, spell it out on a wall as a daily inspiration to share with your family and friends.

Birds on Wire
Looking for a quick and easy way to add some pizzazz to any flat wood surface? Apply contact paper or left over wallpaper for interesting colors and patterns.

Wooden Bird & Fish
For a distressed look, keep the color palette soft as if they faded over time, allow the paint to dry, and then use sandpaper to “age” the surface.

Painted Wood Boxes
The base coat for decorative boxes can be painted using brushes or spray paint. Intricate details and complex designs can be applied using fine point paint pens in solid or metallic finishes. Rhinestones and beads will provide a touch of sparkle.

Wood Owl
This adorable little owl has a painted face and the patterned wings were created with contact paper. For clean, crisp edges on the eyes and beak, use stencils.

Wooden Eggs
Painted eggs are a tradition in many cultures. Applying wax in intricate patterns and dipping the exposed areas into dyes created these beautiful designs.

How to Paint a Wooden Flamingo
Now that you’ve seen several woodcraft examples, it’s time to try your hand at decorating. Craft stores and Dollar Tree stores have several freestanding wood animals, including a flamingo, rhino, hippo, stegosaurus, peacock, elephant and more.

Flamingos
As with all projects, it helps to have a little inspiration. Seeing live flamingos really helps with color and feather pattern decisions as well as basic biology.

Raw Wood Flamingo
As you can see, the thick wood has been cut out in the shape of a flamingo and has the advantage of strong, sturdy legs, making this a freestanding, three-dimensional piece. Both sides and all the edges will need to be painted. Due to the raw nature of the wood, it may require a little sanding, especially along the edges.

Supplies:
Wooden Flamingo (7-1/2” high x 4-1/2” wide x 1-3/8” thick)
Acrylic Paint – orange, black, & white (plus optional yellow for eyes)
1) Bottle fabric paint – orange
1) Bottle fabric paint – pink
Paintbrush
Sandpaper

First Coat of Paint
Step 1 – Paint the flamingo with orange acrylic paint, including both sides and all edges.

Second Coat of Paint
Step 2 – Apply a second coat of orange acrylic paint, and add details to the face. The legs have been painted gray.

Textured Paint
Step 3 – Create a feathered texture by applying orange fabric paint. The paint on the head and neck was applied in a random dotted pattern because these areas are smoother than the lower body. Use long strokes on the torso, ensuring to go in the direction of the feathers. Refer to the inspiration photo as needed. Allow the paint to dry overnight. Using a small paintbrush, and orange acrylic paint, add the thin leg and feet details on the sides, front and back of each leg. This gives the illusion of thin legs like the live birds.

Second Coat Textured Paint
Step 4 – Create more texture by repeating the orange fabric paint process in Step 3. Add additional details with pink acrylic paint: Dot the pink over the head and neck, and create the wings on the torso. Refer to the inspiration photo as needed.

Finished Flamingo
Step 5 – Apply a second coat of pink fabric paint, thickening the wings and increasing the pink highlights on the head and neck. Allow the paint to dry overnight. Using a paintbrush, give the beak a second coat of white and black acrylic paint. To give the eyes more dimension, add a large dot of yellow fabric paint. Remember to add a black dot in the center of each pupil.

This completes your flamingo project. He may not take flight, but the bright colors and cheerful expression are sure to make you smile.  For more painted wood crafts, please click here.

Thanks for Reading & Happy Crafting!